Difference between revisions of "User:Grzegorzg"
m (→Call window) |
|||
| (395 intermediate revisions by the same user not shown) | |||
| Line 1: | Line 1: | ||
| − | + | = Introduction = | |
| − | + | In following manual we are proud to present you Slican '''''PhoneCTI''''' application, which includes all functionalities enable to integrate phone and computer used by PBX subscriber. Main advantage of this software is integration of phone books stored in PBX and subscriber computer. In '''''Slican PhoneCTI''''' application, phone books stored in PBX are used, changes in phone books can be entered in PBX (from phone of from '''''ConfigMAN''''' application) or in computer ('''''Slican PhoneCTI''''' application). Any modification is immediately visible for other users, with appropriate privileges defined in PBX. Phone book editing rules defined in PBX are also valid for editing in '''''Slican PhoneCTI'''''. Additionally '''''Slican PhoneCTI''''' application includes internal chat functionality (computer user can be any PBX subscriber). Sending messages to other person from phone book, who is not PBX subscribers, is possible via XMPP account (if such account was defined for this person) or as SMS. Sending SMSes is also possible according privileges defined in PBX. Internal chat functionality can be attractive for companies, which use Slican PBX and don't allow , from security reasons, to use common chat, as well for person who use one application and want to communicate with persons who uses different chat applications. | |
| − | ''' | + | |
| − | ''' | + | |
| − | '''for | + | |
| − | + | ||
| − | + | ||
| − | + | ||
| − | + | ||
| − | + | ||
| − | + | ||
| − | + | ||
| − | + | ||
| − | + | ||
| − | + | ||
| − | + | ||
| − | + | ||
| − | = | + | = Minimal requirements = |
| − | + | To install SLICAN PhoneCTI application, following minimal requirements are necessarily: | |
| + | * Computer should be powered with clock >800 MHz | ||
| + | * Computer RAM memory should be 1GB minimum | ||
| + | * Computer graphic card should be compatible with DirectX 9 | ||
| + | * Operating system - WindowsXP SP2 or later | ||
| + | * Microsoft .NET Framework 4.0 or later should be installed on computer | ||
| + | * Web browser Internet Explorer 7 or later should be installed on computer | ||
| + | Installing application on computer which doesn't fulfill mentioned minimal requirements is possible but it will work slowly or not all functions will be active. | ||
| + | {{warning|SLICAN PhoneCTI can operate only with PBXes with installed firmware 6.01 or later.}} | ||
| − | = | + | = Installation = |
| − | + | '''''Slican PhoneCTI''''' application is licensed and using it requires purchase of appropriate license code. Purchased license code is entered during PBX configuration and decides about number of workstations with '''''Slican PhoneCTI''''' application. Application licensing has no influence on its installation. Application setup can be downloaded from [http://www.slican.pl Slican webpage] and application install on the computer by entering appropriate data, necessarily to log in, in tap [[User:Grzegorzg#Settings - Connection|Settings - Connection]]. | |
| − | + | {{warning|If extension number entered in tap [[User:Grzegorzg#Settings - Connection|Settings - Connection]] is not authorized to use PhoneCTI application, it is not possible to connect with PBX and data synchronizing.}} | |
| − | + | Second installation stage (not obliged) rely on uploading to PBX properly prepared file with PhoneCTI application update. It can be done by PBX admin. This activity, if done, enables automatic updating PhoneCTI application on workstations. Updating is described in chapter [[User:Grzegorzg#Application updating|Application updating]]. | |
| − | + | == Application launch == | |
| − | + | PhoneCTI application can be launched as any other Windows application. In application settings you can activate functionality of automatic launching application after operating system start. Diuring launching application it log into PBX (according settings defined in tap [[User:Grzegorzg#Settings - Connection | Settings - Connection]]). After successful login, application synchonizes application data with appropriate data in PBX. | |
| − | + | ||
| − | + | ||
| − | + | ||
| − | {{warning| | + | |
| − | + | ||
| − | + | ||
| − | + | ||
| − | == | + | |
| − | + | ||
| − | + | ||
| − | + | ||
| − | + | ||
| − | + | ||
| − | + | ||
| − | + | ||
| − | + | ||
| − | + | ||
| − | + | ||
| − | == | + | == Application updating == |
| − | + | Application updating id executed automatically and user has no influence on its proceedings. Similarly as for PBX, VoIP card or REC card firmware updating, updating of Slican PhoneCTI application updating is executed by PBX admin. Every time during PhoneCTI application launching version check (uploaded to PBX and installed on user PC) is carry out. If these version numbers are different, application stored in PBX is automatically downloaded and installed on user PC, next new installed application is launched and log into PBX. Depending on version number updating can be upgrading or downgrading. | |
| − | + | ||
| − | + | ||
| − | + | ||
| − | + | ||
| − | + | ||
| − | + | ||
| − | + | ||
| − | + | ||
| − | == | + | = Application structure = |
| − | + | == Designation rules == | |
| − | + | PhoneCTI application is very simple and intuitive, with help of appropriate icons status of phones visible in application windows. These icons invite user to execute specific action. | |
| − | + | === Icons and symbols === | |
| − | + | For PBX extension numbers, symbol of phone status and linked phoneCTI application consits of two icons, first of them represents phone status, while second represents application status. In Table 1 you can see icons represent phone status. | |
| − | {{ | + | {|{{prettytable}} |
| − | + | !{{Hl3}} colspan="2" | Phone status | |
| − | + | |- | |
| − | = | + | !{{Hl1}}|Icon !!{{Hl1}}| Icon meaning |
| − | + | |- | |
| − | + | |{{align|center}}|[[File:PhoneCTI_phone_free.png]] ||This icon means free phone | |
| − | + | |- | |
| − | < | + | |{{align|center}}|[[File:PhoneCTI_call.png]] ||This icon busy phone - call with extension number is established |
| − | + | |- | |
| − | + | |{{align|center}}|[[File:PhoneCTI_phone_sleep.png]] ||This icon means, that any call was established with this extension number during last 8 hours (at least). | |
| + | |- | ||
| + | |{{align|center}}|[[File:PhoneCTI_phone_ringing.png]] ||This icon means phone just ringing | ||
| + | |- | ||
| + | |{{align|center}}|[[File:PhoneCTI_phone_off.png]] ||This icon means switched off phone or not logged account | ||
| + | |- | ||
| + | |} | ||
| + | '''''Table 1:''''' Icons represent phone status.<br> | ||
| + | In Table 2 you can see icon represents number, if number assigned to specified contact is external numer. | ||
| + | {|{{prettytable}} | ||
| + | !{{Hl3}} colspan="2" | Phone status | ||
| + | |- | ||
| + | !{{Hl1}}|Icon !!{{Hl1}}| Icon meaning | ||
| + | |- | ||
| + | |{{align|center}}|[[File:PhoneCTI_Numer_zewnętrzny.PNG]] ||This icon means external number | ||
| + | |- | ||
| + | |} | ||
| + | '''''Table 2:''''' Icon represents external number<br>This icon is always blue, because in opposite to extension numbers status of such phone there is not monitored. | ||
| + | {|{{prettytable}} | ||
| + | !{{Hl3}} colspan="2" | Application status | ||
| + | |- | ||
| + | !{{Hl1}}|Icon !!{{Hl1}}| Icon meaning | ||
| + | |- | ||
| + | |{{align|center}}|<None> ||If there in no icon for specified extension number, application PhoneCTI was never logged to specified extension number | ||
| + | |- | ||
| + | |{{align|center}}|[[File:PhoneCTI_apps_ok.png]] ||This icon means, that application is launched and logged to epecific extension number | ||
| + | |- | ||
| + | |{{align|center}}|[[File:PhoneCTI_apps_clock.png]] ||This icon means, that application is in status "Be Right Back", application enter such mode after time of inactivity defined in [[User:Grzegorzg#Settings - General|settings]] | ||
| + | |- | ||
| + | |{{align|center}}|[[File:PhoneCTI_apps_dnd.PNG]] ||This icon means, that application found out DND phone status (do not disturb)<ref name="apps_dnd">In appliction settings, DND phone status can be forced, if application and phone remain in standby mode for sufficiently long time. This time can be defined in [[User:Grzegorzg#Settings - Do not disturb (DND)|application settings]]</ref> | ||
| + | |- | ||
| + | |} | ||
| + | '''''Table 3:''''' Icons represent application status.<br> Finally symbol of phone and application linked with this phone is created by merging one icon from Table 1 with one icon from Table 2.<br>'''Example'''<br>For illustrate mentioned above rule three such symbols was presented in below table:<br> | ||
| + | {|{{prettytable}} | ||
| + | !{{Hl3}}|Symbol !!{{Hl3}}| Symbol meaning | ||
| + | |- | ||
| + | |{{align|center}}|[[File:PhoneCTI_free_not_logged.PNG]] ||This symbol means, that phone is free, but to this extension number PhoneCTI application was never logged | ||
| + | |- | ||
| + | |{{align|center}}|[[File:PhoneCTI_busy_ok.PNG]] ||This symbol means, that phone is busy, but PhoneCTI application is logged to this extension number | ||
| + | |- | ||
| + | |{{align|center}}|[[File:PhoneCTI_free_dnd.PNG]] ||This symbol means, that phone is free, but application found out DND phone status | ||
| + | |- | ||
| + | |} | ||
| + | '''''Table 4:''''' Examples of symbols used by application | ||
| + | === Symbols location and meaning === | ||
| + | Symbols presented in "''Table 4'' can be visible in two places. After log in appropriate symbol is visible in top part of '''PhoneCTI''' application window, as it is presented on following figure: | ||
| + | <center>[[File:PhoneCTI Zalogowanie.PNG]]</center> | ||
| + | Additionally on contact list in all instances of PhoneCTI this symbol is visible near comment defined for specific extension number: | ||
| + | <center>[[File:PhoneCTI Lista kontaktów.PNG]]</center> | ||
| + | Also following information should be noticed: | ||
| + | * Below extension number comment defined in PBX, there is description defined individually by PhoneCTI user. Of course this description is optional and if itb isn't defined, in top part of window following text is visible: ''"Put your comment here..."'' - this text prompts you to enter individual description, on contact list individual description isn't displayed. | ||
| + | * If specified contact includes extension number, this number is visible on the right side of comment. | ||
| + | * If specified contact is included in public phone book and for this number option "Restrict" is switched on, only text "Restricted" appears on screen and read this number is impossible. | ||
| + | * Icons located on right side of contact have following meaning: | ||
| + | ** [[File:PhoneCTI Koperta zielona.PNG]] - contact includes extension number with logged PhoneCTI application or logged XMPP account, so there is possible to send text message to computer assigned to this number, sent text message will be immediately displayed on computer screen. | ||
| + | ** [[File:PhoneCTI Koperta niebieska.PNG]] - contact includes extension number or XMPP account and both - PhoneCTI application nor XMPP account are not logged, there is possible to send text message to computer assigned to this number, sent text message will be displayed on computer screen immediately after log in PhoneCTI application or XMPP account. | ||
| + | ** [[File:PhoneCTI Koperta szara.PNG]] - contact contains number defined in public or private phone book (such contact is marked as [[File:PhoneCTI Numer zewnętrzny.PNG]] icon on its left side), not includes extension number nor XMPP account and PhoneCTI application never been logged to contact's extension number - if any, so there is possible to send only SMS message to this number | ||
| + | ** [[File:PhoneCTI Gwiazdka pusta.PNG]] - such icon means, that specified contact is not included in '''Favourites'''. Clicking this icon add it into '''Favourites'''. | ||
| + | ** [[File:PhoneCTI Gwiazdka pełna.PNG]] - such icon means, that specified contact is included in '''Favourites'''. Clicking this icon remove it from '''Favourites'''. | ||
| − | + | == Settings == | |
| − | + | After selecting option ''Settings'' from '''Program''' menu, the Settings window appears on screen. There are some taps in this window, these taps can be used to set several application option. All taps are described in following chapters. | |
| − | + | === Settings - Connection === | |
| − | + | After selecting ''Connection'' tap, following window appears on the screen: | |
| − | + | <center>[[File:PhoneCTI Ustawienia Połączenie.PNG]]</center> | |
| − | + | Window visible above includes fields which are necessarily to entering data required to establish connection with PBX. Into the first of these field, you should enter extension number of phone, which will be assigned to PhoneCTI application. Second field should contain password defined for subscriber with extension number is defined in previous field (Password can contain from 4 to 16 characters, excluding ";" and "~" characters). Password should be entered by PBX admin in ConfigMAN application (sheet '''Subscribers/CTI Settings'''). During first log in PhoneCTI application, application will force change of this password. Such change can be executed also in any time by clicking link ''Change password'', which is located below the field with password. After clicking this link, following window will be visible on screen:<br> | |
| − | + | <center>[[File:PhoneCTI Zmiana hasła.PNG]]</center><br> | |
| − | + | In this window you should enter old password and new password two times. If all data are entered correctly, password will be changed and stored in PBX configuration. Due to this functionality admin doesn't know the passwords of subscribers. Entered password can be remember in application, by check box located of the right side of field including password. If this check box is empty, application will be enquire password every time while log in. Next field in this window is designed for entering IP addres of PBX. This address can be entered manually or automatically after pressing button "Find server" and selecting appropriate PBX from list of PBXes visible in network. After pressing button "Establish connection", if all mentioned fields are correctly fulfiled, application will connect to the PBX and all data including phone book will be synchronized. After successful connection in bottom part of window, following text will be visible: | |
| − | + | <center>[[File:PhoneCTI Udane połączenie.PNG]]</center> | |
| − | + | If entered data are incorrect, another text will be visible in bottom part of window: | |
| − | + | <center>[[File:PhoneCTI Nieudane połączenie.PNG]]</center> | |
| − | + | Simultaneously link ''Change password'' changes to ''Forgot password'', after clicking this link special '''WebCTI''' window opens, in this window is possible to send message with password to specified e-mail address. | |
| + | === Settings - General === | ||
| + | <center>[[File:PhoneCTI Ustawienia Ogólne.PNG]]</center> | ||
| + | In this window there is possible to set several parameters, which decide about application operating. They defined application launching method, it's behaviour and method of presenting some data. In one field it is possible to set time when application enter in 'Be right back' status, this status is active if no one action is performed during specified time - icon representing application status changes to [[File:PhoneCTI_apps_clock.png|10px]]. In this window you can also determine, which action is performed by application as a result double clicking on on contact. Possible are actions selected from following list: <br><center>[[File:PhoneCTI Action DoubleClick.PNG]]</center><br> | ||
| + | '''Show call window''' - after selecting this option, double click causes displaying following window on computer screen<ref name="call_win">This window appear on computer screen after double clicking on subscriber '''1058 Instrukcja'''</ref><br> <center>[[File:PhoneCTI Okno połączenia.PNG]]</center> | ||
| + | After clicking in - located in this window - button with green handset appropriate number will be dialed and connection established, call establishing process is different, depending phone type assigned to extension number, to which PhoneCTI application is logged. For system phone, PBX simulate to hang up the handset, dial appropriate number, after answering this call acoustic channel is switched on and you can talk. For analog phone, PBX dial appropriate number and after answering ring back to the extension, to which PhoneCTI application is logged.<br> | ||
| + | '''Make call''' - after selecting this option, double click on specified contact causes ring to this contact and establish call according rules described above.<br> | ||
| + | '''Show message window''' - after selecting this option, double click causes displaying window described in chapter [[User:Grzegorzg#Message window|4.6.1 Message window]]. | ||
| − | + | === Settings - WebCTI === | |
| + | <center>[[File:PhoneCTI Ustawienia WebCTI.PNG]]</center> | ||
| + | In this window, you can define port number used for listening recorded calls in WebCTI application. This settings is used only for remote registering (from outside local network). Additionally in this window there is link ''Go to WebCTI'', after clicking this link, application WebCTI - stored in PBX - is launched. | ||
| − | [ | + | === Settings - Calls === |
| − | + | <center>[[File:PhoneCTI Ustawienia Rozmowy.PNG]]</center> | |
| − | + | In this window you can define method of call signaling. After checking first option, while incoming call or lifting handset (for outgoing calls), on computer screen one of following windows appears (depending on call direction): | |
| − | + | <center>[[File:PhoneCTI Okno połączenia 2.PNG]]<br><br>[[File:PhoneCTI_Podniesiona_słuchawka_okno.JPG]]</center> | |
| − | + | If second option is also checked, call window will close after specified time. Detailed description of call window is included in chapter [[User:Grzegorzg#Call window|3.5.4 Call window]]. It is possible also to switch on an automatic notifications about accessibility of subscriber, if previously calll to his/her number was unanswered or number was busy. Such notification appear on computer screen if subscriber with previously dialed number make any action with phone. In lower right corner of computer screen following window appears: | |
| − | + | <center>[[File:PhoneCTI Powiadomienie.PNG]]</center> | |
| − | + | Above window disappear after time defined in window 'Messages', but in tray there is an following icon: | |
| − | + | <center>[[File:PhoneCTI Koperta powiadomienia.PNG]]</center> | |
| + | It means notification from contact. After clicking this icon following window appears: | ||
| + | <center>[[File:PhoneCTI Wiadomość wolny.PNG]]</center> | ||
| + | This message prompt to dial previously unavailable extension number. | ||
| + | |||
| + | === Settings - Messages === | ||
| + | <center>[[File:PhoneCTI Ustawienia SMS.PNG]]</center> | ||
| + | After checking first field in this window, on computer with PhoneCTI application logged on extension number, following window will appear if any message will be send to this extension number: <br> | ||
| + | <center>[[File:PhoneCTI Okno wiadomości.PNG]]</center> | ||
| + | Above window disappear after time defined in window 'Messages', but in tray there is an following icon: | ||
| + | <center>[[File:PhoneCTI Koperta powiadomienia.PNG]]</center> | ||
| + | After clicking in this envelope, window with message text appears on computer screen. | ||
| + | <center>[[File:PhoneCTI Wiadomość 1.PNG]]</center> | ||
| + | In this window all messages sent to and from specfied extension number during current day. Messages from previous days are stored in archive. | ||
| + | If this filed is not checked, window of message notification do not appears. Detailed description of this window is included in chapter [[User:Grzegorzg#Message window|4.6.1 Message window]]. In field "Message Validity" you can define time of storing SMS by mobile provider, if provider can't deliver it to recipient. During this time provider repeats SMS sending attempt. Last field defines if check of text entered into message will be executed. Language of dictionary used to checking is the same as application language. | ||
| + | |||
| + | === Settings - Do not disturb (DND) === | ||
| + | <center>[[File:PhoneCTI Ustawienia NiePrzeszkadzać.PNG]]</center> | ||
| + | This screen is used to setting rules of switching on the DND service. Switchnig on this service is done after specified number of user idleness. Idleness status is when user doesn't use phone nor computer. It is also possible to set automatic switchnig on DND service after quiting application. Obwiously it is possible to switch on DND service in both situations. In the lower part of PhoneCTI main window there is small button, when you click this button DND service is switched on off (dependently on current ststus of this service) for extension number assigned to PhoneCTI application. | ||
| + | |||
| + | === Settings - Forwarding (FWD) === | ||
| + | <center>[[File:PhoneCTI Ustawienia Przekierowanie.PNG]]</center> | ||
| + | In this window there are located all settings decide about forwarding conditions for specified extension number. These settings can be also set in ConfigMAN application or from phone using appropriate services. Swithing on forwarding can take place after defined time of idleness. Idleness status is when user doesn't use phone nor computer. It is also possible to switch on forwarding after quiting application. Obwiously it is possible to switch on forwarding in both situations. While automatic switching on forwarding, it is realized according settings done in this window. By default after clicking button FWD located in the lower part of PhoneCTI main window above window is displayed on computer screen. After checking last field, above window is not displayed but forwarding is switched on according stored settings. | ||
| + | |||
| + | === Settings - Audio settings === | ||
| + | <center>[[File:PhoneCTI Ustawienia Ustawienia Audio.PNG]]</center> | ||
| + | In this window you can define method of audio signaling an incoming message. | ||
| + | {{warning|In left, lower corner of all windows there is a button ''Set default''. This button restores default settings for specified window.}} | ||
| + | |||
| + | == Phone book == | ||
| + | Below figure presents phone book window, this window appear on computer screen after selecting option '''Book''' from menu '''''Contacts'''''. | ||
| + | <center>[[File:PhoneCTI Książka telefoniczna.PNG]]</center> | ||
| + | On the left side of above window you can see panel ''Groups'', in this panel there is a list of groups which include numbers located in phone book as well as structure of these groups. PhoneCTI application user can add, edit and remove groups, however if he/she has no defined in PBX privileges to edit public phone book, all his/her actions concern only private phone book. To create new group, you should select group of higher level, where new created group should be located and click button ''Add''. Following window will be visible on computer screen: | ||
| + | <center>[[File:PhoneCTI_Nowa_Grupa.PNG]]</center> | ||
| + | As a result of entering group number and its confirmation, new group will be added in appropriate place of left panel. After marking group and its selecting to edit, following window appears on screen: | ||
| + | <center>[[File:PhoneCTI_Edycja_Grupy.PNG]]</center> | ||
| + | In this window you can change name of created earlier group. Symilarly, after marking group and its selecting to remove following window appears on screen: | ||
| + | <center>[[File:PhoneCTI_Usuń_Grupę.PNG]]</center> | ||
| + | After confirmation, marked group will be removed. In the right panel, named ''Book'', all contacts are visible. Contacts visible in this panel depend on marking in left panel. Among contacts are PBX extension numbers, numbers from public phone book and numbers entered by subscriber to private phone book. All contacts or only contact belonging to specified group are visible. Clicking button ''Add'' causes presenting following window on computer screen: | ||
| + | <center>[[File:PhoneCTI_Nowy_Kontakt.PNG]]</center> | ||
| + | In this window, you can enter contact name, additionally for every contact it is possible to define many phone numbers (every phone number with appropriate comment). Wrong entered numbers can be removed. Additionally it is possible to contact to group - adding contact to group marked with icon [[File:PhoneCTI_Rączka.PNG]], this icon means affiliation specified group to public phone book. Such situation take place, when PhoneCTI user has no privileges to edit public phone book. | ||
| + | |||
| + | == Call history == | ||
| + | After selecting tap ''History'' - history of calls with extension number assigned to PhoneCTI application is visible in the application main window. After selecting tap ''History'', application main window presents as follows: | ||
| + | <center>[[File:PhoneCTI Historia.PNG]]</center> | ||
| + | Every position of call history means one call incoming to or outgoing from number assigned to PhoneCTI application. Visible are all calls concerning this number and stored in PBX. For every position you can see the caller number, his/her comment (for outgoing calls it is dialed number and comment for this number if it exists in PBX), date and time of call. Beside text information, in every position there are some icons, which describe this call. There are: | ||
| + | <center>[[File:PhoneCTI Połączenie przychodzące.PNG]]</center> | ||
| + | This arrow means incoming call, which was answered. | ||
| + | <center>[[File:PhoneCTI Połączenie wychodzące.PNG]]</center> | ||
| + | This arrow means outgoing call, never mind if call was established or not. | ||
| + | <center>[[File:PhoneCTI Połączenie nieodebrane.PNG]]</center> | ||
| + | This arrow means unanswered incoming call. | ||
| + | <center>[[File:PhoneCTI Połączenie nieodebrane 2.PNG]]</center> | ||
| + | This icon means several unanswered incoming callsfrom the same caller, before review the call history. Number visible in this icon means quantity of such calls. | ||
| + | <center>[[File:PhoneCTI Połączenie odebrane inny.PNG]]</center> | ||
| + | This icon means incoming call, answered by other subscriber. This icon can be used in two situations: | ||
| + | * call was routed to group including specified extension number and was answered by another group agent | ||
| + | * call was routed to specified subscriber but was picked up by another subscriber. | ||
| + | <center>[[File:PhoneCTI SMS.PNG|15px]]</center> | ||
| + | This icon means, that to specified numbe a SMS was sent, text of this SMS will be visible in window, which appears on screen after double clicking this position. | ||
| + | <center>[[File:PhoneCTI Wiadomość.PNG|15px]]</center> | ||
| + | This icon means, that a chat was established with computer assigned to extension number visible in specified position. Text of this chat will be visible in window, which appears on screen after double clicking this position. | ||
| + | <center>[[File:PhoneCTI Nagranie.PNG]]</center> | ||
| + | This icon means, that call was resorded. | ||
| + | |||
| + | == Dialing == | ||
| + | === Dialing number from contact list === | ||
| + | === Dialing number from call history === | ||
| + | === Dialing number from application window === | ||
| + | === Call window === | ||
| + | An example call window is presented in chapter [[User:Grzegorzg#Settings - Calls|4.2.4 Settings - Calls]]. Appeariance of this window changes depending on context of window presentation. First of all - title of this window changes. Following situations are possible:<br> | ||
| + | {| | ||
| + | |1 | ||
| + | || <center>[[File:PhoneCTI Podniesiona słuchawka.PNG]]</center> | ||
| + | ||This title is visible when you lift the hanset to dial the number. | ||
| + | |- | ||
| + | |2 | ||
| + | || <center>[[File:PhoneCTI Wywołanie.PNG]]</center> | ||
| + | ||This title is visible when dialed number is ringing. | ||
| + | |- | ||
| + | |3 | ||
| + | || <center>[[File:PhoneCTI Połączony z.PNG]]</center> | ||
| + | ||Title visible after establishing call. | ||
| + | |- | ||
| + | |4 | ||
| + | || <center>[[File:PhoneCTI Połączenie przychodzące 2.PNG]]</center> | ||
| + | ||This title is visible when incoming call is ringing. | ||
| + | |- | ||
| + | || | ||
| + | ||After answering such call, title changes to visible in point 3. | ||
| + | || | ||
| + | |- | ||
| + | |5 | ||
| + | || <center>[[File:PhoneCTI Zawieszony.PNG]]</center> | ||
| + | ||Title visible after pressing '''Hold''' during call. | ||
| + | |- | ||
| + | |6 | ||
| + | || <center>[[File:PhoneCTI Zawieszony 2.PNG]]</center> | ||
| + | ||Title visible after answering forwarded call - it is possible to announcing call. | ||
| + | |- | ||
| + | |} | ||
| + | Three types of information is presented in central part of window: | ||
| + | * Comment assigned to caller or dialed phone number, as well as comment of number with established call<br>{{warning|If caller or established call number is a PBX extension number, it is commenmt stored in PBX configuration, however if it is number stored in private or public phone book, presented is name stored in this book, when it ix external number and PBX of second part of call sends the comment - it is text of this comment.}} | ||
| + | * Number of this phone | ||
| + | * Call duration time, before establishing call it is ringing time | ||
| + | |||
| + | At the bottom of this window you can see the buttons, which enable to perform action changing the current behaviour of phone with extension number assigned to PhoneCTI application. | ||
| + | {| | ||
| + | | Button which appears in the upper right corner of window depends on call type. For outgoing call it is button with red handset. | ||
| + | || <center>[[File:PhoneCTI Czerwona słuchawka.PNG]]</center> | ||
| + | |- | ||
| + | |After pressing this button, established call is disconnected (if it was established) and singnal of inaccssibility is send to phone. After pressing this key it becomes gray. Additionally in central part of call window, instead mentioned above information following inscription appears: | ||
| + | || <center>[[File:PhoneCTI Odłóż słuchawkę.PNG]]</center> | ||
| + | |- | ||
| + | | After hanging up the handset, call window disappear from computer screen. | ||
| + | |- | ||
| + | | For incoming call, button which appears in upper right corner presents green handset. | ||
| + | || <center>[[File:PhoneCTI Zielona słuchawka.PNG]]</center> | ||
| + | |- | ||
| + | |After establishing call, call window changes and on the left side, in the second row of buttons - there is button, which enables to hold this call. Call widow looks as follows: | ||
| + | || <center>[[File:PhoneCTI Zawieś.PNG]]</center> | ||
| + | |- | ||
| + | |Then you should doubleclick on number to forwarding (in application main window or in phone book window). After it following button will be visible: | ||
| + | || <center>[[File:PhoneCTI Transfer.PNG]]</center> | ||
| + | |- | ||
| + | |After answering call you should announce the forwarded call and hang off the handset. To inform about it call window title changes to view presented in point 6 obove. | ||
| + | || | ||
| + | |- | ||
| + | |On the extreme left side of window there is green button with handset and text ''Answer''. This button can changes depending on situation. By default this button can be seen for incoming call and enables to answer such call. | ||
| + | || <center>[[File:PhoneCTI Zielona słuchawka.PNG]]</center> | ||
| + | |- | ||
| + | |After establishing call, answering button changes in one visible beside. It enables to hold current call and establishing call with another number. | ||
| + | || <center>[[File:PhoneCTI Hold.PNG]]</center> | ||
| + | |- | ||
| + | |After holding current call, mentioned above button is disabled and above it button '''Transfer''' is enabled. You can unhold suspended call by pressing green handset icon - presented beside - visible in call window near suspended call. | ||
| + | || <center>[[File:PhoneCTI Odwieś.PNG]]</center> | ||
| + | |- | ||
| + | |} | ||
| + | |||
| + | == Sending messages == | ||
| + | PhoneCTI application enables to send messages between subscribers (symilarly as common chat applications - ex. ''Skype''), it is also possible to send messages in form of SMS, to persons who use mobile phone. Sending message initialization takes place after right clicking over the any contact from list. Following context menu appears: | ||
| + | <center>[[File:PhoneCTI Menu kontekstowe.PNG]]</center> | ||
| + | From above menu you should select option ''Send Message'' or ''Send SMS'', depend on type of message to send. After selecting one of these option, on screen appears window, which is described in next chapter. This text tells about sending massage to another PhoneCTI application user. It is also possible to answer on received messages. It is also described in next chapter. Let's assume, tht another PhoneCTI user sent message to you. | ||
| + | === Message window === | ||
| + | Receiving message is signal by following window appears in the bottom right corner of computer screen: | ||
| + | <center>[[File:PhoneCTI Okno wiadomości.PNG]]</center> | ||
| + | This window appears only if appropriate option in settings is set ([[User:Grzegorzg#Settings - Messages|4.2.5 Settings - Messages]]) and disappears after time set also in this settings, however application icon will be visible in tray alternatively with following icon: | ||
| + | <center>[[File:PhoneCTI Koperta powiadomienia.PNG]]</center> | ||
| + | After clicking this window, window with message will appear on computer screen: | ||
| + | <center>[[File:PhoneCTI Wiadomość 1.PNG]]</center> | ||
| + | In this window, besides message text there is also information about person who sent this message (together with individual comment of this person - if such comment exists) as well as time of sending message. In bottom part of this window it is possible to enter answer text, if we want to send any. In upper part of this window there is a button, which enables call to number of subscriber, from whom you received message. After clicking left part of this button you can establish call with number from which message was sent, while after clicking right part of button, on screen appears list of all numbers assigned to specified contact. From this list you can select number to establish call. Call establishing is performeed according rules described in chapter [[User:Grzegorzg#Settings - General|4.2.2 Settings - General]]. | ||
| + | |||
| + | === Chat === | ||
| + | Due to PhoneCTI application you can lead the conversation with another application user, by answering his/her questions. Example of such conversation is visible on following figure: | ||
| + | <center>[[File:PhoneCTI Chat.PNG]]</center> | ||
| + | Messages in presented above form are stored tom the end of day. Next are stored in archive and they can be displayed on screen after selection of appropriate tap in ''Message window'' and defining date. | ||
| + | |||
| + | === SMS === | ||
| + | Sending message in SMS form is possible to persons, who don't have PBX extension number. Sending SMS is provided using GSM gateway installed in PBX. Subscriber who want to send SMSes must have privileges to using TelefonCTI.plus. SMS message is send automaticaly by PBX and report about sending SMS is visible in ''Message window'': | ||
| + | <center>[[File:PhoneCTI Wiadomość SMS.PNG]]</center> | ||
| + | Sended SMS can be maximally 160 characters long. However if we use local characters (with ASCII codes above 127) this number decrease to 70. Number of characters, which remain is displayed on the right side of window. PhoneCTI application prevents entering more characters, than available. In ''Message window'' there is field, which should be checked for sending message as Flash SMS. | ||
| + | |||
| + | == Finding data == | ||
| + | In PhoneCTI application, a sophisticated text searching method is implemented. Searching can be done in every application window, if following field is visible: | ||
| + | <center>[[File:PhoneCTI wyszukiwanie.PNG]]</center> | ||
| + | During entering characters PhoneCTI application executes automatic searching. It goes ahead according following rules: | ||
| + | * if number of entered characters is equal to 1 or 2, application searches all strings, for which any word begins with entered text, | ||
| + | * if number of entered characters is equal to 3 or more, application searches all strings, where all words contain entered text. | ||
| + | If search concerns contacts and takes place on contact list, and entered text cannot be found, application informs about it, offers adding new contact and shows other contacts, which contains entered text and there are outside current search area. Described situation is shown on following window: | ||
| + | <center>[[File:PhoneCTI Sugestie.PNG]]</center> | ||
| + | |||
| + | {{References}} | ||
Latest revision as of 09:40, 14 March 2013
Contents
Introduction
In following manual we are proud to present you Slican PhoneCTI application, which includes all functionalities enable to integrate phone and computer used by PBX subscriber. Main advantage of this software is integration of phone books stored in PBX and subscriber computer. In Slican PhoneCTI application, phone books stored in PBX are used, changes in phone books can be entered in PBX (from phone of from ConfigMAN application) or in computer (Slican PhoneCTI application). Any modification is immediately visible for other users, with appropriate privileges defined in PBX. Phone book editing rules defined in PBX are also valid for editing in Slican PhoneCTI. Additionally Slican PhoneCTI application includes internal chat functionality (computer user can be any PBX subscriber). Sending messages to other person from phone book, who is not PBX subscribers, is possible via XMPP account (if such account was defined for this person) or as SMS. Sending SMSes is also possible according privileges defined in PBX. Internal chat functionality can be attractive for companies, which use Slican PBX and don't allow , from security reasons, to use common chat, as well for person who use one application and want to communicate with persons who uses different chat applications.
Minimal requirements
To install SLICAN PhoneCTI application, following minimal requirements are necessarily:
- Computer should be powered with clock >800 MHz
- Computer RAM memory should be 1GB minimum
- Computer graphic card should be compatible with DirectX 9
- Operating system - WindowsXP SP2 or later
- Microsoft .NET Framework 4.0 or later should be installed on computer
- Web browser Internet Explorer 7 or later should be installed on computer
Installing application on computer which doesn't fulfill mentioned minimal requirements is possible but it will work slowly or not all functions will be active.
|
Installation
Slican PhoneCTI application is licensed and using it requires purchase of appropriate license code. Purchased license code is entered during PBX configuration and decides about number of workstations with Slican PhoneCTI application. Application licensing has no influence on its installation. Application setup can be downloaded from Slican webpage and application install on the computer by entering appropriate data, necessarily to log in, in tap Settings - Connection.
|
Second installation stage (not obliged) rely on uploading to PBX properly prepared file with PhoneCTI application update. It can be done by PBX admin. This activity, if done, enables automatic updating PhoneCTI application on workstations. Updating is described in chapter Application updating.
Application launch
PhoneCTI application can be launched as any other Windows application. In application settings you can activate functionality of automatic launching application after operating system start. Diuring launching application it log into PBX (according settings defined in tap Settings - Connection). After successful login, application synchonizes application data with appropriate data in PBX.
Application updating
Application updating id executed automatically and user has no influence on its proceedings. Similarly as for PBX, VoIP card or REC card firmware updating, updating of Slican PhoneCTI application updating is executed by PBX admin. Every time during PhoneCTI application launching version check (uploaded to PBX and installed on user PC) is carry out. If these version numbers are different, application stored in PBX is automatically downloaded and installed on user PC, next new installed application is launched and log into PBX. Depending on version number updating can be upgrading or downgrading.
Application structure
Designation rules
PhoneCTI application is very simple and intuitive, with help of appropriate icons status of phones visible in application windows. These icons invite user to execute specific action.
Icons and symbols
For PBX extension numbers, symbol of phone status and linked phoneCTI application consits of two icons, first of them represents phone status, while second represents application status. In Table 1 you can see icons represent phone status.
Table 1: Icons represent phone status.
In Table 2 you can see icon represents number, if number assigned to specified contact is external numer.
| Phone status | |
|---|---|
| Icon | Icon meaning |
| This icon means external number | |
Table 2: Icon represents external number
This icon is always blue, because in opposite to extension numbers status of such phone there is not monitored.
| Application status | |
|---|---|
| Icon | Icon meaning |
| <None> | If there in no icon for specified extension number, application PhoneCTI was never logged to specified extension number |
| This icon means, that application is launched and logged to epecific extension number | |
| This icon means, that application is in status "Be Right Back", application enter such mode after time of inactivity defined in settings | |
| This icon means, that application found out DND phone status (do not disturb)[1] | |
Table 3: Icons represent application status.
Finally symbol of phone and application linked with this phone is created by merging one icon from Table 1 with one icon from Table 2.
Example
For illustrate mentioned above rule three such symbols was presented in below table:
Table 4: Examples of symbols used by application
Symbols location and meaning
Symbols presented in "Table 4 can be visible in two places. After log in appropriate symbol is visible in top part of PhoneCTI application window, as it is presented on following figure:
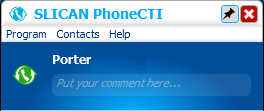
Additionally on contact list in all instances of PhoneCTI this symbol is visible near comment defined for specific extension number:
Also following information should be noticed:
- Below extension number comment defined in PBX, there is description defined individually by PhoneCTI user. Of course this description is optional and if itb isn't defined, in top part of window following text is visible: "Put your comment here..." - this text prompts you to enter individual description, on contact list individual description isn't displayed.
- If specified contact includes extension number, this number is visible on the right side of comment.
- If specified contact is included in public phone book and for this number option "Restrict" is switched on, only text "Restricted" appears on screen and read this number is impossible.
- Icons located on right side of contact have following meaning:
-
- contact includes extension number with logged PhoneCTI application or logged XMPP account, so there is possible to send text message to computer assigned to this number, sent text message will be immediately displayed on computer screen.
-
- contact includes extension number or XMPP account and both - PhoneCTI application nor XMPP account are not logged, there is possible to send text message to computer assigned to this number, sent text message will be displayed on computer screen immediately after log in PhoneCTI application or XMPP account.
-
- contact contains number defined in public or private phone book (such contact is marked as
icon on its left side), not includes extension number nor XMPP account and PhoneCTI application never been logged to contact's extension number - if any, so there is possible to send only SMS message to this number
-
- such icon means, that specified contact is not included in Favourites. Clicking this icon add it into Favourites.
-
- such icon means, that specified contact is included in Favourites. Clicking this icon remove it from Favourites.
-
Settings
After selecting option Settings from Program menu, the Settings window appears on screen. There are some taps in this window, these taps can be used to set several application option. All taps are described in following chapters.
Settings - Connection
After selecting Connection tap, following window appears on the screen:
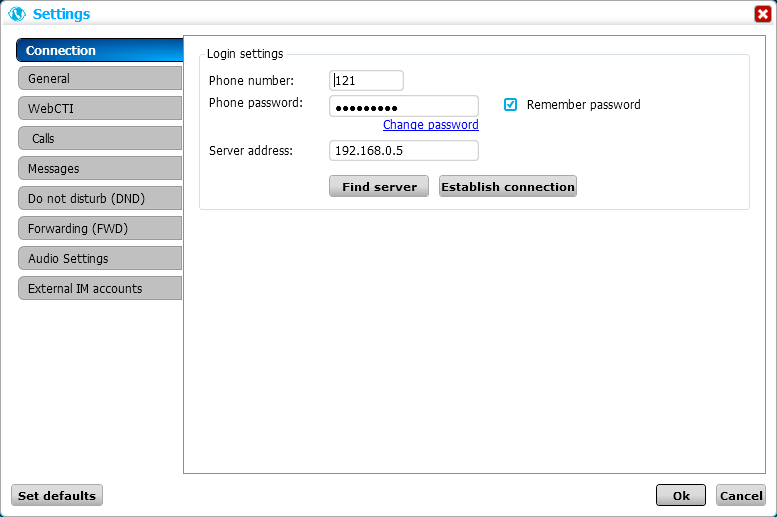
Window visible above includes fields which are necessarily to entering data required to establish connection with PBX. Into the first of these field, you should enter extension number of phone, which will be assigned to PhoneCTI application. Second field should contain password defined for subscriber with extension number is defined in previous field (Password can contain from 4 to 16 characters, excluding ";" and "~" characters). Password should be entered by PBX admin in ConfigMAN application (sheet Subscribers/CTI Settings). During first log in PhoneCTI application, application will force change of this password. Such change can be executed also in any time by clicking link Change password, which is located below the field with password. After clicking this link, following window will be visible on screen:
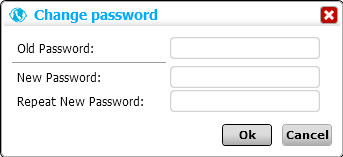
In this window you should enter old password and new password two times. If all data are entered correctly, password will be changed and stored in PBX configuration. Due to this functionality admin doesn't know the passwords of subscribers. Entered password can be remember in application, by check box located of the right side of field including password. If this check box is empty, application will be enquire password every time while log in. Next field in this window is designed for entering IP addres of PBX. This address can be entered manually or automatically after pressing button "Find server" and selecting appropriate PBX from list of PBXes visible in network. After pressing button "Establish connection", if all mentioned fields are correctly fulfiled, application will connect to the PBX and all data including phone book will be synchronized. After successful connection in bottom part of window, following text will be visible:
If entered data are incorrect, another text will be visible in bottom part of window:
Simultaneously link Change password changes to Forgot password, after clicking this link special WebCTI window opens, in this window is possible to send message with password to specified e-mail address.
Settings - General
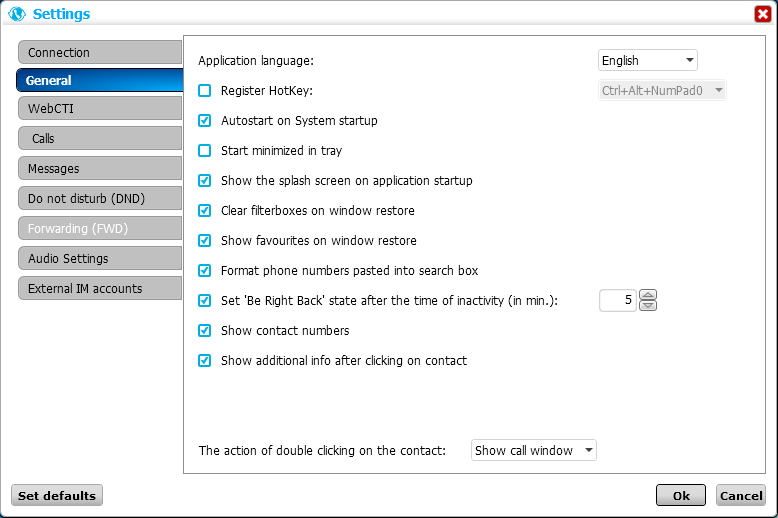

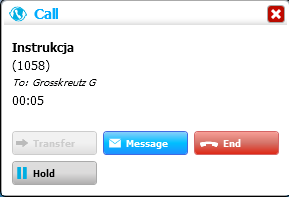
Show call window - after selecting this option, double click causes displaying following window on computer screen[2]
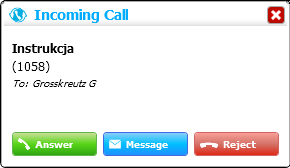
After clicking in - located in this window - button with green handset appropriate number will be dialed and connection established, call establishing process is different, depending phone type assigned to extension number, to which PhoneCTI application is logged. For system phone, PBX simulate to hang up the handset, dial appropriate number, after answering this call acoustic channel is switched on and you can talk. For analog phone, PBX dial appropriate number and after answering ring back to the extension, to which PhoneCTI application is logged.
Make call - after selecting this option, double click on specified contact causes ring to this contact and establish call according rules described above.
Show message window - after selecting this option, double click causes displaying window described in chapter 4.6.1 Message window.
Settings - WebCTI
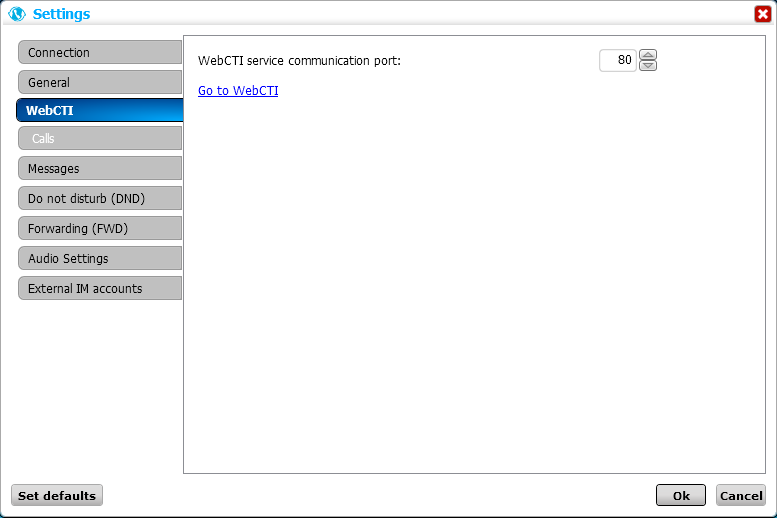
In this window, you can define port number used for listening recorded calls in WebCTI application. This settings is used only for remote registering (from outside local network). Additionally in this window there is link Go to WebCTI, after clicking this link, application WebCTI - stored in PBX - is launched.
Settings - Calls
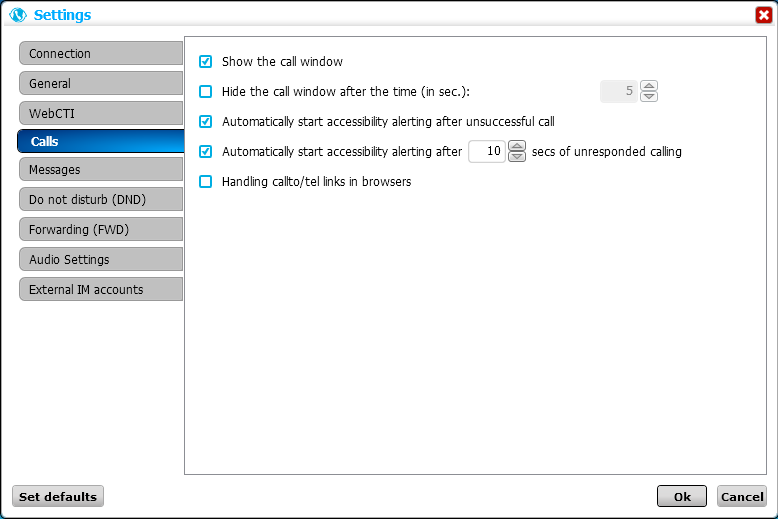
In this window you can define method of call signaling. After checking first option, while incoming call or lifting handset (for outgoing calls), on computer screen one of following windows appears (depending on call direction):
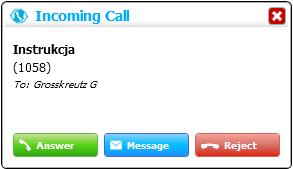
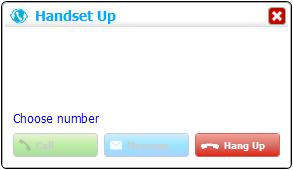
If second option is also checked, call window will close after specified time. Detailed description of call window is included in chapter 3.5.4 Call window. It is possible also to switch on an automatic notifications about accessibility of subscriber, if previously calll to his/her number was unanswered or number was busy. Such notification appear on computer screen if subscriber with previously dialed number make any action with phone. In lower right corner of computer screen following window appears:

Above window disappear after time defined in window 'Messages', but in tray there is an following icon:
It means notification from contact. After clicking this icon following window appears:
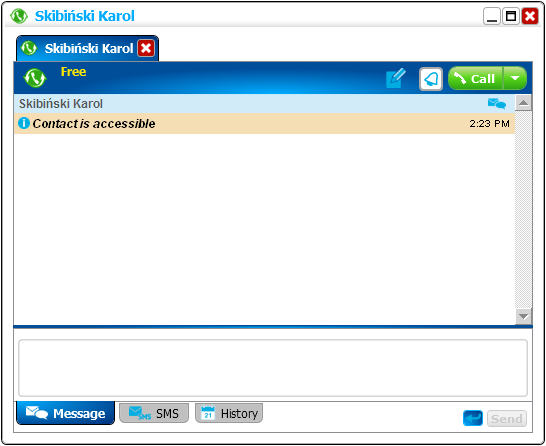
This message prompt to dial previously unavailable extension number.
Settings - Messages
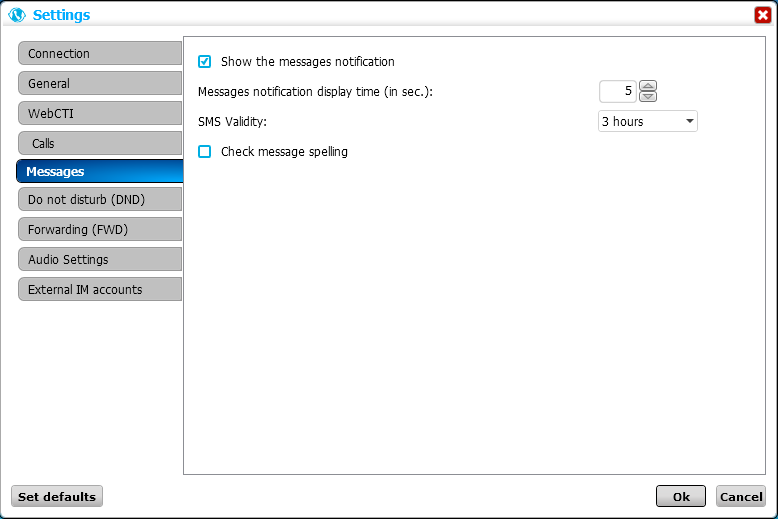
After checking first field in this window, on computer with PhoneCTI application logged on extension number, following window will appear if any message will be send to this extension number:

Above window disappear after time defined in window 'Messages', but in tray there is an following icon:
After clicking in this envelope, window with message text appears on computer screen.
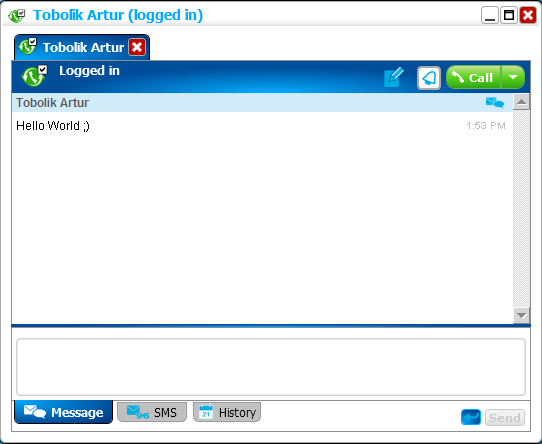
In this window all messages sent to and from specfied extension number during current day. Messages from previous days are stored in archive. If this filed is not checked, window of message notification do not appears. Detailed description of this window is included in chapter 4.6.1 Message window. In field "Message Validity" you can define time of storing SMS by mobile provider, if provider can't deliver it to recipient. During this time provider repeats SMS sending attempt. Last field defines if check of text entered into message will be executed. Language of dictionary used to checking is the same as application language.
Settings - Do not disturb (DND)
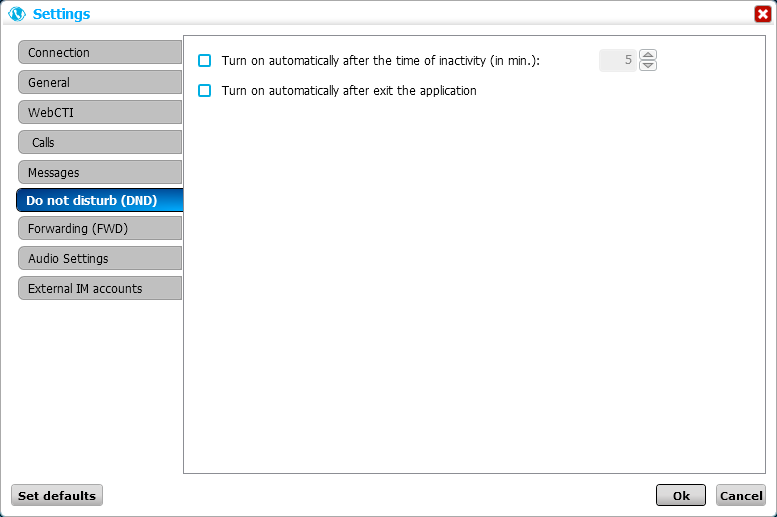
This screen is used to setting rules of switching on the DND service. Switchnig on this service is done after specified number of user idleness. Idleness status is when user doesn't use phone nor computer. It is also possible to set automatic switchnig on DND service after quiting application. Obwiously it is possible to switch on DND service in both situations. In the lower part of PhoneCTI main window there is small button, when you click this button DND service is switched on off (dependently on current ststus of this service) for extension number assigned to PhoneCTI application.
Settings - Forwarding (FWD)
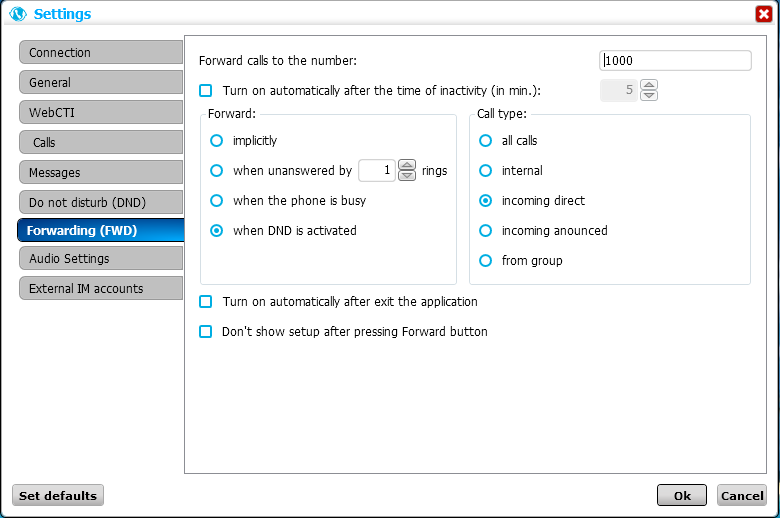
In this window there are located all settings decide about forwarding conditions for specified extension number. These settings can be also set in ConfigMAN application or from phone using appropriate services. Swithing on forwarding can take place after defined time of idleness. Idleness status is when user doesn't use phone nor computer. It is also possible to switch on forwarding after quiting application. Obwiously it is possible to switch on forwarding in both situations. While automatic switching on forwarding, it is realized according settings done in this window. By default after clicking button FWD located in the lower part of PhoneCTI main window above window is displayed on computer screen. After checking last field, above window is not displayed but forwarding is switched on according stored settings.
Settings - Audio settings
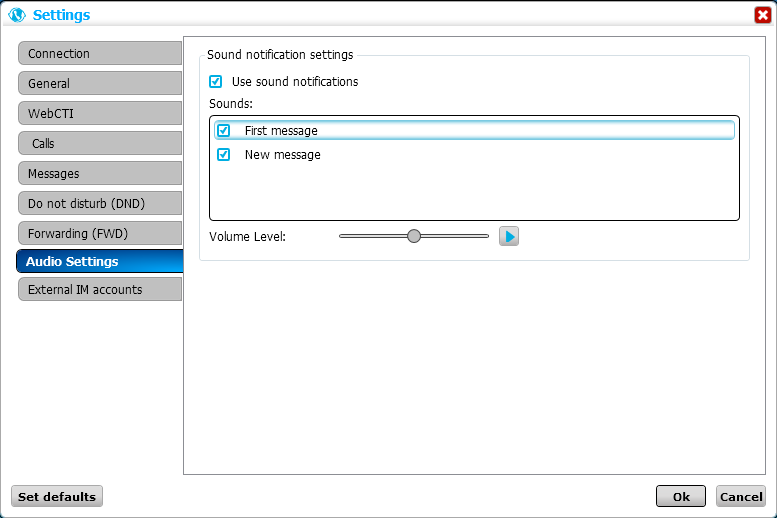
In this window you can define method of audio signaling an incoming message.
|
Phone book
Below figure presents phone book window, this window appear on computer screen after selecting option Book from menu Contacts.
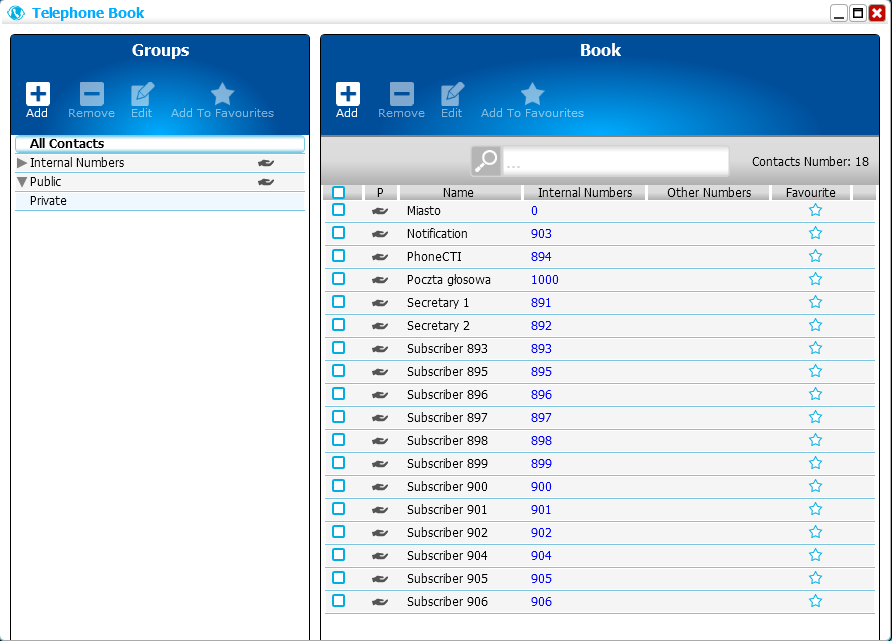
On the left side of above window you can see panel Groups, in this panel there is a list of groups which include numbers located in phone book as well as structure of these groups. PhoneCTI application user can add, edit and remove groups, however if he/she has no defined in PBX privileges to edit public phone book, all his/her actions concern only private phone book. To create new group, you should select group of higher level, where new created group should be located and click button Add. Following window will be visible on computer screen:
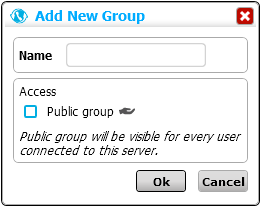
As a result of entering group number and its confirmation, new group will be added in appropriate place of left panel. After marking group and its selecting to edit, following window appears on screen:
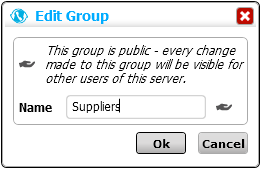
In this window you can change name of created earlier group. Symilarly, after marking group and its selecting to remove following window appears on screen:
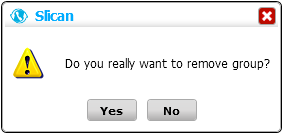
After confirmation, marked group will be removed. In the right panel, named Book, all contacts are visible. Contacts visible in this panel depend on marking in left panel. Among contacts are PBX extension numbers, numbers from public phone book and numbers entered by subscriber to private phone book. All contacts or only contact belonging to specified group are visible. Clicking button Add causes presenting following window on computer screen:
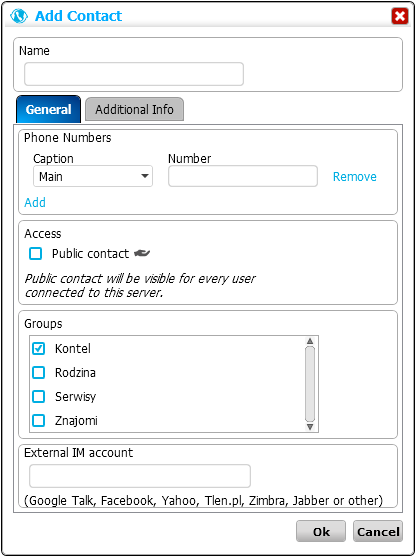
In this window, you can enter contact name, additionally for every contact it is possible to define many phone numbers (every phone number with appropriate comment). Wrong entered numbers can be removed. Additionally it is possible to contact to group - adding contact to group marked with icon , this icon means affiliation specified group to public phone book. Such situation take place, when PhoneCTI user has no privileges to edit public phone book.
Call history
After selecting tap History - history of calls with extension number assigned to PhoneCTI application is visible in the application main window. After selecting tap History, application main window presents as follows:
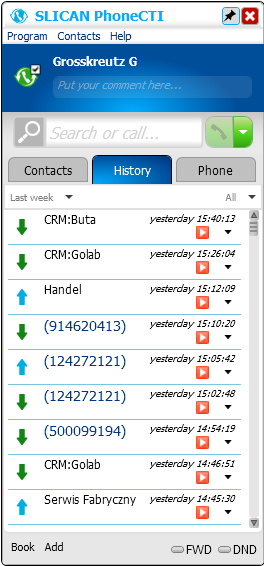
Every position of call history means one call incoming to or outgoing from number assigned to PhoneCTI application. Visible are all calls concerning this number and stored in PBX. For every position you can see the caller number, his/her comment (for outgoing calls it is dialed number and comment for this number if it exists in PBX), date and time of call. Beside text information, in every position there are some icons, which describe this call. There are:
This arrow means incoming call, which was answered.
This arrow means outgoing call, never mind if call was established or not.
This arrow means unanswered incoming call.
This icon means several unanswered incoming callsfrom the same caller, before review the call history. Number visible in this icon means quantity of such calls.
This icon means incoming call, answered by other subscriber. This icon can be used in two situations:
- call was routed to group including specified extension number and was answered by another group agent
- call was routed to specified subscriber but was picked up by another subscriber.
This icon means, that to specified numbe a SMS was sent, text of this SMS will be visible in window, which appears on screen after double clicking this position.
This icon means, that a chat was established with computer assigned to extension number visible in specified position. Text of this chat will be visible in window, which appears on screen after double clicking this position.
This icon means, that call was resorded.
Dialing
Dialing number from contact list
Dialing number from call history
Dialing number from application window
Call window
An example call window is presented in chapter 4.2.4 Settings - Calls. Appeariance of this window changes depending on context of window presentation. First of all - title of this window changes. Following situations are possible:
Three types of information is presented in central part of window:
- Comment assigned to caller or dialed phone number, as well as comment of number with established call
|
- Number of this phone
- Call duration time, before establishing call it is ringing time
At the bottom of this window you can see the buttons, which enable to perform action changing the current behaviour of phone with extension number assigned to PhoneCTI application.
Sending messages
PhoneCTI application enables to send messages between subscribers (symilarly as common chat applications - ex. Skype), it is also possible to send messages in form of SMS, to persons who use mobile phone. Sending message initialization takes place after right clicking over the any contact from list. Following context menu appears:
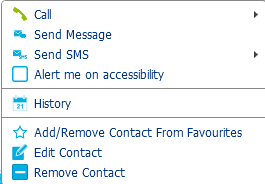
From above menu you should select option Send Message or Send SMS, depend on type of message to send. After selecting one of these option, on screen appears window, which is described in next chapter. This text tells about sending massage to another PhoneCTI application user. It is also possible to answer on received messages. It is also described in next chapter. Let's assume, tht another PhoneCTI user sent message to you.
Message window
Receiving message is signal by following window appears in the bottom right corner of computer screen:

This window appears only if appropriate option in settings is set (4.2.5 Settings - Messages) and disappears after time set also in this settings, however application icon will be visible in tray alternatively with following icon:
After clicking this window, window with message will appear on computer screen:

In this window, besides message text there is also information about person who sent this message (together with individual comment of this person - if such comment exists) as well as time of sending message. In bottom part of this window it is possible to enter answer text, if we want to send any. In upper part of this window there is a button, which enables call to number of subscriber, from whom you received message. After clicking left part of this button you can establish call with number from which message was sent, while after clicking right part of button, on screen appears list of all numbers assigned to specified contact. From this list you can select number to establish call. Call establishing is performeed according rules described in chapter 4.2.2 Settings - General.
Chat
Due to PhoneCTI application you can lead the conversation with another application user, by answering his/her questions. Example of such conversation is visible on following figure:
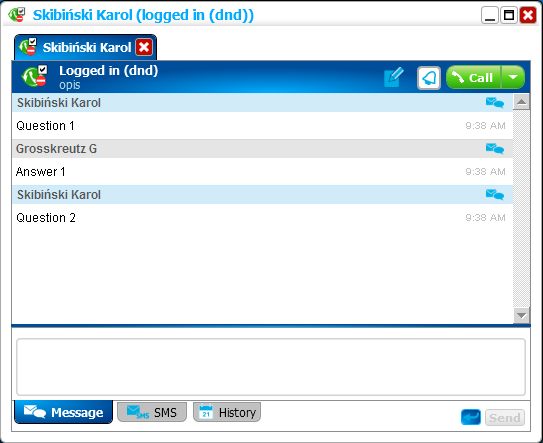
Messages in presented above form are stored tom the end of day. Next are stored in archive and they can be displayed on screen after selection of appropriate tap in Message window and defining date.
SMS
Sending message in SMS form is possible to persons, who don't have PBX extension number. Sending SMS is provided using GSM gateway installed in PBX. Subscriber who want to send SMSes must have privileges to using TelefonCTI.plus. SMS message is send automaticaly by PBX and report about sending SMS is visible in Message window:
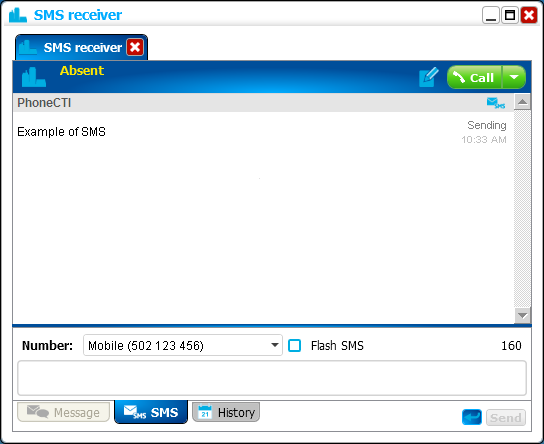
Sended SMS can be maximally 160 characters long. However if we use local characters (with ASCII codes above 127) this number decrease to 70. Number of characters, which remain is displayed on the right side of window. PhoneCTI application prevents entering more characters, than available. In Message window there is field, which should be checked for sending message as Flash SMS.
Finding data
In PhoneCTI application, a sophisticated text searching method is implemented. Searching can be done in every application window, if following field is visible:
During entering characters PhoneCTI application executes automatic searching. It goes ahead according following rules:
- if number of entered characters is equal to 1 or 2, application searches all strings, for which any word begins with entered text,
- if number of entered characters is equal to 3 or more, application searches all strings, where all words contain entered text.
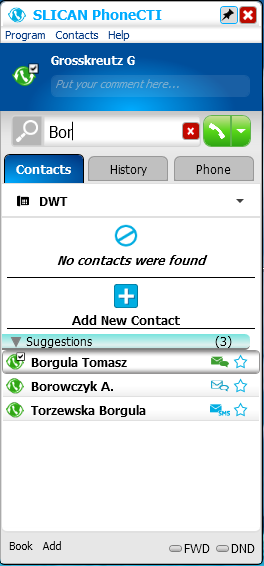
If search concerns contacts and takes place on contact list, and entered text cannot be found, application informs about it, offers adding new contact and shows other contacts, which contains entered text and there are outside current search area. Described situation is shown on following window:
References
- ↑ In appliction settings, DND phone status can be forced, if application and phone remain in standby mode for sufficiently long time. This time can be defined in application settings
- ↑ This window appear on computer screen after double clicking on subscriber 1058 Instrukcja
