Difference between revisions of "CTS-202 - information"
(→Search for Internal numbers in Subscriber list) |
|||
| (249 intermediate revisions by 3 users not shown) | |||
| Line 1: | Line 1: | ||
| − | <center>'''System | + | <center>'''System Telephones'''</center> |
| − | <center>'''Slican CTS-202'''</center> | + | <center>'''Slican CTS-202.CL'''</center> |
| − | <center>'''Slican CTS-202. | + | <center>'''Slican CTS-202.BT'''</center> |
<center>'''Slican CTS-202.IP'''</center> | <center>'''Slican CTS-202.IP'''</center> | ||
| − | <center>''' | + | <center>'''Slican CTS-203.IP-POE'''</center> |
| + | <center>'''and CTS-232 console'''</center> | ||
| − | |||
| + | <center>Instruction manual version 1.11 </center> | ||
| − | <center>[[Image: | + | |
| + | <center>[[Image:Io CTS-CTS z konsolami.png]]</center> | ||
| − | |||
| Line 27: | Line 28: | ||
| − | <center> | + | <center>“The manufacturer reserves right to modify the product without prior notification.”</center> |
| − | <center>Date of last modification: | + | <center>Date of the last modification: 29.11.2010 </center> |
| + | =Introduction= | ||
| − | + | <br> | |
| + | {{warning| CTS-202.IP system phone work only with PBX with firmware version 5.11 or lower. In higher versions, CTS-202.IP needs to be replaced with CTS-203.IP.}} | ||
| + | <br><br> | ||
| − | + | Slican CTS-202.CL, CTS-203.BT and CTS-203.IP system phones that enable work with CTS-232 consoles have been designed for integration with the new family of Slican PBX-type units. CTS-202.CL and CTS-203.BT are digital system phones that comply with the U<sub>p0</sub> terminal, while CTS-202.IP and CTS-203.IP-POE are VoIP system phones. | |
| − | + | The most important functional features of these products are shown in the table below: | |
| − | {|{{ | + | {| {{prettytable}} |
!{{Hl2}}| | !{{Hl2}}| | ||
| − | !{{Hl2}}| <center>System | + | !{{Hl2}}| <center>System Phone Feature</center> |
!{{Hl2}}| <center>CTS-202.CL</center> | !{{Hl2}}| <center>CTS-202.CL</center> | ||
| − | !{{Hl2}}| <center>CTS-202. | + | !{{Hl2}}| <center>CTS-202.BT</center> |
!{{Hl2}}| <center>CTS-202.IP</center> | !{{Hl2}}| <center>CTS-202.IP</center> | ||
| + | !{{Hl2}}| <center>CTS-203.IP-POE</center> | ||
|- | |- | ||
| <center>1.</center> | | <center>1.</center> | ||
| − | | | + | | Backlit display |
| − | | <center> | + | | <center>{{Ok}} </center> |
| − | | <center> | + | | <center>{{Ok}}</center> |
| − | | <center> | + | | <center>{{Ok}}</center> |
| + | | <center>{{Ok}}</center> | ||
|- | |- | ||
| <center>2.</center> | | <center>2.</center> | ||
| − | | | + | | AUDIO OUT recording output |
| − | | <center> | + | | <center>{{No}}</center> |
| − | | <center> | + | | <center>{{No}}</center> |
| − | | <center> | + | | <center>{{Ok}}</center> |
| + | | <center>{{No}}</center> | ||
|- | |- | ||
| <center>3.</center> | | <center>3.</center> | ||
| − | | | + | | Integrated Bluetooth phone base |
| − | | <center> | + | | <center>{{No}}</center> |
| − | | <center> | + | | <center>{{Ok}}</center> |
| − | | <center> | + | | <center>{{No}}</center> |
| + | | <center>{{No}}</center> | ||
|- | |- | ||
| <center>4.</center> | | <center>4.</center> | ||
| − | | | + | | PoE power supply |
| − | | <center> | + | | <center>{{No}}</center> |
| − | | <center> | + | | <center>{{No}}</center> |
| − | | <center> | + | | <center>{{Ok}}</center> |
| + | | <center>{{Ok}}</center> | ||
|- | |- | ||
| <center>5.</center> | | <center>5.</center> | ||
| − | | | + | | External power pack |
| − | | <center> | + | | <center>OPTION</center> |
| − | | <center> | + | | <center>OPTION</center> |
| − | | <center> | + | | <center>STANDARD</center> |
| + | | <center>OPTION</center> | ||
|- | |- | ||
| <center>6.</center> | | <center>6.</center> | ||
| − | | | + | | 'Hands Free' mode |
| − | | <center> | + | | <center>{{Ok}}</center> |
| − | | <center> | + | | <center>{{Ok}}</center> |
| − | | <center> | + | | <center>ONLY AVAILABLE FOR LISTENING</center> |
| + | | <center>{{Ok}}</center> | ||
|- | |- | ||
| <center>7.</center> | | <center>7.</center> | ||
| − | | | + | | Works with CTS-232 consoles |
| − | | <center> | + | | <center>{{Ok}}</center> |
| − | | <center> | + | | <center>{{Ok}}</center> |
| − | | <center> | + | | <center>{{Ok}}</center> |
| + | | <center>{{Ok}}</center> | ||
| − | <center>(phone | + | |- |
| + | | <center>8.</center> | ||
| + | | Support of the CTI application | ||
| + | | <center>{{Ok}}</center> | ||
| + | | <center>{{Ok}}</center> | ||
| + | | <center>{{Ok}}</center> | ||
| + | <center>(provided that the phone is installed in <BR>the same local area network with PBX)</center> | ||
| + | | <center>{{Ok}}</center> | ||
| + | <center>(provided that the phone is installed in <BR>the same local area network with PBX)</center> | ||
| + | |- | ||
| + | | <center>9.</center> | ||
| + | | Available colors | ||
| + | | <center>Gray and Black</center> | ||
| + | | <center>Gray and Black</center> | ||
| + | | <center>Gray</center> | ||
| + | | <center>Gray</center> | ||
|} | |} | ||
| − | + | CTS-202.CL telephones are available in two colours. The CTS-202.CL-GR model is available in grey and CTS-202.CL-BK in black. These telephones work with the following consoles: grey CTS-232-GR and black CTS-232-BK. | |
| − | + | The products ensure trouble-free work on any assistant or manager’s work stand. With no doubt, they will comply with the requirements applicable to any lobby terminals. An intelligible menu ensures intuitive setup of phone parameters and adaptation to the user's preferred features. Due to the entire integration of the product and telephone exchange applications the user will be able to promptly change the settings of individual phone sets on the PBX configuration platform. | |
| − | + | Programmable multiple-function keys ensure easy access to the PBX features, extension numbers and phone book entries. The user can check with three phone number registers: | |
| − | * | + | * Public phone book: managed on a global basis, available to all PBX subscribers, |
| − | * | + | * Personal phone book: property of a specific phone user, |
| − | * | + | * List of subscribers: list of PBX extension numbers. |
| − | + | The number of system telephones to be integrated with the PBX depends on the type of PBX and is presented in below table: | |
| + | <center> | ||
| + | {| {{prettytable}} | ||
| + | !{{Hl2}}| | ||
| + | !{{Hl2}}| MAC-6400 | ||
| + | !{{Hl2}}| CCT-1668 | ||
| + | !{{Hl2}}| CXS-0424 | ||
| + | |- | ||
| + | |CTS-202.CL/CTS-202.BT | ||
| + | |120 | ||
| + | |18 | ||
| + | |12 | ||
| + | |- | ||
| + | |CTS-202.IP | ||
| + | |18 | ||
| + | |18 | ||
| + | |18 | ||
| + | |- | ||
| + | |- | ||
| + | |CTS-203.IP-PoE | ||
| + | |18 | ||
| + | |18 | ||
| + | |18 | ||
| + | |} | ||
| + | </center> | ||
| − | = | + | A maximum of five CTS-232 consoles can be connected to up to four system phones connected to the PBX, and the other system phones enable connecting up to two CTS-232 consoles. This enables expanding the number of speed access keys. This also enhances the capabilities for the management of calls with the preview showing if individual subscribers are busy. <br> |
| + | IP system phones are equipped in following codecs: | ||
| + | <center> | ||
| + | {| {{prettytable}} | ||
| + | !{{Hl2}}| CTS-202.IP | ||
| + | !{{Hl2}}| CTS-203.IP-PoE | ||
| + | |- | ||
| + | |G711;GSM | ||
| + | |style="text-align:center"|G711 | ||
| + | |} | ||
| + | </center> | ||
| + | Depending on distance between PBX and phone CTS-202.CL or CTS-202.BT and number of connected consoles it may be necessarily to use external power supply.<br> | ||
| + | CTS-202.IP and CTS-203.IP-PoE phones can be powered directly from computer network, if adequate equipment is used. Otherwise external power supply is obvious. Recommended types of power supply for specified phones are presented in following table: | ||
| + | <center> | ||
| + | {|{{prettytable}} | ||
| + | !{{Hl2}}|No !!{{Hl2}}|System phone !!{{Hl2}}|Power supply<br>36V/160mA !!{{Hl2}}|Power supply<br>12V/1,25A | ||
| + | |- | ||
| + | |1 ||'''CTS-202.CL''' ||{{Ok}} ||{{No}} | ||
| + | |- | ||
| + | |2 ||'''CTS-202.BT''' ||{{Ok}} ||{{No}} | ||
| + | |- | ||
| + | |3 ||'''CTS-202.IP''' ||{{Ok}} ||{{no}} | ||
| + | |- | ||
| + | |4 ||'''CTS-203.IP-PoE''' ||{{No}} ||{{Ok}} | ||
| + | |} | ||
| + | </center> | ||
| − | + | = Functionalities = | |
| − | * | + | * 12 general purpose programmable keys, such as: subscriber status signal; speed access; PBX services; shortcuts for entries into phone books. |
| − | * | + | * Each speed access key may be dedicated to any PBX function; |
| − | * | + | * Menu navigation keys: up/down arrow keys; two context keys; |
| − | * | + | * +/- volume keys; |
| − | * | + | * Keys: Flash, SPK ON, SPK OFF, Mute, Redial; |
| − | * | + | * Two phone books: public and personal, plus the list of extension numbers; |
| − | * | + | * Cache call register of the last ten numbers: dialled, received, and missed numbers; |
| − | * | + | * Presentation of incoming subscribers, inclusive of the names, consistent with the entries in the phone book or PBX database; |
| − | * | + | * Presentation of waiting calls; |
| − | * | + | * Presentation of outgoing call numbers dialled by the caller; |
| − | * | + | * Presentation of call time during the calls; |
| − | * | + | * Programmable settings: menu language; ringing volume; speakerphone and handset, as well as the LCD display contrast; |
| − | * | + | * Five types of ringing tones; |
| − | * | + | * Option to program telephone settings via the PBX configuration program; |
| − | * | + | * AUTO-Redial function: automatic redialling of busy or unavailable numbers; |
| − | * | + | * Digital transmission via one pair of wires using the U terminal, up to 1 km, compatible with the PBX; |
| − | * | + | * The phone can be enhances by additional CTS-232 consoles (increasing the number of programmable keys from 42 to 162 – see section 1). |
| − | * | + | * Multiple-line LCD screen supporting two font types. |
| − | * | + | * Phone replacement will not delete the entries |
| − | + | * Support for headphones. | |
| − | '' | + | '''''IMPORTANT!'' ''' |
| + | '''The phone functionality strictly depends on the PBX software release. This manual describes telecom operations and functions that are accessible only with the present software version. Some of them may be unavailable. In such a case, please contact our customer service department. ''' | ||
| − | = | + | = Equipment = |
| + | {| {{prettytable}} | ||
| + | !{{Hl2}}| <center>Accessories</center> | ||
| + | !{{Hl2}}| <center>CTS-202.CL phone</center> | ||
| + | <center>(Pcs. included)</center> | ||
| + | !{{Hl2}}| <center>Slican CTS-202.BT phone</center> | ||
| − | + | <center>(Pcs. included)</center> | |
| − | + | ||
| − | + | ||
| − | + | ||
| − | <center>( | + | |
| − | + | ||
| − | + | ||
| − | + | ||
!{{Hl2}}| <center>CTS-202.IP phone</center> | !{{Hl2}}| <center>CTS-202.IP phone</center> | ||
| − | <center>( | + | <center>(Pcs. included)</center> |
!{{Hl2}}| <center>CTS-232 console</center> | !{{Hl2}}| <center>CTS-232 console</center> | ||
| − | <center>( | + | <center>(Pcs. included)</center> |
|- | |- | ||
| − | | Phone | + | | Phone set |
| − | <center>[[ | + | <center>[[File:Io_cts_2.png]]</center> |
| − | | <center>1 | + | | <center>1 pc.</center> |
| − | | <center>1 | + | | <center>1 pc.</center> |
| − | | <center>1 | + | | <center>1 pc.</center> |
| <center>-</center> | | <center>-</center> | ||
| Line 192: | Line 267: | ||
| Handset | | Handset | ||
| − | <center>[[ | + | <center>[[File:Io_cts_3.png]]</center> |
| − | | <center>1 | + | | <center>1 pc.</center> |
| − | | <center>1 | + | | <center>1 pc.</center> |
| − | | <center>1 | + | | <center>1 pc.</center> |
| <center>-</center> | | <center>-</center> | ||
| Line 201: | Line 276: | ||
| Handset cord | | Handset cord | ||
| − | <center>[[ | + | <center>[[File:Io_cts_5.png]]</center> |
| − | | <center>1 | + | | <center>1 pc.</center> |
| − | | <center>1 | + | | <center>1 pc.</center> |
| − | | <center>1 | + | | <center>1 pc.</center> |
| <center>-</center> | | <center>-</center> | ||
|- | |- | ||
| − | | Phone cable | + | | Phone line cable |
| − | <center>[[ | + | <center>[[File:Io_cts_5.png]]</center> |
| − | | <center>1 | + | | <center>1 pc.</center> |
| − | | <center>1 | + | | <center>1 pc.</center> |
| <center>-</center> | | <center>-</center> | ||
| <center>-</center> | | <center>-</center> | ||
|- | |- | ||
| − | | Phone power | + | | Phone's power pack |
| − | | <center> | + | | <center>Optional feature</center> |
| − | + | | <center>Optional feature</center> | |
| − | | <center> | + | | <center>1 pc.</center> |
| − | | <center>1 | + | |
| <center>-</center> | | <center>-</center> | ||
| + | |||
|- | |- | ||
| Console | | Console | ||
| − | <center>[[ | + | <center>[[File:Io_cts_6.png]]</center> |
| <center>-</center> | | <center>-</center> | ||
| <center>-</center> | | <center>-</center> | ||
| <center>-</center> | | <center>-</center> | ||
| − | | <center>1 | + | | <center>1 pc.</center> |
|- | |- | ||
| − | | | + | | Console – phone or console - console connecting cable |
| − | <center>[[ | + | <center>[[File:Io_cts_7.png]]</center> |
| <center>-</center> | | <center>-</center> | ||
| <center>-</center> | | <center>-</center> | ||
| <center>-</center> | | <center>-</center> | ||
| − | | <center>1 | + | | <center>1 pc.</center> |
|- | |- | ||
| − | | | + | | Connecting element console – phone or console - console |
| − | <center>[[ | + | <center>[[File:Io_cts_8.png]]</center> |
| <center>-</center> | | <center>-</center> | ||
| <center>-</center> | | <center>-</center> | ||
| <center>-</center> | | <center>-</center> | ||
| − | | <center>1 | + | | <center>1 pc.</center> |
|- | |- | ||
| − | | | + | | Mounting screws |
| − | <center>[[ | + | <center>[[File:Io_cts_9.png]]</center> |
| <center>-</center> | | <center>-</center> | ||
| <center>-</center> | | <center>-</center> | ||
| <center>-</center> | | <center>-</center> | ||
| <center>4 pcs.</center> | | <center>4 pcs.</center> | ||
| − | |||
|} | |} | ||
| − | = | + | = Design = |
| − | + | ||
== Phone == | == Phone == | ||
| + | <imagemap> | ||
| + | Image:Io_cts_10.png|center|alt=CTS-202 | ||
| + | rect 178 50 309 115 [[CTS-202_-_information#Phone|Display]] | ||
| + | circle 92 141 26 [[CTS-202_-_information#Phone|Cradle switch]] | ||
| + | poly 178 154 311 154 311 179 243 224 178 179 [[CTS-202_-_information#Phone|Menu navigation keys]] | ||
| + | circle 337 176 11 begin_of_the_skype_highlighting 337 176 11 end_of_the_skype_highlighting [[CTS-202_informacje#Phone|Mute button]] | ||
| + | circle 364 177 10 [[CTS-202_-_information#Phone|Volume control button]] | ||
| + | circle 390 177 11 [[CTS-202_-_information#Phone|Volume control button]] | ||
| + | circle 324 262 15 [[CTS-202_-_information#Phone|Flash button]] | ||
| + | circle 324 304 14 [[CTS-202_-_information#Phone|Redial button]] | ||
| + | poly 309 339 317 332 331 332 338 339 338 350 332 359 324 361 325 373 335 378 339 388 336 396 329 400 321 402 314 398 310 389 310 381 315 374 323 374 323 360 315 357 310 351 309 345 [[CTS-202_-_information#Phone|'Hands Free' mode ON/OFF buttons (headphones or speakerphone)]] | ||
| + | rect 371 205 400 402 [[CTS-202_-_information#Phone|Programmable keys with LED signalling]] | ||
| + | rect 271 206 365 213 [[CTS-202_-_information#Phone|Ringer LED]] | ||
| + | rect 168 246 280 402 [[CTS-202_-_information#Phone|Numerical keyboard]] | ||
| + | rect 46 213 139 361 [[CTS-202_-_information#Phone|Speaker]] | ||
| + | desc none | ||
| + | </imagemap> | ||
| − | + | <center> | |
| − | <center> | + | {| {{prettytable}} |
| − | + | ||
| − | + | ||
| − | + | ||
| − | {|{{ | + | |
| 1. Display | | 1. Display | ||
| − | | 7. | + | | 7. Mute key |
|- | |- | ||
| 2. Cradle switch | | 2. Cradle switch | ||
| − | | 8. Volume control | + | | 8. Volume control buttons |
|- | |- | ||
| 3. Menu navigation keys | | 3. Menu navigation keys | ||
| − | | 9. | + | | 9. Programmable keys with LED signalling |
|- | |- | ||
| − | | 4. | + | | 4. Ringer LED |
| 10. Flash key | | 10. Flash key | ||
| Line 293: | Line 379: | ||
|- | |- | ||
| − | | 6. | + | | 6. Keyboard |
| − | | 12. Hands Free mode | + | | 12. 'Hands Free' mode ON/OFF buttons (headphone or speakerphone) |
|} | |} | ||
| − | + | [[Image:Io_cts_11.png]] | |
| − | {|{{ | + | {| {{prettytable}} |
| − | | 13. CTS- | + | | 13. CTS-232 console socket |
| − | | 16. | + | | 16. Handset socket |
| − | + | ||
|- | |- | ||
| − | | 14. POWER | + | | 14. POWER 36V/0.1A socket - power pack socket |
| − | | 17. AUDIO OUT | + | | 17. AUDIO OUT(CTS -202.IP) |
| − | + | ||
|- | |- | ||
| 15. LINE socket | | 15. LINE socket | ||
| − | | 18. | + | | 18. Additional socket for headphones with microphone |
| − | + | ||
|} | |} | ||
| + | </center> | ||
== Display == | == Display == | ||
| − | + | {| {{prettytable}} | |
| − | + | |- | |
| − | {|{{ | + | | |
| − | | | + | |
{|{{CTS}} | {|{{CTS}} | ||
|<center> | |<center> | ||
| Line 329: | Line 412: | ||
</center> | </center> | ||
|} | |} | ||
| − | | | + | | System screen: the first screen that appears when the PBX and the phone (CTS-202.CL and CTS-202.BT) are ON. |
| + | |||
|- | |- | ||
| − | | | + | | |
{|{{CTS}} | {|{{CTS}} | ||
|<center> | |<center> | ||
| − | + | Digital Phone | |
CTS-202.IP | CTS-202.IP | ||
SLICAN 2007 | SLICAN 2007 | ||
| − | Terminal 0. | + | Terminal 0.81 |
</center> | </center> | ||
|} | |} | ||
| − | | | + | | System screen: the first screen that appears when the phone's (CTS-202.IP) PBX is ON. |
| + | |||
|- | |- | ||
| − | | | + | | |
{|{{CTS}} | {|{{CTS}} | ||
|<center> | |<center> | ||
No connection | No connection | ||
| − | with | + | with PBX |
</center> | </center> | ||
|} | |} | ||
| − | | | + | | This message notifies of a lost connection with the PBX. It will appear if no connection with the PBX is established within 30 seconds from the moment when the power supply is ON (CTS-202.CL and CTS-202.BT). After another 5 seconds the system will reset and attempt another connection. |
| + | |||
|- | |- | ||
| | | | ||
| Line 360: | Line 446: | ||
</center> | </center> | ||
|} | |} | ||
| − | | This message | + | | This message will appear if the phone loses its connection with the PBX during normal operations (CTS-202.CL and CTS-202.BT). |
| + | |||
|- | |- | ||
| − | | | + | | |
{|{{CTS}} | {|{{CTS}} | ||
|<center> | |<center> | ||
Slican VoIP | Slican VoIP | ||
| − | No | + | No PBX |
connection | connection | ||
Check LAN | Check LAN | ||
| Line 373: | Line 460: | ||
</center> | </center> | ||
|} | |} | ||
| − | | No | + | | No cable connected message (CTS-202.IP). |
| + | |||
|- | |- | ||
| − | | | + | | |
{|{{CTS}} | {|{{CTS}} | ||
|<center> | |<center> | ||
| − | Slican VoIP | + | Slican VoIP |
| − | No | + | No PBX |
| − | + | connection | |
| − | No | + | No VoIP |
| − | + | answer | |
Menu Connect | Menu Connect | ||
</center> | </center> | ||
|} | |} | ||
| − | | No | + | | No connection with VoIP message (CTS-202.IP). |
| + | |||
|- | |- | ||
| − | | | + | | |
{|{{CTS}} | {|{{CTS}} | ||
|<center> | |<center> | ||
| − | + | Wednesday | |
| − | + | 27.07.2010 13:30 | |
| − | + | Subscriber name | |
Menu Connect | Menu Connect | ||
</center> | </center> | ||
|} | |} | ||
| − | | Display in standby mode (all | + | | Display screen in the standby mode (all types of phone). |
| + | |||
|- | |- | ||
| − | | | + | | |
{|{{CTS}} | {|{{CTS}} | ||
| − | | | + | | Talking to: |
| − | + | Name | |
| − | + | 1044 | |
| − | + | 1:22 | |
| − | 1: | + | |
| − | + | Options Hold | |
|} | |} | ||
| − | | Display during call (all | + | | Display screen during a call (all types of phone). |
| − | + | Caller's name – the name of a subscriber assigned in PBX or the name of an entry in the personal or public directory; | |
| − | + | 1044 – an example number presented by the subscriber or extension number. | |
| − | 1: | + | 1:22 – Call time. |
| − | Save – | + | Menu and Save – Current context menu function dedicated to the key. |
|- | |- | ||
| Line 424: | Line 514: | ||
{|{{CTS}} | {|{{CTS}} | ||
| | | | ||
| − | + | Trade ACD 13:24 | |
| − | + | Connections 2/10 | |
| − | Wait time | + | Wait time 1 |
| − | Exp. time | + | Exp. time 0/4 |
| − | + | Lost % 0/0 | |
| − | Agents | + | Agents 1/17 |
| − | Menu | + | Menu Book |
|} | |} | ||
| + | |||
| + | | Preview of an ACD group status: | ||
| + | |||
| + | '''Comment''' of the group – max. 10 characters | ||
| − | + | '''Calls''' – the number of calls in queue/calls being processed by the speaking agents | |
| − | ''' | + | '''Waiting time''' - actual waiting time of a call that has been the longest in the queue |
| − | ''' | + | '''Estimated time''' - estimated waiting time calculated on the basis of the average time of call including the number of waiting calls and the number of active agents/declared waiting time that defines the queue overflow |
| − | ''' | + | '''Missed %''' - the number of calls lost due to the originator's cancellation given as a percentage/number of rejected calls due to the queue overflow during last 15 minutes given as a percentage |
| + | |||
| + | '''Agents''' – the number of available agents/total number of agents | ||
| − | |||
| − | |||
| − | |||
|} | |} | ||
== Console == | == Console == | ||
| + | <center>[[Image:Io_cts_12.png]] | ||
| − | + | [[Image:Io_cts_13.png]] [[Image:Io_cts_14.png]] | |
| − | |||
| + | {| {{prettytable}} | ||
| + | | 1. Programmable keys | ||
| + | |- | ||
| + | | 2. Output socket to second console | ||
| + | |- | ||
| + | | 3. Input socket to phone | ||
| + | |} | ||
| + | </center> | ||
| + | = Connecting CTS-202 phones up to the PBX = | ||
| + | == Physical connection of CTS-202 phones with the PBX == | ||
| + | ''The regularity of CTS-202.CL and CTS-202.BT phone operations depends on the distance between the PBX and the phone, the number of connected consoles as well as on the quality of the wiring system inside the building.'' | ||
| − | + | {| {{prettytable}} | |
| − | + | ||
| − | + | ||
| − | + | ||
| − | + | ||
| − | + | ||
| − | + | ||
| − | + | ||
| − | + | ||
| − | + | ||
| − | + | ||
| − | + | ||
| − | + | ||
| − | + | ||
| − | + | ||
| − | {|{{ | + | |
| <center>1</center> | | <center>1</center> | ||
| − | | <center>[[Image: | + | | <center>[[Image:Io_cts_15.png]]</center> |
| − | | | + | | Plug the handset cord into the handset socket. |
| − | + | ||
|- | |- | ||
| <center>2</center> | | <center>2</center> | ||
| − | | <center>[[Image: | + | | <center>[[Image:Io_cts_16.png]]</center> |
| − | | | + | | Connect the handset free plug with the socket marked with the following symbol on the telephone body: [[Image:Io_cts_sluchawki.png]]. |
| − | + | Then connect: | |
| − | + | * phone cable (for CTS-202.CL or CTS-202.BT) | |
| − | + | * Ethernet cable (for CTS-202.IP and CTS-203.IP-POE) the socket marked LINE in the telephone | |
| − | + | * In the case of CTS-202.IP system phones, connect the power pack to the socket marked as '''36V/0,1A. ''' | |
| + | * In the case of CTS-203.IP-PoE system phones, connect the power pack to the socket marked as '''POWER''' | ||
| + | * In the case of CTS-202.BT phones connect to the socket marked as '''POWER'''. | ||
| + | * In both cases connect the end of the cable with the power pack housing to 230V power socket. | ||
| − | + | '''''IMPORTANT! '''CTS-202.IP and CTS-203.IP-POE system phones can be also powered by network devices with the Power over Ethernet function. There is no need to use a power pack in such a case.'' | |
| − | + | ||
| − | |||
|- | |- | ||
| <center>4</center> | | <center>4</center> | ||
| − | | <center>[[Image: | + | | <center>[[Image:Io_cts_18.png]]</center> |
| − | | | + | | In the case of CTS-202.CL and CTS-202.BT system phones, connect the other end of the phone line cord with the socket of the telecom service provider. |
| − | + | In the case of CTS-202.IP and CTS-203.IP-POE system phones, connect the other end of the Ethernet cable to the computer network socket. | |
| − | ''''' | + | '''''Important! '''Before you plug in the phone contact your network administrator to make sure whether or not the socket complies with your system telephone model.'' |
| − | + | ||
| − | ''Before | + | |
| − | + | ||
| − | + | ||
| + | ''The products must be connected with dedicated sockets only.'' | ||
|- | |- | ||
| − | |||
| − | |||
| − | |||
| − | |||
| − | |||
| − | |||
| − | |||
| − | |||
| − | |||
| − | |||
| − | |||
| + | | <center>6</center> | ||
| + | | <center>[[Image:Mowa.jpg]]</center> | ||
| + | | Regular phone operations: PBX icon on the display and acoustic signal in the user's handset. | ||
|- | |- | ||
| − | |||
| − | |||
| − | |||
| − | |||
|} | |} | ||
| − | + | See below several useful hints about the proper installation of CTS-202.CL and CTS-202.BT telephones: | |
| − | + | ||
| − | * Always connect | + | * Always connect the phone up by the phone cord or computer cable whose cross section must not be smaller than 0.5 mm<sup>2</sup>.. |
| − | * | + | * Observe the pair compatibility condition (cord/cable). |
| − | * | + | * Do not connect the phone and other facilities (such as e.g. ISDN lines, other analogue phones) by means of a single shared phone cord. |
| − | * | + | * We suggest maintaining the phone-to-PBX distances specified below: |
| − | ** | + | ** Up to 200 m: in the case of phones that need no power supply; this distance ensures regular phone operations; |
| − | ** | + | ** More than 200 m: the phone will demonstrate some irregularities if you fail to use additional power supply unit, and |
| − | ** | + | ** More than 400 m: a power supply unit will be required to ensure regular phone operation. |
'''''REMEMBER! ''''' | '''''REMEMBER! ''''' | ||
| − | ''For | + | ''For the CTS-202.CL, CTS-202.BT and CTS-203.IP-POE the power pack is not included as standard but is available as an option. In the case of an extended PBX-to-phone distance and the poor quality of cables you may have trouble with regular operation of CTS-202.CL, CTS-202.BT and CTS-203.IP-POE system phones. A solution to this problem is a power pack.'' |
| − | + | == CTS-202.IP and CTS-203.IP-POE phone configuration for integration with a PBX == | |
| + | === Configuration of phones for work in the company LAN === | ||
| + | '''''IMPORTANT! '''CTS-202.IP telephones will work only with pre-programmed PBXs. The admin must set the PBX parameters and program the keys, subject to the individual requirements of the customer. A phone is authorized in the PBX by entering its MAC address. This number is assigned individually to each phone and can be found on the label placed on the bottom of phone cover. It can also be viewed in the phone menu (VoIP - status).'' | ||
| − | |||
| − | + | '''''Example 1 '''''– a DHCP server operates in the local area network; network settings are defined automatically in the device. | |
| − | + | CTS-202.IP phone is by default configured for operation in local area network and for integration with a DHCP server. The phone will automatically search for the PBX and connect with it after connecting to the network and power. The phone is ready to make calls after the connection is made. | |
| − | |||
| − | + | '''''Example 2 '''''– a DHCP server is not used in the local area network, network settings are defined manually in the device. | |
| − | + | ||
| − | + | ||
| − | + | ||
| − | + | ||
| − | + | ||
| − | + | ||
| − | '''''Example 2''''' – DHCP server is not used in | + | |
| − | + | ||
| − | + | ||
| − | + | ||
| + | You must perform the initial configuration before connecting the CTS-202.IP phone to a LAN. To do that, connect the phone to the 230V mains using the power pack. After initializing a phone connected only to the mains, only one menu is available – '''VoIP'''. | ||
| Line 575: | Line 639: | ||
| '''VoIP'''('''1''') | | '''VoIP'''('''1''') | ||
| | | | ||
| − | |||
|- | |- | ||
| | | | ||
| '''Network settings''' ('''1''') | | '''Network settings''' ('''1''') | ||
| − | |||
|- | |- | ||
| | | | ||
| '''VoIP server''' ('''2''') | | '''VoIP server''' ('''2''') | ||
| − | |||
|- | |- | ||
| | | | ||
| '''Status '''('''3''') | | '''Status '''('''3''') | ||
| − | |||
|} | |} | ||
| − | Using context keys [[Image: | + | Using the context keys [[Image:Io_cts_prawo.png]] and [[Image:Io_cts_dol.png]], select '''Network settings''' from the menu '''VoIP'''. |
| − | '''Network settings '''–''' ''' | + | '''Network settings '''–''' '''this menu enables entering phone settings for the network it will be used in. The procedure is: |
| − | * | + | * cancel downloading settings from a DHCP server, |
| − | * enter phone IP address, | + | * enter the phone's IP address, |
| − | * enter subnet mask, | + | * enter the subnet mask, |
| − | * enter default gateway address, | + | * enter the default gateway address, |
| − | * enter DNS server address. | + | * enter the DNS server address. |
| + | The phone will display the final question '''Set?''' Answer '''Yes'''. The phone will restart and perform initialisation. If no VoIP server address has been entered before, you will be informed that there is no connection with the PBX. | ||
| − | + | To set the IP address of a VoIP server, use the left context key [[Image:Io_cts_prawo.png]] to select '''VoIP Menu.''' Press [[Image:Io_cts_dol.png]] to scroll the menu list for the '''VoIP Server''' option and click '''Select [[Image:Io_cts_prawo.png]] '''to go to a submenu and enter the address. | |
| − | |||
| + | If the CTS-202.IP phone is connected to the same local area network with the PBX, then the VoIP (PBX) server address can be acquired automatically and it is not required to enter it manually. Open the '''VoIP'''menu and then '''VoIP server''' menu and use the left context key to select [[Image:Io_cts_prawo.png]] the option '''Auto'''. | ||
| − | + | The IP Address and the name of VoIP server are supplied by the local area network administrator or PBX admin. | |
| − | + | ||
| − | + | ||
| − | + | ||
<center> | <center> | ||
{|{{CTS}} | {|{{CTS}} | ||
| | | | ||
| − | + | Status: | |
| − | + | DHCP On | |
| + | IP Number: | ||
| + | 192.168.0.100 | ||
| + | Subnet Mask: | ||
| + | 255.255.255.0 | ||
| + | Next OK | ||
|} | |} | ||
</center> | </center> | ||
| − | '''Status''' – enables | + | '''Status''' – enables viewing the current VoIP settings of the phone |
| − | After connecting phone to | + | After connecting the phone to the local network and establishing a PBX connection, the '''VoIP''' menu is available as item 6 and has the following structure. Additional submenu appears – '''Codec'''. |
| − | + | {| class="prettytable}" | |
| − | {| class="prettytable" | + | |
| '''VoIP'''('''6''') | | '''VoIP'''('''6''') | ||
| | | | ||
| − | |||
|- | |- | ||
| | | | ||
| '''Network settings''' ('''1''') | | '''Network settings''' ('''1''') | ||
| − | |||
|- | |- | ||
| | | | ||
| '''VoIP server''' ('''2''') | | '''VoIP server''' ('''2''') | ||
| − | |||
|- | |- | ||
| | | | ||
| '''Codec''' ('''3''') | | '''Codec''' ('''3''') | ||
| − | |||
|- | |- | ||
| | | | ||
| '''Status '''('''4''') | | '''Status '''('''4''') | ||
| − | |||
|} | |} | ||
| − | '''Codec''' – this menu enables | + | '''Codec''' – this menu enables selecting the audio codec to be used by the phone for establishing calls. The selection of an audio codec affects the size of band that will be required for establishing the call. The available options: |
| − | * G.711 – | + | * G.711 – broader band, |
| − | * GSM – | + | * GSM – smaller band, |
| − | * Auto – codec | + | * Auto – a codec will be selected automatically depending on whether the phone is used in the same local area network with the CCT-1668, MAC-6400 or CXS-0424 PBX that the phone works with. If the network is the same – G.711 codec will be used and GSM codec will be used outside the network. |
| − | === | + | === Configuration of phones for work in a WAN (Internet) === |
| + | '''''NOTE1! '''CTS-202.IP or CTS-203.IP-POE system phones will work only with pre-programmed PBX. The administrator must set the PBX parameters and program the keys, subject to the individual requirements of the customer. A phone is authorized in the PBX by entering its MAC address. This number is assigned individually to each phone and can be found on the label placed at the bottom of the phone's cover. It can also be viewed in the phone menu (VoIP - status).'' | ||
| + | '''''NOTE2! '''The phone uses port 5522 for operation.'' | ||
| − | |||
| − | + | You must perform initial configuration before connecting the CTS-202.IP phone to WAN (Internet). To do that, connect the phone to 230V mains using the power pack. Only one menu is available in the phone connected only to the mains – '''VoIP'''. | |
| − | |||
| − | |||
| − | + | {| class="prettytable" | |
| − | + | ||
| − | + | ||
| − | + | ||
| − | + | ||
| − | + | ||
| − | {| class="prettytable | + | |
| '''VoIP'''('''1''') | | '''VoIP'''('''1''') | ||
| | | | ||
| − | |||
|- | |- | ||
| | | | ||
| '''Network settings''' ('''1''') | | '''Network settings''' ('''1''') | ||
| − | |||
|- | |- | ||
| | | | ||
| '''VoIP server''' ('''2''') | | '''VoIP server''' ('''2''') | ||
| − | |||
|- | |- | ||
| | | | ||
| '''Status '''('''3''') | | '''Status '''('''3''') | ||
| − | |||
|} | |} | ||
| − | |||
| + | To enter the settings, use the left context key [[Image:Io_cts_prawo.png]] '''Menu''' to select '''VoIP menu'''. Press ''' Select '''[[Image:Io_cts_prawo.png]],''' '''to enter '''Network settings'''. You can scroll the menu using the [[Image:Io_cts_dol.png]] key. | ||
| − | |||
| − | + | '''Network settings '''–''' '''this menu enables entering phone settings for the network it will be used in. First decide if the settings will be downloaded from a DHCP server. If not, enter the following items in sequence: | |
| − | + | ||
| − | + | ||
| − | + | ||
| + | * phone's IP address, | ||
| + | * Subnet mask, | ||
| + | * default gateway address, | ||
| + | * DNS server address. | ||
| − | '''VoIP server''' – | + | '''VoIP server''' – enter the IP address of the VoIP server (or name) in this menu, i.e. the address of CCT-1668, MAC-6400 or CXS-0424-type PBX. |
| − | '''Status''' – | + | '''Status''' – enables viewing the current VoIP settings of the phone. Also shows the phone's MAC address. |
| − | After connecting phone to WAN | + | After connecting the phone to the WAN (the Internet) and establishing a PBX connection, the '''VoIP''' menu is available as item 6 and has the following structure. Additional submenu appears – '''Codec'''. |
| − | + | {| class="prettytable" | |
| − | {| class="prettytable | + | | '''VoIP'''('''5''') |
| − | | '''VoIP'''(''' | + | |
| | | | ||
| − | |||
|- | |- | ||
| | | | ||
| '''Network settings''' ('''1''') | | '''Network settings''' ('''1''') | ||
| − | |||
|- | |- | ||
| | | | ||
| '''VoIP server''' ('''2''') | | '''VoIP server''' ('''2''') | ||
| − | |||
|- | |- | ||
| | | | ||
| '''Codec''' ('''3''') | | '''Codec''' ('''3''') | ||
| − | |||
|- | |- | ||
| | | | ||
| '''Status '''('''4''') | | '''Status '''('''4''') | ||
| − | |||
|} | |} | ||
| − | '''Codec''' – this menu enables | + | '''Codec''' – this menu enables selecting the audio codec to be used by the phone for making calls. The selection of an audio codec affects the size of band that will be required for making the call. The available options: |
| − | * G.711 – | + | * G.711 – broader band, |
| − | * GSM – | + | * GSM – smaller band, |
| − | * Auto – codec | + | * Auto – a codec will be selected automatically depending on whether the phone is used in the same local area network with the CCT-1668, MAC-6400 or CXS-0424 PBX that the phone cooperates with. If the network is the same – the G.711 codec will be used and GSM codec will be used outside the network. |
| − | === Error messages and | + | === Error messages and troubleshooting when connecting the CTS-202.IP phone to a PBX === |
| − | + | ||
| − | + | ||
| − | + | ||
| − | + | ||
| − | + | ||
| − | + | ||
| − | + | ||
| − | + | ||
| − | + | ||
| + | {| {{prettytable}} | ||
| + | !{{Hl2}}|'''Message text''' | ||
| + | !{{Hl2}}|''' What to do''' | ||
|- | |- | ||
| − | | ''Set | + | | ''Set the parameters of VoIP server'' |
| − | | | + | | Enter the valid IP address and the VoIP server (PBX) name. |
| − | + | ||
|- | |- | ||
| − | | '' | + | | ''Set the LAN parameters'' |
| − | | | + | | Switch on downloading the phone's network settings from a DHCP server or enter them manually. |
| − | + | ||
|- | |- | ||
| − | | '' | + | | ''Check network cable '' |
| − | | | + | | Missing network connection. Check network cable. |
| − | + | |- | |
| + | | ''PBX not found'' | ||
| + | | The phone has automatic PBX search enabled but the PBX was not found in the network the phone is in. Enter the PBX (VoIP server) IP address and check the phone configuration. | ||
|- | |- | ||
| ''No answer from DNS server'' | | ''No answer from DNS server'' | ||
| − | | | + | | The PBX name was entered but connecting the DNS server was unsuccessful. |
| − | + | ||
|- | |- | ||
| ''No answer from VoIP server'' | | ''No answer from VoIP server'' | ||
| − | | | + | | Cannot connect with the PBX. The PBX settings, PBX IP address might have been configured incorrectly or the PBX is switched off. |
| − | + | ||
|- | |- | ||
| − | | ''No answer from DHCP server '' | + | | ''No answer from DHCP server'' |
| − | | DHCP server | + | | The DHCP server was not found in the local area network. Contact the network admin. |
| − | + | ||
|- | |- | ||
| − | | ''Connection | + | | ''|Connection established, waiting for authorization'' |
| − | | Your phone | + | | Your phone has been configured correctly and connected to the PBX. You do not have the privileges assigned to use the phone in a PBX. Contact the PBX admin. |
| − | + | ||
|- | |- | ||
| − | | '' | + | | ''Wrong VoIP server name'' |
| − | | | + | | The entered PBX name is incorrect. The PBX name was not found on the DNS server. |
| − | + | ||
|} | |} | ||
| − | == Connecting CTS-232 console == | + | == Connecting the CTS-232 console == |
| − | + | {{warning| '''Disconnect the phone from the line and power pack before connecting the console. Connecting the console to a powered phone might damage the phone'''}} | |
| − | + | ||
| − | + | ||
| − | + | ||
| − | { | + | |
| − | | | + | |
| − | + | ||
| − | + | ||
| + | {| {{prettytable}} | ||
| + | | [[Image:io cts-202 połączenie z konsolą.png]] | ||
| + | | Screw the connecting element to the console and the telephone using the attached fixing screws. | ||
|- | |- | ||
| − | | < | + | |<br><br><br> |
| − | | | + | | |
| − | + | ||
| − | + | ||
|- | |- | ||
| − | | < | + | | [[Image:io cts-202 połączenie telefonu z konsolą.png]] |
| + | | Connect the plug of the connecting cable to the console's IN socket and to the phone's CONSOLE socket | ||
| + | |- | ||
| + | |<br><br><br> | ||
| | | | ||
| + | |- | ||
| + | | | ||
{|{{CTS}} | {|{{CTS}} | ||
| | | | ||
| − | + | Key (F16) | |
Free | Free | ||
| − | Change | + | Change Back |
|} | |} | ||
| − | | | + | | Press any key to check the console's operation. The number assigned to the key should be shown on the display. |
| − | + | ||
|} | |} | ||
| − | + | {{warning| '''Disconnect the phone from the line and power pack before connecting the console. Connecting the console to a powered phone might damage the phone'''}} | |
| + | == Hooking up headphones and an external microphone == | ||
| + | The phone enables connecting headphones or standard headphones with a microphone used with computers. | ||
| − | |||
| − | |||
| − | + | <center>[[Image:Io_cts_calosc.png]]</center> | |
| + | * Connect the headset plug to the socket marked with the following symbol on the telephone: [[Image:Io_cts_sluchawki.png]]. | ||
| + | * Connect the external microphone cord plug to the socket marked with the following symbol on the phone: [[Image:Io_cts_mikro.png]]. | ||
| − | + | '''''Important! '''Microphone and headphone earthing points must be separated.''' ''''' | |
| − | |||
| − | '' | + | '''''Remember! '''When headphones are connected to the CTS-202.CL and CTS-202.BT phones, the system automatically switches to the headphones support mode which is signalled by the letter H shown on the display. In CTS-202.IP phones the headphones must be enabled in the phone menu. The Switching the headphones on/off function can be assigned to a programmable key.'' |
| + | == Connecting the CTS-202.IP phone to the external call recording system == | ||
| + | The CTS-202. phones are designed to support an external call recording system. Use the AUDIO OUT (RJ-11) to connect the phone with a recording device: | ||
| − | + | <center> | |
| − | |||
| − | |||
| − | |||
| − | |||
| − | |||
| − | |||
| − | |||
| − | |||
| − | |||
{|{{prettytable}} | {|{{prettytable}} | ||
| − | !{{Hl1}}| '' | + | !{{Hl1}}| ''No. of terminal'' |
!{{Hl1}}| ''Meaning'' | !{{Hl1}}| ''Meaning'' | ||
|rowspan="7" |[[Image:io cts-202 RJ11-6styków.png]] | |rowspan="7" |[[Image:io cts-202 RJ11-6styków.png]] | ||
|- | |- | ||
| 1 | | 1 | ||
| − | | | + | | not connected |
|- | |- | ||
| 2 | | 2 | ||
| − | | '''''STERa''' ''recorder | + | | '''''STERa''' ''controlling the recorder |
|- | |- | ||
| 3 | | 3 | ||
| − | | '''''VOICEa''''' analogue signal from phone | + | | '''''VOICEa''''' analogue signal from the phone |
|- | |- | ||
| 4 | | 4 | ||
| − | | '''''VOICEb''' ''analogue signal from phone | + | | '''''VOICEb''' ''analogue signal from the phone |
|- | |- | ||
| 5 | | 5 | ||
| − | | '''''STERb''' ''recorder | + | | '''''STERb''' ''controlling the recorder |
|- | |- | ||
| 6 | | 6 | ||
| − | | | + | | not connected |
|} | |} | ||
| + | |||
</center> | </center> | ||
| − | |||
| + | The analogue signal from the telephone is supplied continuously on the central part of the AUDIO OUT – VOICEa, VOICEb socket. | ||
| − | |||
| + | The STERa, STERb pair is used for starting the recording. The “connection” status (resistance approx. 35Ω) is present from the moment of picking up the handset (switching on the 'Hands Free' system) to hanging up the handset (switching off the 'Hands Free' mode). | ||
| − | |||
| + | The polarization of the sound signal and control signal does not matter. | ||
| − | |||
| + | The parameters of the control output (AUDIO OUT): | ||
| − | + | <center> | |
| − | {|{{ | + | {| {{prettytable}} |
| − | | max. | + | | max. activation current: |
| 100 mA | | 100 mA | ||
| − | | | + | | continuous |
| − | + | ||
|- | |- | ||
| − | | max. | + | | max. applied voltage: |
| 200 V | | 200 V | ||
| peak | | peak | ||
| − | |||
|- | |- | ||
| − | | | + | | cut-off current: |
| <nowiki><1 mA</nowiki> | | <nowiki><1 mA</nowiki> | ||
| − | | for | + | | for 200 V |
| − | + | ||
|- | |- | ||
| output capacity: | | output capacity: | ||
| 25 pF | | 25 pF | ||
| for signal 50 V; f=1 MHz | | for signal 50 V; f=1 MHz | ||
| − | |||
|} | |} | ||
| − | + | </center> | |
| − | '' | + | '''''WARNING: ''''' |
| + | ''If you are using TelefonCTI the AUDIO OUT socket in the CTS-202.IP system phone is used for connecting the phone directly with line or microphone input on the computer's sound card. | ||
| − | = Phone | + | = Phone Settings = |
| − | + | {| {{prettytable}} | |
| − | + | ||
| − | + | ||
| − | {|{{ | + | |
| '''Ringing tone''' | | '''Ringing tone''' | ||
| − | | | + | | You may choose from among five ringer signals. |
| − | + | ||
|- | |- | ||
| − | | '''Ringing | + | | '''Ringing Volume''' |
| − | | This function | + | | This function allows either selecting from among seven ringer volume levels (incoming call signals) or switching off the ringer. |
| − | + | ||
|- | |- | ||
| '''Contrast''' | | '''Contrast''' | ||
| − | | | + | | You may configure the optimum visibility on the LCD display. |
| − | + | ||
|- | |- | ||
| '''Language''' | | '''Language''' | ||
| − | | | + | | The phone enables displaying messages in different languages. The Polish language is the default setting. |
| − | + | ||
|- | |- | ||
| '''Auto answer''' | | '''Auto answer''' | ||
| − | | | + | | The phone ensures automatic receipt of incoming calls: it will switch on the sonic circuit of either the headphone or 'Hands Free' system. You need not be involved. The call will be disconnected after 5 seconds from the moment the call originator has hung up the phone. |
| − | + | ||
|- | |- | ||
| '''Auto dial''' | | '''Auto dial''' | ||
| − | | Automatic number | + | | Automatic number dialling: press (for one second) and release the programmable key that is dedicated to an extension number or directory numbers. You need not pick up the handset. |
| − | + | ||
|- | |- | ||
| − | | ''' | + | | '''Amplification''' |
| − | + | | '''Sp-ph power''' adjustment of 'Hands Free' or headphone (if active) loudspeaker volume. '''Handset power''' adjustment of the handset loudspeaker volume. | |
| − | + | ||
| − | | '''Sp-ph power''' | + | |
| − | + | ||
| − | '''Handset power''' | + | |
| − | + | ||
|- | |- | ||
| '''Own number''' | | '''Own number''' | ||
| − | | | + | | Presentation of the number that has been assigned to your phone at the PBX level. |
| − | + | ||
|- | |- | ||
| '''Outgoing digit''' | | '''Outgoing digit''' | ||
| − | | | + | | You can program a flag digit that should be dialled when you make an outgoing call (usually '0'). This setting is required for correctly redialling the received and missed calls as well as for dialling directory phone numbers. |
| − | + | ||
|- | |- | ||
| '''Headphones''' | | '''Headphones''' | ||
| − | | | + | | This feature allows switching on/off the headphones. If the headphones are ON, press the '''SPK ON''' button to hear the acoustic signals in the headphones instead of the 'Hands Free' speakerphone. |
| − | + | ||
|- | |- | ||
| − | | ''' | + | | '''Telephone name''' |
| − | | | + | | Using this option you can enter a phone name (e.g. secretary) which will be displayed on the standby screen. |
| − | + | ||
|- | |- | ||
| '''Factory settings''' | | '''Factory settings''' | ||
| − | | This | + | | This feature will delete all your current settings. You must not forget that it will also delete any and all numbers saved to your personal directory and to dedicated keys. |
| − | + | |- | |
| + | | '''Program version''' | ||
| + | | You can view the phone firmware release number. | ||
|- | |- | ||
| − | |||
| − | |||
| − | |||
|} | |} | ||
| − | = Phone | + | = Phone Operations = |
| + | == Phone Menu (navigation through the phone menu) == | ||
| + | To navigate via the phone menu, use the keys located in the top part of the keypad under the display. The functions are saved to every key. | ||
| − | |||
| − | |||
| − | |||
| − | |||
| − | |||
| − | |||
| − | |||
| − | |||
| − | |||
| − | |||
| − | |||
| − | |||
| − | |||
| + | <center>[[Image:Io_cts_prawo.png]] [[Image:Io_cts_lewo.png]]<br> | ||
| + | [[Image:Io_cts_gora.png]]<br><br> | ||
| + | [[Image:Io_cts_dol.png]] | ||
| + | </center> | ||
| + | The system will present them on the display and change descriptions in real time, depending on the menu item. | ||
| − | {|{{ | + | {| {{prettytable}} |
| − | | | + | | [[Image:Io_cts_prawo.png]] |
| − | | | + | | The main context-related key functions are: |
* '''Menu''' | * '''Menu''' | ||
| Line 992: | Line 986: | ||
* '''Save''' | * '''Save''' | ||
| − | + | The current key function is displayed on the left side above the key. | |
|- | |- | ||
| − | | | + | | [[Image:Io_cts_lewo.png]] |
| − | | | + | | The main context-related key functions are: |
| − | * ''' | + | * '''Directory''' |
* '''Back''' | * '''Back''' | ||
* '''Exit''' | * '''Exit''' | ||
| − | + | The current key function is displayed on the right side above the key. | |
| − | + | ||
|- | |- | ||
| − | | | + | | [[Image:Io_cts_gora.png]] |
| − | | * Scrolling up | + | | * Scrolling up the menu. |
| − | * | + | * If you press down this button in the standby mode: |
| − | + | ||
| − | + | ||
| − | + | ||
| + | * once, you will enter your personal directory, | ||
| + | * twice - you will enter the public directory <ref name="ftn1">Provided the subscriber has acquired the right to access the public directory (this right is assigned by the administrator).</ref> | ||
|- | |- | ||
| − | | | + | | [[Image:Io_cts_dol.png]] |
| − | | * Scrolling down | + | | |
| − | * | + | * Scrolling down the menu. |
| + | * If you press down this key in the standby mode, you will enter the list of extension numbers. | ||
|} | |} | ||
| − | == Quick return to main screen | + | == Quick Return to the Main Screen == |
| + | You may leave any menu item at once and immediately return to the main screen (for instance, if you want to view the presentation of an incoming call number). To do so, press '''''SPK OFF'''''. | ||
| + | == Function Buttons == | ||
| + | The phone is equipped with function buttons designed for support manufacturer-defined programmable features. | ||
| − | |||
| − | + | {| {{prettytable}} | |
| − | + | | [[Image:Io_cts_flash.png]] | |
| − | + | ||
| − | + | ||
| − | + | ||
| − | + | ||
| − | + | ||
| − | + | ||
| − | + | ||
| − | {|{{ | + | |
| − | | [[Image: | + | |
| Flash | | Flash | ||
| − | | | + | | This button supports a selection of PBX services or dialling another subscriber during an active call. If you press this button in the standby mode, you will enter the '''Menu >> Services'''. |
|- | |- | ||
| − | | [[Image: | + | | [[Image:Io_cts_redial.png]] |
| Redial | | Redial | ||
| − | | | + | | If you press this button in the standby mode: |
| − | + | ||
| − | + | ||
| + | * once, the system will display the list of the last dialled numbers; | ||
| + | * twice, the system will display the list of received calls, and | ||
| + | * three times, the system will display the list of missed calls. | ||
|- | |- | ||
| − | | [[Image: | + | | [[Image:Io_cts_spk_on.png]] |
| SPK ON | | SPK ON | ||
| − | | * | + | | |
| + | * This button switches on the 'Hands Free' mode. | ||
| − | * | + | * You will be able to receive a call when the ringer is on. |
| − | + | ||
| − | + | ||
| + | * You will be able to initiate the call in the case of "cold" dialling (handset on the cradle). | ||
|- | |- | ||
| − | | [[Image: | + | | [[Image:Io_cts_spk_off.png]] |
| SPK OFF | | SPK OFF | ||
| − | | * | + | | |
| − | * | + | * This button switches off the 'Hands Free' mode or disconnects the call if the handset is picked up. |
| − | * | + | * It will cancel the call when the ringer is on. |
| − | * | + | * It will immediately exit the phone menu if you stay in any menu item. |
| − | + | * It will delete all the missed calls (no need to view the details) if the phone saves such calls. | |
|- | |- | ||
| − | | [[Image: | + | | [[Image:Io_cts_mute.png]] |
| − | | | + | | Microphone OFF |
| − | | * | + | | |
| − | * | + | * This button will switch off the handset microphone or the speakerphone in 'Hands Free' mode ('Hands Free' mode or external loudspeaker). <ref name="ftn2">The ''CTS-202.IP'' phone does not feature a 'Hands Free' mode microphone</ref>. If you press it again, the system will switch on the microphone. |
| − | + | * If an ACD group is present in the PBX, this key will display the view of this ACD group status. The feature depends on the specific configuration of the CTS telephone display status in the ''ConfigMAN'' application; the service should be programmed by the service team during installation of the PBX. The system displays the number of parameters such as: number of waiting calls; number of active calls; call waiting time; average call time; number of available agents. | |
|- | |- | ||
| − | | [[Image: | + | | [[Image:Io_cts_regulation-.png]] |
| − | | | + | | Control Button |
| − | | * | + | | |
| − | * | + | * In the standby mode and for the period of ringing, this button will decrease the ringing volume. |
| − | * | + | * For the period of call setting and calling the button will decrease the calling volume of the handset, 'Hands Free' or active headphone systems. |
| − | + | * To adjust the options in '''Menu >> Settings >> Volume >> Hands Free Loudspeaker / Speakerphone.''' | |
|- | |- | ||
| − | | [[Image: | + | | [[Image:Io_cts_regulation+.png]] |
| − | | | + | | Control Button |
| − | | * | + | | |
| − | * | + | * In the standby mode and for the period of ringing, this button will increase the ringing volume. |
| − | * ''' | + | * For the period of call setting and calling the button will increase the calling volume of the handset, 'Hands Free' or active headphone systems. |
| − | + | * To adjust the options in '''Menu >> Settings >> Volume >> Hands Free Loudspeaker / Speakerphone.''' | |
|} | |} | ||
| − | == Menu | + | == Menu Structure == |
| − | + | ||
| − | + | ||
| − | + | ||
{| class="prettytable" | {| class="prettytable" | ||
| Call register ('''1''') | | Call register ('''1''') | ||
| + | | | ||
| | | | ||
|- | |- | ||
| | | | ||
| − | | | + | | Missed calls('''1''') |
| + | | | ||
|- | |- | ||
| | | | ||
| − | | Received calls('''2''') | + | | Received calls ('''2''') |
| + | | | ||
|- | |- | ||
| | | | ||
| − | | Dialed numbers ('''3''') | + | | Dialed numbers ('''3''') |
| + | | | ||
|- | |- | ||
| | | | ||
| Erase last call ('''4''') | | Erase last call ('''4''') | ||
| + | | | ||
|- | |- | ||
| | | | ||
| Last call time ('''5''') | | Last call time ('''5''') | ||
| + | | | ||
|- | |- | ||
| | | | ||
| − | | Last call cost ('''6''') | + | | Last call cost ('''6''') |
| + | | | ||
|- | |- | ||
| − | | Program keys('''2''') | + | | Program keys ('''2''') |
| + | | | ||
| | | | ||
|- | |- | ||
| | | | ||
| − | | Press a key | + | | Press a key |
| + | | | ||
|- | |- | ||
| | | | ||
| Set default | | Set default | ||
| + | | | ||
|- | |- | ||
| Services ('''3''') | | Services ('''3''') | ||
| + | | | ||
| | | | ||
| Line 1,136: | Line 1,131: | ||
| | | | ||
| Call forward. ('''1''') | | Call forward. ('''1''') | ||
| + | | | ||
|- | |- | ||
| | | | ||
| Don't disturb ('''2''') | | Don't disturb ('''2''') | ||
| + | | | ||
|- | |- | ||
| | | | ||
| Urgent call ('''3''') | | Urgent call ('''3''') | ||
| + | | | ||
|- | |- | ||
| | | | ||
| − | | Phone lock ('''4''') | + | | Phone lock('''4''') |
| + | | | ||
|- | |- | ||
| | | | ||
| Temporarily CLIR ('''5''') | | Temporarily CLIR ('''5''') | ||
| + | | | ||
|- | |- | ||
| | | | ||
| Park ('''6''') | | Park ('''6''') | ||
| + | | | ||
|- | |- | ||
| | | | ||
| 3PTY ('''7''') | | 3PTY ('''7''') | ||
| + | | | ||
|- | |- | ||
| | | | ||
| − | | Fixed account('''8''') | + | | Fixed account ('''8''') |
| + | | | ||
|- | |- | ||
| | | | ||
| Urgent ringing ('''9''') | | Urgent ringing ('''9''') | ||
| + | | | ||
|- | |- | ||
| | | | ||
| Call intercept. ('''10''') | | Call intercept. ('''10''') | ||
| + | | | ||
|- | |- | ||
| | | | ||
| Private call ('''11''') | | Private call ('''11''') | ||
| + | | | ||
|- | |- | ||
| | | | ||
| Working mode ('''12''') | | Working mode ('''12''') | ||
| + | | | ||
|- | |- | ||
| | | | ||
| MCID ('''13''') | | MCID ('''13''') | ||
| + | | | ||
|- | |- | ||
| | | | ||
| Voicemail ('''14''') | | Voicemail ('''14''') | ||
| + | | | ||
|- | |- | ||
| | | | ||
| Conference ('''15''') | | Conference ('''15''') | ||
| + | | | ||
| + | |||
| + | |- | ||
| + | | | ||
| + | | MobilePhone ('''16''') | ||
| + | | | ||
|} | |} | ||
| − | |||
{| class="prettytable" | {| class="prettytable" | ||
| Settings ('''4''') | | Settings ('''4''') | ||
| + | | | ||
| | | | ||
| Line 1,203: | Line 1,218: | ||
| | | | ||
| Ringing tone ('''1''') | | Ringing tone ('''1''') | ||
| + | | | ||
|- | |- | ||
| | | | ||
| Ringing volume ('''2''') | | Ringing volume ('''2''') | ||
| + | | | ||
|- | |- | ||
| | | | ||
| Contrast ('''3''') | | Contrast ('''3''') | ||
| + | | | ||
|- | |- | ||
| | | | ||
| Language ('''4''') | | Language ('''4''') | ||
| + | | | ||
|- | |- | ||
| | | | ||
| Auto answer ('''5''') | | Auto answer ('''5''') | ||
| + | | | ||
|- | |- | ||
| | | | ||
| Auto dial ('''6''') | | Auto dial ('''6''') | ||
| + | | | ||
|- | |- | ||
| | | | ||
| Amplification ('''7''') | | Amplification ('''7''') | ||
| + | | | ||
|- | |- | ||
| | | | ||
| Own number ('''8''') | | Own number ('''8''') | ||
| + | | | ||
|- | |- | ||
| | | | ||
| Outgoing digit ('''9''') | | Outgoing digit ('''9''') | ||
| + | | | ||
|- | |- | ||
| | | | ||
| Headphones ('''10''') | | Headphones ('''10''') | ||
| + | | | ||
|- | |- | ||
| | | | ||
| Telephone name ('''11''') | | Telephone name ('''11''') | ||
| + | | | ||
|- | |- | ||
| | | | ||
| − | | Factory settings ('''12''') | + | | Factory settings ('''12''') |
| + | | | ||
|- | |- | ||
| | | | ||
| Program version ('''13''') | | Program version ('''13''') | ||
| + | | | ||
|- | |- | ||
| − | | | + | | Bluetooth ('''5''') <nowiki>*</nowiki> |
| + | | | ||
| | | | ||
|- | |- | ||
| | | | ||
| − | | | + | | Switch BT on/off ('''1''') |
| + | | | ||
|- | |- | ||
| | | | ||
| − | | | + | | Register headphone ('''2''') |
| + | | | ||
|- | |- | ||
| | | | ||
| − | | Status ('''3''') | + | | Status('''3''') |
| + | | | ||
| + | |||
| + | |- | ||
| + | | | ||
| + | | | ||
| + | | | ||
|} | |} | ||
| Line 1,272: | Line 1,309: | ||
{| class="prettytable" | {| class="prettytable" | ||
| VoIP ('''5''')<nowiki>**</nowiki> | | VoIP ('''5''')<nowiki>**</nowiki> | ||
| − | | | + | | |
| + | | | ||
|- | |- | ||
| | | | ||
| − | | Network settings ('''1''') | + | | Network settings ('''1''') |
| + | | | ||
|- | |- | ||
| | | | ||
| − | | VoIP server ('''2''') | + | | VoIP server ('''2''') |
| + | | | ||
|- | |- | ||
| | | | ||
| Codec ('''3''') | | Codec ('''3''') | ||
| + | | | ||
|- | |- | ||
| | | | ||
| Status''' '''('''4''') | | Status''' '''('''4''') | ||
| + | | | ||
|} | |} | ||
| + | <nowiki>*</nowiki> - this menu is available only in CTS-202.BT phones | ||
| − | + | <nowiki>**</nowiki> - this menu is available only in CTS-202.IP phones | |
| − | + | ||
| − | <nowiki>** </nowiki>- menu available only in CTS-202.IP phones | + | |
| − | + | ||
| − | + | ||
| − | + | ||
| − | + | ||
| − | + | ||
| − | + | ||
| − | + | ||
| − | + | ||
| − | + | ||
| − | + | ||
| − | + | ||
| − | + | ||
| − | + | ||
| − | + | ||
| − | + | ||
| − | + | ||
| − | + | ||
| − | + | ||
| − | + | ||
| − | + | == Quick Navigation via Menu == | |
| + | You can quickly go to a selected menu item using a special shortcut. | ||
| − | |||
| − | |||
| − | + | {| class="prettytable" | |
| − | + | ||
| − | + | ||
| − | + | ||
| − | + | ||
| − | + | ||
| − | + | ||
| − | + | ||
| − | + | ||
| <center>1</center> | | <center>1</center> | ||
| − | | | + | | Press '''Menu.''' |
| − | + | |- | |
| + | | | ||
| + | | | ||
|- | |- | ||
| <center>2</center> | | <center>2</center> | ||
| − | | | + | | Type the code of the menu item you want to select: for instance, if you want to open the '''Settings >> Own number''' menu, select 4 and next, 8. |
| − | + | ||
|- | |- | ||
| − | | | + | | |
| − | | | + | | |
| − | + | ||
| − | + | ||
| − | + | ||
| − | + | ||
| − | + | ||
|} | |} | ||
| − | |||
| − | = | + | = Receiving and finishing a call = |
| + | {| class="prettytable" | ||
| + | | <center>1</center> | ||
| + | | The incoming call is announced by the ringer, flashing LED strip, and display of the number or subscriber name on the screen. | ||
| − | + | |- | |
| − | + | | | |
| − | | | + | | |
| − | | | + | |
|- | |- | ||
| <center>2</center> | | <center>2</center> | ||
| − | | | + | | If you want to refuse a call, press '''SPK OFF ''' or the left context key ''Options'', and then select '''Reject'''. In this case the call will be saved to the '''Received Calls''' category (see section 3.3). |
| + | |||
| + | |- | ||
| + | | | ||
| + | | | ||
|- | |- | ||
| <center>3</center> | | <center>3</center> | ||
| − | | | + | | If you wish to decrease the volume of the incoming call ringer, press the '''Mute''' button. Once the call originator hangs up the handset, the call will also be saved to the '''Received Calls'''category. |
|- | |- | ||
| − | | | + | | |
| − | | | + | | |
| − | | | + | |- |
| + | | <center>3</center> | ||
| + | | If you wish to receive the call, pick up the handset or press the '''SPK ON''' button to go to the 'Hands Free' mode. | ||
| − | + | |- | |
| + | | | ||
| + | | | ||
| − | + | |- | |
| + | | <center>4</center> | ||
| + | | Having set the call, start talking. | ||
| + | |- | ||
| + | | | ||
| + | | | ||
| + | |- | ||
| + | | <center>5</center> | ||
| + | | If you wish to terminate the call, hang up the handset or press the '''SPK OFF''' button. | ||
| − | + | |- | |
| + | | | ||
| + | | | ||
| − | + | |} | |
| − | + | = Dialling Numbers on the Phone Keypad = | |
| + | == Hot Dialling == | ||
| − | + | <center> | |
| + | {| {{prettytable}} | ||
| + | | 1 | ||
| + | | Pick up the handset or press the '''SPK ON'''[[image:Io_cts_spk_on.png]] button. | ||
| + | |- | ||
| + | | 2 | ||
| + | | Dial the number you wish to call. | ||
| + | |- | ||
| + | | 3 | ||
| + | | Having set the call, start talking.[[image:Mowa.jpg]] | ||
| + | |- | ||
| + | |- | ||
| + | | 4 | ||
| + | | If you wish to terminate the call, hang up the handset or press the '''SPK OFF''' button.[[image:Io_cts_spk_off.png]] | ||
| + | |} | ||
| + | </center> | ||
| + | Once you pick up the handset, the phone leaves you 15 seconds for dialling the number (from the directory or keypad). After 15 seconds the PBX will play the unavailable signal. | ||
| + | == “Cold” Dialling == | ||
| − | + | <center> | |
| + | {| {{prettytable}} | ||
| + | | 1 | ||
| + | | Dial the number you wish to call. | ||
| + | |- | ||
| + | | 2 | ||
| + | | Pick up the handset or press the '''SPK ON'''[[image:Io_cts_spk_on.png]] button. | ||
| + | |- | ||
| + | | 3 | ||
| + | | Having set the call, start talking.[[image:Mowa.jpg]] | ||
| + | |- | ||
| + | | 4 | ||
| + | | If you wish to terminate the call, hang up the handset or press the '''SPK OFF'''[[image:Io_cts_spk_off.png]] button. | ||
| + | |- | ||
| + | |} | ||
| + | </center> | ||
| + | = Dialling from the Lists = | ||
| + | == Quick Dialling of the Last Dialled Number == | ||
| + | {| class="prettytable" | ||
| + | | 1 | ||
| + | | Press the '''REDIAL''' button. The phone will display the last dialled number which will be the first item on the last-dialled numbers list; you can browse the list using the [[Image:Io_cts_gora.png]] / [[Image:Io_cts_dol.png]]) keys. | ||
| + | |- | ||
| + | | 2 | ||
| + | | Pick up the handset or press the '''SPK ON'''[[image:Io_cts_spk_on.png]] button. | ||
| + | |- | ||
| + | | 3 | ||
| + | | Having set the call, start talking.[[image:Mowa.jpg]] | ||
| + | |- | ||
| + | | 4 | ||
| + | | If you wish to terminate the call, hang up the handset or press the '''SPK OFF'''[[image:Io_cts_spk_off.png]] button. | ||
| + | |- | ||
| + | |} | ||
| − | + | == Dialling Extension Numbers from the Subscriber List == | |
| − | + | {| class="prettytable" | |
| + | | 1 | ||
| + | | The phone must be set in the standby mode. Press [[Image:Io_cts_dol.png]] (down arrow key). | ||
| + | |- | ||
| + | | 2 | ||
| + | | Type in the initial letters of the entry. The system will go to the beginning of the group with these initial letters. | ||
| + | |- | ||
| + | | 3 | ||
| + | | Scroll the subscriber list up or down until you find your entry. | ||
| + | |- | ||
| + | | 4 | ||
| + | | Pick up the handset or press the '''SPK ON'''[[Image:Io_cts_spk_on.png]] button. | ||
| + | |- | ||
| + | |} | ||
| + | === Presentation of the Extension Number Status === | ||
| + | If you select a single subscriber or subscriber group from the list of PBX extension numbers, the system will display the busy status on the screen. In the case of a group, the 'busy' status will be displayed if all the phones in this group are busy and the waiting queue is full. | ||
| − | + | The subscriber list will contain no subscribers without any comments. Select the left context key '''Pr. key'' '''''(Program key) when browsing the list of subscribers and the system will go to the option of assignment of a specific subscriber to the quick dial key. | |
| + | <center> | ||
| + | {|{{CTS}} | ||
| + | | | ||
| + | ---Extension numbers--- | ||
| + | Subscriber name | ||
| + | 1044 | ||
| + | Subscriber (Free) | ||
| + | |||
| + | Program Back | ||
| + | |} | ||
| + | </center> | ||
| − | + | == Call History (Call Register) == | |
| + | The call register is a cache record of the last calls initiated from a specific phone. | ||
| + | Such calls are saved to the categories specified below: | ||
| − | + | * Missed calls; | |
| + | * Received calls, and | ||
| + | * Dialled numbers. | ||
| + | If you want to call a number that has been saved to the call history: | ||
| − | + | {| class="prettytable" | |
| + | | <center>1</center> | ||
| + | | Select '''Menu >> Call Register >> Missed, Received Calls '''or '''Dialled Numbers'''. | ||
| + | |- | ||
| + | | <center>2</center> | ||
| + | | Dial the number you wish to call. | ||
| + | |- | ||
| + | | <center>3</center> | ||
| + | | Pick up the handset or press the '''SPK ON'''[[Image:Io_cts_spk_on.png]] button. | ||
| + | |} | ||
| − | + | Similar functionality is available by pressing the redial key [[Image:Io_cts_redial.png]] and then up/down key [[Image:Io_cts_gora.png]] [[Image:Io_cts_dol.png]] | |
| + | Pressing "Redial" several times toggles specific call lists, i.e.:<br> | ||
| + | * First press displays the last-dialled numbers list. | ||
| + | * Second press displays the list of received calls. | ||
| + | * Third press displays the list of missed calls. | ||
| + | = Use of Speed Access Keys = | ||
| + | The quick dial keys are programmable backlit keys grouped in a column on the right of the CTS-202.CL, CTS-202., CTS-202.IP system phones and on the additional consoles dedicated for these phones. | ||
| − | |||
| − | + | <center>[[Image:Io_cts_all.png]] </center> | |
| − | |||
| − | |||
| − | |||
| + | The term 'programmable' means you can dedicate each of these keys to the parameters specified below: | ||
| − | |||
| − | + | * Extension number (subscriber, account, or group), | |
| − | + | * Entry shortcut (personal or public directory), | |
| − | + | ||
| − | + | ||
| − | + | ||
| − | + | ||
| − | + | ||
| − | + | ||
| − | + | ||
| − | + | ||
| − | + | ||
| − | + | ||
| − | + | ||
| − | + | ||
| − | + | ||
| − | + | ||
| − | + | ||
| − | + | ||
| − | + | ||
| − | * | + | |
| − | * Entry | + | |
* Service, | * Service, | ||
| − | * Function, | + | * Function, and |
| − | * Line (trunk or trunk group status | + | * Line (trunk status signal or trunk group status signalling): this parameter may be programmed by the PBX administrator only.<br/> |
| − | + | ||
| − | + | ||
| − | + | ||
| + | If the key is not programmed, its LED will remain OFF. If you press this key for a short period of time, the system will display a message reading that no feature has been assigned to this key. | ||
<center> | <center> | ||
{|{{CTS}} | {|{{CTS}} | ||
| | | | ||
| − | Key | + | Key (F8) |
Free | Free | ||
| Line 1,456: | Line 1,554: | ||
|} | |} | ||
</center> | </center> | ||
| + | The following sections will show you how to program and use the quick dial keys as well as how to interpret their LED signalling code. We will use either the terms 'key' or 'button'. Where you find a command "'''press and hold a key/button'''”, it will mean you have to press a key and hold it for about three seconds until a specific feature becomes active. | ||
| − | + | == Speed Access Key Programming == | |
| − | + | <center> | |
| − | + | {| {{prettytable}} | |
| − | == Programming | + | | 1 |
| − | + | | [[Image:io cts-202 fragment telefonu i konsoli.png]] | |
| − | + | | Select and press the quick dial key on the phone or console. | |
| − | + | ||
| − | + | ||
| − | {|{{ | + | |
| − | | | + | |
| − | | | + | |
| − | | | + | |
| − | + | ||
|- | |- | ||
| − | | | + | | 2 |
| − | | | + | | Change<br> |
| − | + | [[Image:Io_cts_prawo.png]] | |
| − | + | | Press the '''''Change''''' key. | |
| − | | Press '''''Change '''''key. | + | |
| − | + | ||
|- | |- | ||
| − | | | + | | 3 |
| − | | | + | | [[Image:Io_cts_gora.png]]<br> |
| − | + | or<br> | |
| − | + | [[Image:Io_cts_dol.png]] | |
| − | + | | Select the type of function to be programmed for the key: | |
| − | + | ||
| − | | Select | + | |
| − | * '''Extension number'''(subscriber, | + | * '''Extension number '''(subscriber, account, or groups), |
| − | * ''' | + | * '''Entry shortcut''' (personal or public directory), |
* '''Service''', | * '''Service''', | ||
* '''Function''' | * '''Function''' | ||
| − | and press | + | and press the '''''Select''''' context key. |
| − | After selecting | + | After selecting the type specify the extension number, shortcut, service or function you want to assign to the key. |
| + | |- | ||
| + | | 4 | ||
| + | | Save | ||
| + | [[Image:Io_cts_prawo.png]] | ||
| + | | Confirm the selected entry. | ||
|- | |- | ||
| − | |||
| − | |||
| − | |||
| − | |||
| − | |||
| − | |||
|} | |} | ||
| + | </center> | ||
| − | + | You can do the same from the phone menu: select '''''Menu / Keys / Select Key'''''. | |
| − | + | Assignment of translation or the trunk quick selection function to a quick dial key is allowed to the PBX administrator only. | |
| − | == Speed access | + | == Speed access Keys: Subscribers and accounts == |
| + | Interpretation of the LED Colour Code. | ||
| − | + | Speed access keys may be dedicated to specific extension numbers or subscriber accounts. Their LEDs will let you know the status of particular subscribers or accounts by means of a special colour code as follows: | |
| + | * '''OFF''': the subscriber/account is available, | ||
| + | * '''Continuous light''': the subscriber/account is busy at this time, | ||
| + | * '''Even flashing''': the subscriber/account is being called, and | ||
| + | * '''Odd flashing at irregular intervals''': nobody calls this account or the subscriber has activated the DND service. | ||
| − | + | '''''IMPORTANT!''''' In the case of subscriber accounts, the LED signalling code will apply to the key dedicated to the account and to the subscriber whose phone is used for calling the account. | |
| − | |||
| − | |||
| − | |||
| − | |||
| + | Using the Keys. | ||
| − | |||
| − | + | * Press and release the preset subscriber/account key. The system will display information on this subscriber/account <ref name="ftn3">Provided no [#Auto dial Auto dial] function has been set on this phone. </ref>. | |
| + | * Press and hold the preset subscriber/account key. The system will call up this subscriber/account provided it is free. If the caller activates the function '''''Urgent Ringing''''', the target phone will answer by means of a special ringing (analogue telephones) or the call will be immediately forwarded to the loudspeaker (if the subscriber has a CTS system phone). | ||
| + | * Press and hold the preset subscriber/account key. If this subscriber/account is being called, your phone will intercept the call <ref name="ftn4">Provided no protection from call intercepting has been activated by the admin on this subscriber/account.</ref>. | ||
| + | == Speed Acces Keys: Groups == | ||
| + | Interpretation of the LED Colour Code. | ||
| + | Speed access keys may also be dedicated to specific groups. Their LEDs will let you know the status of particular groups: | ||
| − | + | * '''OFF''': nobody calls this group and the system has not achieved the maximum capacity of this group; | |
| − | + | * '''Continuous light''': the system has achieved the maximum capacity of this group, | |
| + | * '''Even flashing''': someone is queuing and waiting for the call. | ||
| − | Using | + | Using the Keys. |
| − | * | + | * ''Press and release the preset group key''. The system will display information on this group, especially data such as: '''''the number of queuing group agents/number of busy group agents / total capacity of the group'''''. Press and release again the same key. The system will present the next persons from the group who are waiting for setting up a call to this group, if any. If the queue is empty, you will be able to call the group: press and release the key and pick up the handset. If the queue is not empty, you will be able to intercept the call of anyone from the waiting list: pick up the handset once you see the presentation of that agent on the display. |
| − | + | * ''Press and hold the '' key. The system will call it up if the queue is empty. If the queue is not empty, you will not be able to call the group even if you press and hold the key. Instead, pick up the handset and dial the number or press the group key. | |
| − | * | + | |
| + | '''''IMPORTANT! '''''In the case of a conference group in the standby mode or in the call setup mode, the system will not present information on the group even if you press the key dedicated to this conference group; neither will it view or intercept the calls from this conference group. | ||
| − | == Speed | + | == Speed Access Keys: Phone Book Entries and Services == |
| + | Interpretation of the LED Colour Code. | ||
| + | Speed Access keys may be dedicated to phone book entries or services (such as e.g. DND, re-routing, etc.). If you dedicate a speed access key to a phone book entry, the LED '''will be always OFF'''. If you dedicate a speed access key to a service (except "Voice Mail"), its LED will let you know the status of this service: | ||
| − | + | * '''OFF''': the service is not available, and | |
| + | * '''Continuous light''': the service is available. | ||
| + | Using the Keys. | ||
| − | + | * Press and release the preset service key. The system will activate the service and display a confirmation message. Press and release this key again. The system will switch off the service. | |
| + | * Press and release the preset phone book entry key. The system will display the preset phone book entry. | ||
| + | * Press and hold the preset phone book entry key. The system will start setting up the call. | ||
| − | + | Interpretation of the LED Colour Code for Individual / Group Voice Mail. | |
| − | + | If you dedicate a key to a preset the "Voice Mail" service or to an extension number of a public voice mailbox, its LED will let you know the status of this service: | |
| − | * ''' | + | * '''OFF''': no messages (subscriber / public mailbox is empty); |
| + | * '''Slow flashing '''(1 sec. light/1 sec. break): new messages (the records have not been played); | ||
| + | * '''Continuous light''': the records have been played, and | ||
| + | * '''Quick flashing '''(0.5 sec. light/0.5 sec. break): subscriber/public mailbox is full. | ||
| + | Using the Preset Individual / Group Voice Mail Key. Press down and release the preset key. | ||
| − | + | * Short press of the key will display the mail directory number <nowiki>(similar to the preset subscriber key) and information on the number of messages [number of new (not played) messages/number of all messages]</nowiki><ref name="ftn5">If you pick up the handset or press the '''SPK ON''' button when the phone displays these data, the system will connect you to voice mail.</ref>. | |
| + | * Press and hold the "Voice Mail" service preset key. The system will activate this service and display the confirmation message. Press and hold this key again. The system will switch off this service. | ||
| + | * Press and hold the mailbox extension number preset key. The system will set up the call to the group voice mail. | ||
| + | == Speed Access Keys: Functions == | ||
| + | You may dedicate speed access keys to the features specified below: | ||
| − | + | # '''Personal phone book''': access to the entries saved to the personal phone book (shortcut to the first option of the '''''Book''''' menu); | |
| − | + | # '''Public phone book''': access to the entries saved to the public directory (shortcut to the second option of the '''''Book''''' menu); | |
| + | # '''Search''' - search for names in the personal and public phone books (shortcut to the third option of the '''''Books''''') menu); | ||
| + | # '''Headphone''': headphone ON/OFF (or else, select '''Menu >> Settings >> Headphone >> ON/OFF'''), | ||
| + | # '''Auto answer''' - switching on/off the [#Auto answer Auto answer] function (or else select '''Menu >> Settings>> Auto answer >> Yes/No'''). | ||
| − | + | Interpretation of the LED Colour Code. | |
| − | + | If you dedicate the key to Functions No. '''1÷3''', the LED '''will be always OFF'''. | |
| − | + | If you dedicate the key to Function No. '''4''', the LED will let you know the status: | |
| + | * '''OFF''': the headphone is OFF, and | ||
| + | * '''Continuous light''': the headphones are ON (and additionally, letter '''H''' is shown on the display). | ||
| + | If you dedicate the key to Function No. '''5''', the LED will let you know the status: | ||
| − | + | * '''OFF''': the automatic call receipt is OFF, and | |
| + | * '''Continuous light''' – the automatic call receipt is ON (and additionally, letter '''A''' is shown on the display). | ||
| − | + | Using the Keys. | |
| − | * ''' | + | * Press and release the preset Function '''1÷3''' key. The system will display a corresponding '''''Book''''' menu option.<br> |
| − | * ''' | + | Using the keys '''Up''' or '''Down''' search the required item in the phone book. The record can also be searched by entering the name using the numerical keyboard. |
| + | Pick up the handset or press the '''SPK ON '''button to dial the currently selected number from the phone book. | ||
| + | * Press and release the preset Function '''4''' or '''5'''. The system will switch on this function and show the corresponding confirmation letter on the phone display. Press and release this key again. The system will switch off this function. | ||
| + | == Speed Access Keys: Lines == | ||
| + | The speed access keys may be dedicated to individual external lines that are connected with the PBX. The term "lines" means either individual trunks or trunk groups. | ||
| − | |||
| − | + | '''''IMPORTANT! '''Speed access keys may be dedicated to the lines only by the admin at the PBX level. This procedure is not feasible at the phone level. '' | |
| − | + | ||
| − | + | ||
| − | LED | + | Interpretation of the LED Colour Code. |
| − | + | The preset line key LEDs will let you know the status of individual lines: | |
| − | * ''' | + | * '''OFF''': the line is free; |
| − | * ''' | + | * '''Continuous light''': the line is busy; |
| − | * ''' | + | * '''even flashing''' '''quick''' (0.5 sec /0.5 sec) – the line is damaged, and |
| − | * ''' | + | * '''even flashing''' '''slow''' (1 sec /1 sec) – the line is being called. |
| + | Using the Keys. | ||
| − | + | * Press and release the preset line key. The system will display information on this line, especially data on the line name and busy status. | |
| + | * Press and hold the preset line key. The system will book the line in order to set up the call by means of this line. To make this call, pick up the handset or press down the SPK ON button and dial the number you want to contact. | ||
| + | * If you pick up the handset when you view the status of the line you are calling, the system will intercept the call. | ||
| − | + | == Speed access Keys: Benefits == | |
| − | + | === Viewing and changing the Dedicated Keys === | |
| − | + | If you wish to view the assignment of a programmable key, set up the standby mode, press down the '''''Menu''''',''''' ''''' and then, press your programmable key. The system will display information on this key. Now you can change the assignment: press the left '''''Change''''' context key. | |
| + | === Call Interception === | ||
| + | If the key is dedicated to a subscriber number, you will be able to intercept his or her calls subject to relevant authorisation. If this subscriber is being called, just press and hold the key for about 3 seconds; the system will intercept the call and forward it to your phone. | ||
| − | + | If the key is dedicated to the "Intercept ringing" service, the system will intercept the call from any phone belonging to the same PickUP group once you press and release this key. | |
| + | === Call Transfer without Call Answering === | ||
| + | You need not answer the call. Instead, you may forward it to another subscriber or to an individual/group voice mail. Just press and hold the key dedicated to a subscriber or voice mail service/group voice mailbox extension number during an incoming call. | ||
| − | |||
| − | + | '''''IMPORTANT!''''' | |
| − | + | ||
| − | + | ||
| − | + | ||
| − | + | ||
| + | ''This option will not be available if the admin sets limits on a subscriber at the PBX level.'' | ||
| − | |||
| − | + | A connection can also be transferred to the selected phone or to a group from the subscriber directory. You can do this in two ways: | |
| − | + | '''''First method:''''' | |
| − | |||
| − | |||
| − | + | {| class="prettytable" | |
| + | | 1 | ||
| + | | If you want to forward an incoming call without answering it, press [[Image:Io_cts_dol.png]] (down arrow - go to '''Subscriber List'''). | ||
| + | |- | ||
| + | | 2 | ||
| + | | Select the number to which you want to forward the call (you may use the quick dial keys for searching the '''Subscriber List'''). | ||
| + | |- | ||
| + | | 3 | ||
| + | | Press the [[Image:Io_cts_prawo.png]] '''''Transfer''''' context key. | ||
| + | |} | ||
| + | '''''Second method:''''' | ||
| − | |||
| − | |||
| + | {| class="prettytable" | ||
| + | | 1 | ||
| + | | If you want to forward an incoming call without answering it, press the [[Image:Io_cts_prawo.png]] '''''Options''''' context key. | ||
| + | |- | ||
| + | | 2 | ||
| + | | Select the '''Forward''' option. | ||
| + | |- | ||
| + | | 3 | ||
| + | | Enter the number to which you want to forward the call or press the [[Image:Io_cts_dol.png]] key and look for the subscriber name. | ||
| + | |- | ||
| + | | 4 | ||
| + | | Press the [[Image:Io_cts_prawo.png]] '''''Transfer''''' context key. | ||
| + | |- | ||
| + | |} | ||
| − | + | === Urgent Call === | |
| + | If a key is dedicated to an extension number, press and hold this key for 3 seconds in order to call this number using the '''''Urgent Call''''' service. | ||
| − | |||
| − | |||
| + | '''''IMPORTANT! ''''' | ||
| − | + | ''The 'Urgent Call' service is available subject to specific privileges of the subscriber. In the absence of such privileges, the subscriber who wants to use this service makes the call while the recipient hears a standard tone.'' | |
| + | ''See another section of this text for another method of calling the 'Urgent Call' service.'' | ||
| + | === List of Programmable Keys === | ||
| + | The '''Keys''' menu allows viewing the status of the phone’s programmable keys. | ||
| − | |||
| + | {| class="prettytable" | ||
| + | | 1 | ||
| + | | After entering the '''Keys''' menu, press the [[Image:Io_cts_prawo.png]] '''''List''''' key. | ||
| + | |- | ||
| + | | 2 | ||
| + | | Scroll the list up and down using the '''Up/Down''' arrow keys. The system will backlight the key whose status is being viewed. | ||
| + | |- | ||
| + | | 3 | ||
| + | | If you press the '''''Change''''' key, the system will open the key programming menu. | ||
| + | |- | ||
| + | |} | ||
| − | + | = Phone books = | |
| − | |||
| + | The CTS telephones support three kinds of phone books: | ||
| − | + | * '''''Personal phone book''''': the entries to this phone book are available with this phone only; | |
| + | * '''''Public phone book''''': the entries to this phone book are available to all the PBX users, and | ||
| + | * '''''Subscriber list''''': list of all the PBX extension numbers. | ||
| − | + | Only the PBX admin is allowed to update the subscriber list. Phone books are saved to the PBX and will not be lost in the case of phone replacement or failure. | |
| − | + | ==Search for Internal numbers in Subscriber list== | |
| − | + | {| class="prettytable" | |
| − | + | | 1 | |
| − | + | | Press Arrow key down key. | |
| + | |- | ||
| + | | | ||
| + | | | ||
| − | + | |- | |
| + | | 2 | ||
| + | | Enter part of the name you are looking for or select desired subscribers group. | ||
| − | + | |- | |
| − | + | | | |
| − | + | | | |
| + | |- | ||
| + | | 3 | ||
| + | | Using the UP and DOWN arrow keys search for the entry among the selected entries. | ||
| − | + | |- | |
| + | | | ||
| + | | | ||
| + | |} | ||
| − | + | After displaying searched subscriber, user can call it by picking the handset or assigning the contact to BLF button. | |
| + | == Search for Entries to Phone book (Personal and Public) == | ||
| − | + | {| class="prettytable" | |
| + | | 1 | ||
| + | | Press the ''' ''Book''''' context key. | ||
| + | |- | ||
| + | | 2 | ||
| + | | Select a personal or public phone book. | ||
| + | |- | ||
| + | | 3 | ||
| + | | Select the '''Search''' option. | ||
| + | |- | ||
| + | | 4 | ||
| + | | Enter part of the name you are looking for and then press '''''Search''''' context key. | ||
| + | |- | ||
| + | |} | ||
| + | == Entry to the phone book == | ||
| − | |||
| + | === Adding a New Entry to the Directory === | ||
| + | {| class="prettytable" | ||
| + | | <center>1</center> | ||
| + | | Press the '''Book''' key. | ||
| + | |- | ||
| + | | <center>2</center> | ||
| + | | Select the phone book where you want to add a new entry ('''Personal book''' or '''Public book'''). | ||
| + | |- | ||
| + | | <center>3</center> | ||
| + | | Press the '''''Options''''' key and then select '''Add name<ref name="ftn6">'''You can add new entries to the public phone book(the Add new entry option is active) provided you have acquired the applicable privileges from the PABX administrator.'''</ref>. | ||
| + | |- | ||
| + | | <center>4</center> | ||
| + | | Enter the name you wish to assign to the new entry. | ||
| + | |- | ||
| + | | <center>5</center> | ||
| + | | Go to assignment of the number. | ||
| + | |- | ||
| + | | <center>6</center> | ||
| + | | Enter the number you wish to save to the phone book. | ||
| + | |- | ||
| + | | <center>7</center> | ||
| + | | Confirm the entry. | ||
| + | |- | ||
| + | |} | ||
| + | === Saving Numbers to the Phone book during the Call === | ||
| − | |||
| + | You can add the incoming call number to the phone book during the call provided the caller has presented this number. | ||
| − | |||
| + | {| class="prettytable" | ||
| + | | 1 | ||
| + | | Press the '''''Options''''' key. | ||
| + | |- | ||
| + | | 2 | ||
| + | | Select the '''Directory''' option. | ||
| + | |- | ||
| + | |- | ||
| + | | 3 | ||
| + | | Select the '''Add to personal '''or '''Add to public''' option | ||
| + | |- | ||
| + | | 4 | ||
| + | | Enter the name you wish to assign to the number and press the '''''Number'''''key. | ||
| + | |- | ||
| + | | 5 | ||
| + | | Confirm the entry: press the '''''Save''''' key. | ||
| + | |- | ||
| + | |} | ||
| + | |||
| + | === Entry from Call History === | ||
| − | + | {| class="prettytable" | |
| + | | <center>1</center> | ||
| + | | Open the '''Call Register''' menu. | ||
| + | |- | ||
| + | | <center>2</center> | ||
| + | | Search for your specific call in the call history. | ||
| + | |- | ||
| + | | <center>3</center> | ||
| + | | Once you find this entry, press the '''''Options''''' key. | ||
| + | |- | ||
| + | | <center>4</center> | ||
| + | | Select the '''Add to personal '''or '''Add to public''' option | ||
| + | |- | ||
| + | | <center>5</center> | ||
| + | | Enter the name and confirm the entry: press the '''''Save''''' key. | ||
| + | |- | ||
| + | |} | ||
| + | == Entry Processing == | ||
| + | === How to Edit Entries === | ||
| + | You will be able to edit entries in the public phone book if you have the applicable privileges. You need no specific privileges to edit your own entries in the personal phone book. | ||
| − | |||
| − | '' | + | {| class="prettytable" |
| + | | 1 | ||
| + | | In the standby mode, open the '''''Book''''' menu. | ||
| + | |- | ||
| + | | 2 | ||
| + | | Select the directory where you want to edit the entries. | ||
| + | |- | ||
| + | | 3 | ||
| + | | Search for the entry you want to edit. | ||
| + | |- | ||
| + | | 4 | ||
| + | | Press the '''''Options'' '''key and select '''Edit'''. You can edit descriptions or numbers. | ||
| + | |- | ||
| + | | 5 | ||
| + | | Confirm changes: press the '''''Save''''' key. | ||
| + | |- | ||
| + | |} | ||
| + | === How to Copy Entries (from and to Phone books) === | ||
| − | |||
| − | + | You will be able to copy entries from and to the personal and public phone book provided you have acquired the applicable privileges to copy and save entries to the public phone book. | |
| − | 1 | + | {| class="prettytable" |
| + | | 1 | ||
| + | | In the standby mode, open the '''''Book''''' menu. | ||
| + | |- | ||
| + | | 2 | ||
| + | | Select the phone book from where you want to copy an entry. Once you confirm your selection, the system will start searching for the entries to this phone book. | ||
| + | |- | ||
| + | | 3 | ||
| + | | Find the entry you want to copy. | ||
| + | |- | ||
| + | | 4 | ||
| + | | Press the '''''Options'' '''key and select '''Copy'''. Confirm your entry. | ||
| + | |- | ||
| + | |} | ||
| − | + | === How to Move Entries (from and to Phone books) === | |
| + | You will be able to transfer the entries from and to personal and public phone book provided you have acquired the applicable privileges to save entries to the public phone book. | ||
| − | |||
| − | |||
| − | 1 | + | {| class="prettytable" |
| + | | 1 | ||
| + | | In the standby mode, press the '''''Book''''' key. | ||
| + | |- | ||
| + | | 2 | ||
| + | | Select the phone book from where you want to transfer an entry. Once you confirm your selection, the system will start searching for the entries to this phone book. | ||
| + | |- | ||
| + | | 3 | ||
| + | | Find the entry you want to transfer. | ||
| + | |- | ||
| + | | 4 | ||
| + | | Press the '''''Options'' '''key and select '''Move'''. Confirm your entry. | ||
| + | |- | ||
| + | |} | ||
| − | + | === How to Delete Entries from Phone book === | |
| + | Only a subscriber who has acquired the applicable privileges will be able to delete entries from the public phone book. | ||
| − | |||
| − | |||
| − | = | + | {| class="prettytable" |
| + | | 1 | ||
| + | | Press the '''Book''' key. Select the '''Search''' option. | ||
| + | |- | ||
| + | | 2 | ||
| + | | Enter part of the name you want to delete. | ||
| + | |- | ||
| + | | 3 | ||
| + | | If the entry displayed on the screen is not the desired one but only includes the desired phrase, then you can go to the desired element using the menu scrolling keys (up/down). | ||
| + | |- | ||
| + | | 4 | ||
| + | | Open the '''Options''' menu.''' '''Select '''Erase'''.''' '''Confirm the entry erasing operation. | ||
| + | |- | ||
| + | |} | ||
| + | === How to Dedicate Speed Access Keys === | ||
| + | If you use an entry repeatedly (you often dial an outgoing number that is saved to one of the phone books), you will find it useful to save this number to one of the speed access keys. Using a key programmed with this method is described in above. | ||
| − | |||
| − | |||
| − | |||
| − | |||
| − | |||
| − | |||
| − | |||
| − | |||
| − | |||
| − | |||
| − | |||
| − | |||
| − | |||
| − | |||
| − | |||
| − | |||
| − | |||
| − | |||
| − | |||
| − | |||
| − | |||
| − | |||
| − | |||
| − | |||
| − | + | {| class="prettytable" | |
| − | + | | 1 | |
| − | + | | In the standby mode, press the '''''Book'''''key. | |
| − | + | |- | |
| − | + | | 2 | |
| − | + | | Search for the phone book from where you wish to select the entry and assign it to a speed access key. Once you confirm your selection, the system will start searching for the entries to this phone book. | |
| − | + | |- | |
| − | + | | 3 | |
| − | + | | Search for the entry you want to assign to the key. | |
| − | + | |- | |
| − | + | | 4 | |
| − | + | | Press the '''''Options'' '''key and select '''Assign Key'''. | |
| − | + | |- | |
| − | + | | 5 | |
| − | + | | Press the key you want to dedicate to this entry. | |
| − | + | |- | |
| − | + | | 6 | |
| − | + | | Confirm your selection: press the '''''Save''''' key. | |
| − | + | |} | |
| − | + | ||
| − | + | ||
| − | + | ||
| − | + | ||
| − | + | ||
| − | + | ||
| − | + | ||
| − | + | ||
| − | + | ||
| − | + | ||
| − | + | ||
| − | + | ||
| − | + | ||
| − | + | ||
| − | + | ||
| − | + | ||
| − | + | ||
| − | + | ||
| − | + | ||
| − | + | ||
| − | + | ||
| − | + | ||
| − | + | ||
| − | + | ||
| − | + | ||
| − | + | ||
| − | + | ||
| − | 1 | + | |
| − | + | ||
| − | + | ||
| − | + | ||
| − | + | ||
| − | + | ||
| − | + | ||
| − | + | ||
| − | + | ||
| − | + | ||
| − | + | ||
| − | + | ||
| − | + | ||
| − | + | ||
| − | + | ||
| − | + | ||
| − | + | ||
| − | + | ||
| − | + | ||
| − | + | ||
| − | + | ||
| − | + | ||
| − | + | ||
| − | + | ||
| − | + | ||
| − | + | ||
| − | + | ||
| − | + | ||
| − | + | ||
| − | + | ||
| − | + | ||
| − | + | ||
| − | + | ||
| − | + | ||
| − | + | ||
| − | + | ||
| − | + | ||
| − | + | ||
| − | + | ||
| − | + | ||
| − | + | ||
| − | + | ||
| − | + | ||
| − | + | ||
| − | + | ||
| − | + | ||
| − | + | ||
| − | + | ||
| − | + | ||
| − | + | ||
| − | + | ||
| − | + | ||
| − | 2 | + | |
| − | + | ||
| − | + | ||
| − | + | ||
| − | + | ||
| − | + | ||
| − | + | ||
| − | + | ||
| − | + | ||
| − | + | ||
| − | + | ||
| − | + | ||
| − | + | ||
| − | + | ||
| − | + | ||
| − | + | ||
| − | + | ||
| − | + | ||
| − | + | ||
| − | + | ||
| − | + | ||
| − | + | ||
| − | + | ||
| − | + | ||
| − | + | ||
| − | + | ||
| − | + | ||
| − | + | ||
| − | + | ||
| − | + | ||
| − | + | ||
| − | + | ||
| − | + | ||
| − | + | ||
| − | + | ||
| − | + | ||
| − | + | ||
| − | + | ||
| − | + | ||
| − | + | ||
| − | + | ||
| − | + | ||
| − | + | ||
| − | + | ||
| − | + | ||
| − | + | ||
| − | + | ||
| − | + | ||
| − | + | ||
| − | + | ||
| − | + | ||
| − | + | ||
| − | 4 | + | |
| − | + | ||
| − | + | ||
| − | + | ||
| − | + | ||
| − | + | ||
| − | + | ||
| − | + | ||
| − | + | ||
| − | + | ||
| − | + | ||
| − | + | ||
| − | + | ||
| − | + | ||
| − | + | ||
| − | + | ||
| − | + | ||
| − | + | ||
| − | + | ||
| − | + | ||
| − | + | ||
= Services = | = Services = | ||
| + | Each of the services that are available from the PBX may be directly selected on your phone. Just pick up the handset and use the keypad. | ||
| + | See the Slican CCT-1668.S, L, EU, or MAC-6400 and CXS-0424 PBX Operations Manuals for a description of all the services and methods of selection. From this manual, you will learn how to select the services directly from your phone menu. | ||
| − | + | You can smooth this process by dedicating specific services to the programmable keys of your phone. | |
| − | + | == Call Transfer == | |
| − | + | {| class="prettytable" | |
| + | | 1 | ||
| + | | Your current call may be transfered to any subscriber registered with the PBX or an external caller provided you have acquired the applicable privileges from the PBX admin. | ||
| + | |- | ||
| + | | | ||
| + | | | ||
| − | + | |- | |
| + | | 2 | ||
| + | | To forward a call, press '''FLASH'''. | ||
| + | |- | ||
| + | | | ||
| + | | | ||
| + | |- | ||
| + | | 3 | ||
| + | | Dial the number to which you want to forward the call. | ||
| − | + | |- | |
| + | | | ||
| + | | | ||
| − | + | |- | |
| + | | 4 | ||
| + | | If you forward a call with announcement, wait until your selected subscriber answers the call. If you refrain from call announcement, immediately hang up the handset. | ||
| − | + | |- | |
| + | | | ||
| + | | '''''IMPORTANT!''''' Press the ''' FLASH''' button twice to come back to the number that awaits the transfer.''' '''Repeat the steps of the present procedure from para. 2 above in order to continue searching for the number to which you want to forward further the call. | ||
| − | + | |- | |
| + | | | ||
| + | | | ||
| − | + | |- | |
| + | | 5 | ||
| + | | Once you hang up the handset, the PABX will set up the call between the subscribers. | ||
| − | + | |- | |
| + | | | ||
| + | | | ||
| − | + | |} | |
| + | == DND Service (Do Not Disturb) == | ||
| + | The "Do Not Disturb" service locks the incoming calls on your phone. The caller will receive the message: "Subscriber unavailable now; please call again later" or your own message. The system telephone will display the following message: "Do Not Disturb". | ||
| − | + | The "Do Not Disturb" function has different effects depending on the selected number type: | |
| − | + | * If the caller selects a group number, the subscriber who has activated the DND service and who belongs to this group will be treated as a busy subscriber. | |
| + | * If the caller selects a direct number with active DND service, the caller will receive the message: "Subscriber unavailable now; please call again later." | ||
| − | + | <center>'''''IMPORTANT!'''''/</center> | |
| − | + | ||
| − | + | <center>''If the DND service is active, you will not be able to re-route any calls to this number.''</center> | |
| − | + | {| class="prettytable" | |
| − | 1 | + | | 1 |
| − | + | | Go to '''Menu >> Service >> Do not disturb >> ON/OFF'''.''' '''Confirm your option pressing down the '''''Next''''' key. | |
| − | + | |- | |
| − | + | | 2 | |
| − | ''''' | + | | Exit the '''Menu''',''' '''for instance, press the SPK OFF button. |
| + | |- | ||
| + | | 3 | ||
| + | | The system will display '''Do not disturb''' message confirming that the service is active. | ||
| + | |} | ||
| + | '''''IMPORTANT! '''If you dial a number with an active DND service, your system telephone will display the "Do Not Disturb" message.'' | ||
== Park == | == Park == | ||
| + | '''''First method:''''' | ||
| − | ''''' | + | {| class="prettytable" |
| + | | 1 | ||
| + | | Having set a call with a number or having answered an incoming call, press the '''''Options''''' key and select '''Menu >> Services >> Park'''. | ||
| + | |- | ||
| + | | 2 | ||
| + | | Wait for the message: "Service Accepted", hang up the handset or press the '''FLASH''' button to dial the number you want to contact, e.g. to talk about the parking caller. The call will be parked for 3 minutes and the subscriber on the hold will hear a musical signal. | ||
| + | |- | ||
| + | | 3 | ||
| + | | To return to a parked call, go again to the '''Menu >> Services >> Park'''. | ||
| + | |- | ||
| + | | 4 | ||
| + | | Wait for the call that is announced on the screen by the ''Return call...'' message. | ||
| + | |- | ||
| + | |} | ||
| + | '''''Second method:''''' | ||
| − | |||
| − | + | {| class="prettytable" | |
| + | | 1 | ||
| + | | Having set a call with a number or having answered an incoming call, press the '''''Park''''' key. | ||
| + | |- | ||
| + | | 2 | ||
| + | | Wait for the message: "Service Accepted", hang up the handset or press the '''FLASH''' button to dial the number you want to contact, e.g. to talk about the parking caller. The call will be parked for 3 minutes and the subscriber on the hold will hear a musical signal. | ||
| + | |- | ||
| + | | 3 | ||
| + | | To return to a parked call, press the '''''Unpark''''' key. | ||
| + | |- | ||
| + | | 4 | ||
| + | | Wait for the call that is announced on the screen by the ''Return call...'' message. | ||
| + | |- | ||
| + | |} | ||
| − | + | == Phone Locking == | |
| + | The "Phone Locking" function means that your phone has got the lowest level rights. You will be allowed to call extension or emergency numbers only (subject to the PABX-defined 'A' category). Using a locked phone you can call temporary or fixed accounts. If this function is active, you will not be able to access the phone menu, system keys, directories, or subscriber lists. The "Phone Locking" service will be valid until cancellation. | ||
| − | + | The phone may also be locked at the PABX administrator level. You cannot cancel this lock. | |
| − | |||
| − | 1 | + | {| class="prettytable" |
| + | | 1 | ||
| + | | Go to '''Menu >> Services >> Phone locking'''. | ||
| − | + | |- | |
| + | | | ||
| + | | | ||
| − | + | |- | |
| + | | 2 | ||
| + | | Switch this service on or off. Type a four-digit lock code, e.g. 6565 (the first code is assigned by the service team and you should change it using the #55 service). | ||
| − | + | |- | |
| + | | | ||
| + | | | ||
| − | + | |- | |
| + | | 3 | ||
| + | | Confirm your entry. Exit '''Menu'''. | ||
| + | |- | ||
| + | | | ||
| + | | | ||
| − | + | |- | |
| + | | 4 | ||
| + | | The system will display the '''LOCK''' message confirming that the service is active. | ||
| − | + | |- | |
| + | | | ||
| + | | | ||
| + | |- | ||
| + | | 5 | ||
| + | | To cancel the lock, press the '''''Unlock''''' key and type the lock code. | ||
| + | |} | ||
| + | == Fixed Account == | ||
| + | The "Fixed Account" feature recalls the privileges of another phone or virtual subscriber to your phone. If the account is recalled on a phone itself, the system will cancel it on other phones, if applicable. A fixed account may also be called up on a locked phone. | ||
| − | |||
| − | + | {| class="prettytable" | |
| + | | 1 | ||
| + | | Select '''Menu >> Services >> Fixed account'''.''' '''Switch the service''' on or off. | ||
| + | |- | ||
| + | | 2 | ||
| + | | Type the account number.'''''IMPORTANT! '''By pressing the [[Image:Io_cts_dol.png]] key, you will be able to access the subscriber list and select the account number using the up and down arrow keys or by searching for it based on the first few letters of its name.'' | ||
| + | |- | ||
| + | | 3 | ||
| + | | Confirm your entry. | ||
| + | |- | ||
| + | | 4 | ||
| + | | Enter a four-digit PIN account code (the code is individually assigned by the service team; you can change it using the #55 service). Confirm your entry. | ||
| + | |- | ||
| + | | 5 | ||
| + | | Exit '''Menu'''. The system will display '''account''' message confirming that the service is active. | ||
| + | |} | ||
| − | + | == Urgent Ringing == | |
| + | If you call a subscriber using this service, the system will automatically open the interphone mode on the target CTS phone or generate a specific signal on the target analogue phone. | ||
| − | + | '''''IMPORTANT! '''For another method of calling the 'Urgent Ringing' service - see in another part of instruction. | |
| − | |||
| − | = | + | {| class="prettytable" |
| + | | 1 | ||
| + | | Select '''Menu >> Services >> Urgent ringing'''. | ||
| + | |- | ||
| + | | | ||
| + | | | ||
| − | + | |- | |
| + | | 2 | ||
| + | | Exit '''Menu'''.''' '''The system will display the '''URGENT RINGING''' message confirming that the service is active. | ||
| − | + | |- | |
| + | | | ||
| + | | | ||
| − | + | |- | |
| + | | 3 | ||
| + | | This service is available only for the number you dial immediately after selection of the URGENT CALL option. | ||
| − | + | |- | |
| + | | | ||
| + | | | ||
| − | + | |} | |
| − | + | ||
| − | + | ||
| − | + | ||
| − | + | ||
| − | + | ||
| − | + | ||
| − | + | ||
| − | + | ||
| − | + | ||
| − | + | ||
| − | + | ||
| − | + | ||
| − | + | ||
| − | + | ||
| − | + | ||
| − | + | ||
| − | + | ||
| − | + | ||
| − | + | ||
| − | + | ||
== Call forwarding == | == Call forwarding == | ||
| + | The Call Forwarding function is a PABX service that consists in re-routing of the incoming calls to another phone or account. The service is active until cancellation. | ||
| + | {| class="prettytable" | ||
| + | | 1 | ||
| + | | Select '''Menu >> Services >> Call forwarding'''. | ||
| + | |- | ||
| + | | 2 | ||
| + | | Switch the call forwarding option on or off. | ||
| + | |- | ||
| + | | 3 | ||
| + | | Enter the number to which you want to forward the call, e.g. 123. '''''IMPORTANT! '''You can also use the arrow keys to select the type of phone book from which you want to select a target number for call forwarding. Select the phone book and look for the number using the up and down arrow keys or typing the first few letters of the subscriber’s name.'' | ||
| + | |- | ||
| + | | 4 | ||
| + | | Confirm and select the type of call forwarding: | ||
| − | + | * '''All calls''' | |
| + | * '''Incoming direct calls ''' | ||
| + | * '''Extension numbers''' | ||
| + | * '''Incoming calls with announcement''' | ||
| + | * '''Calls from group''' | ||
| + | |- | ||
| + | | 5 | ||
| + | | Confirm your selection and select the forwarding criteria: | ||
| + | # '''Unconditional''' | ||
| + | # '''While busy''' | ||
| + | # '''When no answer''' | ||
| + | # '''While DND''' | ||
| + | |- | ||
| + | | 6 | ||
| + | | Confirm your selection and exit '''Menu'''. | ||
| + | |- | ||
| + | | 7 | ||
| + | | The system will display '''call forwarding ''' and letter '''F'''<ref name="ftn6">From '''Call Forwarding'''</ref> on the display. | ||
| + | |- | ||
| + | |} | ||
| + | '''''IMPORTANT!''' In addition, if the phone rings to group instead of individual subscriber, only "Calls from group" and "Unconditional" forwarding options will be active.'' | ||
| + | == Malicious Calls (MCID) == | ||
| + | This service allows recording a call as a malicious call on the master PABX and marking it as a malicious incident in the PABX event buffer. | ||
| − | |||
| − | + | '''''1 How to select this service during the call:''''' | |
| − | |||
| − | |||
| − | + | Press the '''''Options''''' key and select '''Menu >> Services >> MCID'''<ref name="ftn7">'''From ''Malicious Call IDentification.</ref> | |
| − | + | Confirm the service. | |
| − | + | ||
| − | + | ||
| − | + | ||
| − | + | '''''2 How to switch on this service once the call is terminated by the caller:''''' | |
| − | + | ||
| − | + | ||
| − | + | ||
| − | + | Press the '''''MCID''''' key within 30 seconds from the moment the caller has hung up the phone.<br> | |
| + | '''''IMPORTANT! '''Wait until the caller of the malicious call hangs up the phone! The target phone cannot be the first to be hung up!.'' | ||
| − | + | == Three-Party (3PTY) Calls == | |
| + | '''''First method:''''' | ||
| − | ''''' | + | {| class="prettytable" |
| + | | 1 | ||
| + | | Set up the call with your first interlocutor and hold the line using the '''FLASH''' button. | ||
| + | |- | ||
| + | | 2 | ||
| + | | Dial the number of the second interlocutor and open the '''Options >> Set up 3PTY''' menu while talking. | ||
| + | |- | ||
| + | | 3 | ||
| + | | Confirm the service.''' '''The three-party call has been successfully set up. | ||
| + | |- | ||
| + | | 4 | ||
| + | | During the call, the caller of the three-party call can change interlocutors. In such a case, one of the partners will stay on hold. | ||
| + | |} | ||
| − | |||
| + | '''''Second method:''''' | ||
| − | |||
| + | {| class="prettytable" | ||
| + | | 1 | ||
| + | | Dial the number of the first interlocutor, set up the call, and hold the line using the '''FLASH''' button. | ||
| + | |- | ||
| + | | 2 | ||
| + | | Dial the number of the second interlocutor and press '''FLASH#3''' while talking. | ||
| + | |- | ||
| + | | 3 | ||
| + | | The three-party call has been successfully set up. | ||
| + | |} | ||
| + | '''''IMPORTANT! '''The caller of the three-party call can switch between the partners. To do so, press the '''Options'''key and select the partner with whom you wish to talk, using the navigation keys.'' | ||
| − | |||
| + | '''''IMPORTANT! '''The three-party call can be terminated by its caller who should press '''FLASH#0'''.'' | ||
| − | |||
| − | + | '''''IMPORTANT! '''Once the caller hangs up the phone, the system terminates the 3PTY call.'' | |
| − | ''''' | + | '''''IMPORTANT! '''To switch over to one partner only (the other partner hearing a musical signal), the caller should press either '''FLASH#1 or FLASH#2 '''(where: 1 - means that the caller wants to talk with the first selected partner to this call, and 2 stands for the talk with the second partner). To restore the 3PTY call, the originator should press '''FLASH#3 '''''. |
| + | == Call interception in a PickUp group == | ||
| + | This service ensures interception of the incoming calls addressed to another PABX user provided that the subscriber who calls up this service has acquired the applicable privileges (the subscriber must belongs to the same PickUp group, i.e. call interception group). | ||
| − | |||
| + | {| class="prettytable" | ||
| + | | 1 | ||
| + | | If you want to intercept a call addressed to another number of the PickUp group and your own phone belongs to the same group, select '''Menu >> Services >> Call Interception'''. | ||
| + | |- | ||
| + | | 2 | ||
| + | | Pick up the handset to answer your intercepted call.'''''IMPORTANT!''''' Apart from the above mentioned method (picking up the handset) you can also intercept the call (i.e. enter the call status and skip the ringer) pressing down the '''SPK ON''' button and typing '''<nowiki>#37</nowiki>'''. | ||
| + | |} | ||
| − | + | == Temporary CLIR == | |
| + | This service switches off presentation of the number for the period of a single call. | ||
| − | |||
| + | {| class="prettytable" | ||
| + | | <center>1</center> | ||
| + | | Select '''Menu >> Services >> Temporary CLIR'''.''' '''Confirm your selection. | ||
| + | |- | ||
| + | | <center>2</center> | ||
| + | | Pick up the handset or press the '''SPK ON''' button. | ||
| + | |- | ||
| + | | <center>3</center> | ||
| + | | Dial the number you wish to call. | ||
| + | |} | ||
| − | ' | + | == Private Call == |
| + | This function will change the privileges to set up the calls (subscribers' personal privileges) and register the call as a private one with the PABX buffer. Such calls are identified by the billing application for the purpose of separating business calls from private calls. | ||
| − | + | {| class="prettytable" | |
| − | + | ||
| − | + | ||
| − | + | ||
| − | + | ||
| − | + | ||
| − | + | ||
| − | + | ||
| − | + | ||
| − | + | ||
| − | + | ||
| − | + | ||
| − | + | ||
| − | + | ||
| − | + | ||
| − | + | ||
| − | + | ||
| − | + | ||
| − | + | ||
| − | + | ||
| − | + | ||
| − | + | ||
| − | + | ||
| − | + | ||
| − | + | ||
| − | + | ||
| − | + | ||
| − | + | ||
| − | + | ||
| − | + | ||
| − | + | ||
| − | + | ||
| − | + | ||
| − | + | ||
| − | + | ||
| − | + | ||
| − | + | ||
| − | + | ||
| − | + | ||
| − | + | ||
| − | + | ||
| − | + | ||
| − | + | ||
| − | + | ||
| − | + | ||
| − | + | ||
| − | + | ||
| − | + | ||
| − | + | ||
| − | + | ||
| − | + | ||
| − | + | ||
| − | + | ||
| − | + | ||
| − | + | ||
| − | + | ||
| − | + | ||
| − | + | ||
| − | + | ||
| − | + | ||
| − | + | ||
| − | + | ||
| − | {| | + | |
| <center>1</center> | | <center>1</center> | ||
| − | | | + | | Select '''Menu >> Services >> Private calls'''.''' '''Confirm your selection. |
| − | + | ||
|- | |- | ||
| <center>2</center> | | <center>2</center> | ||
| − | | | + | | Pick up the handset or press the '''SPK ON''' button. |
| − | + | ||
|- | |- | ||
| <center>3</center> | | <center>3</center> | ||
| − | | Dial | + | | Dial the number you wish to call. |
| − | + | ||
|} | |} | ||
| − | == Urgent | + | == Urgent Call == |
| + | An urgent call means that the subscriber will be given a special category of access in the outgoing traffic for the period of a single call. Due to this service the call may bypass standard routes. The '''Urgent Call''' service is available only to subscribers who have acquired the applicable privileges. The service is active for the period of a single call made from the telephone. | ||
| − | + | {| class="prettytable" | |
| − | + | ||
| − | + | ||
| − | {| | + | |
| <center>1</center> | | <center>1</center> | ||
| − | | | + | | Select '''Menu >> Services >> Urgent calls'''.''' '''Confirm your selection. |
| − | + | ||
|- | |- | ||
| <center>2</center> | | <center>2</center> | ||
| − | | | + | | Pick up the handset or press the '''SPK ON''' button. |
| − | + | ||
|- | |- | ||
| <center>3</center> | | <center>3</center> | ||
| − | | Dial | + | | Dial the number you wish to call. |
| − | + | ||
|} | |} | ||
| − | == | + | == Operating Modes == |
| + | This service''' ''' ensures a manual change in the operating mode at the PABX level. The subscriber must acquire the applicable rights to change the PABX operating mode. A special option allows dedicating the operating mode to a selected key on the system telephone. | ||
| − | + | {| class="prettytable" | |
| + | | 1 | ||
| + | | Select '''Menu >>''' ''' Services >> Operating Modes'''.''' '''Using the menu navigation keys select the operating mode you wish to use (e.g. Day - Manual Mode). | ||
| + | |- | ||
| + | | 2 | ||
| + | | Press '''Next''' after you find the operating mode. The PABX will ask you to type the access code. | ||
| + | |- | ||
| + | | 3 | ||
| + | | After entering the '''Key''' the PABX will ask you to enter the validity period (deadline) of your operating mode (if you fail to enter the time limit, your operating mode will be cancelled during the first scheduled change in the operating mode of the PABX). | ||
| + | |} | ||
| + | == Voice Mail == | ||
| + | Due to this service the caller may leave a voice message for a specific subscriber. | ||
| + | '''''IMPORTANT!''''' | ||
| − | + | ''If the subscriber wishes to use this service, the PABX admin will have to assign an individual voice mail for saving the messages, as well as a voice mail extension number for the purpose of service activation, new message notification, and message management.'' | |
| − | + | To switch on this service, you must set the call transfer to the extension number of the individual voice mail: | |
| − | |||
| − | = | + | {| class="prettytable" |
| + | | 1 | ||
| + | | Select '''Menu >> Services >> Call forwarding >> Switch on'''. Confirm your selection by pressing the '''''Next''''' key. | ||
| + | |- | ||
| + | | 2 | ||
| + | | Type the directory number of the individual voice mail (the default value is ''1000'') and confirm your entry. | ||
| + | |- | ||
| + | | 3 | ||
| + | | Select the type of calls you wish to send to the voice mail: | ||
| + | * '''All calls''' | ||
| + | * '''Incoming direct calls ''' | ||
| + | * '''Extension numbers''' | ||
| + | * '''Incoming calls with announcement''' | ||
| + | * '''Calls from group''' | ||
| − | + | Confirm your selection. | |
| + | |- | ||
| + | | 5 | ||
| + | | Select the criteria of call transfer to voice mail: | ||
| − | ''''' | + | # '''Unconditional''' |
| + | # '''While busy''' | ||
| + | # '''When no answer''' | ||
| + | # '''While DND''' | ||
| − | |||
| − | |||
| − | + | |- | |
| − | + | | 6 | |
| − | + | | Confirm your selection and exit '''Menu'''. | |
| − | + | |- | |
| − | + | | 7 | |
| − | + | | The system will display the letter '''V<ref name="ftn8">'''From '''Voicemail'''</ref> at the top right-hand corner of the screen to confirm that the service has been switched on. | |
| − | + | |- | |
| − | + | ||
| − | + | ||
| − | + | ||
| − | + | ||
| − | + | ||
| − | + | ||
| − | + | ||
| − | + | ||
| − | + | ||
| − | + | ||
| − | + | ||
| − | + | ||
| − | + | ||
| − | + | ||
| − | + | ||
| − | + | ||
| − | + | ||
| − | + | ||
| − | + | ||
| − | + | ||
| − | + | ||
| − | + | ||
| − | + | ||
| − | + | ||
| − | + | ||
| − | + | ||
| − | + | ||
| − | + | ||
| − | + | ||
| − | + | ||
| − | + | ||
| − | + | ||
| − | + | ||
| − | + | ||
| − | + | ||
| − | + | ||
| − | + | ||
| − | + | ||
| − | + | ||
| − | + | ||
| − | + | ||
| − | + | ||
| − | + | ||
| − | + | ||
| − | + | ||
| − | + | ||
| − | + | ||
| − | + | ||
| − | + | ||
| − | + | ||
|} | |} | ||
| − | |||
| − | + | To switch on/off the active service (switch on/off the call transfer to voice mailbox): | |
| − | |||
| − | |||
| − | |||
| − | + | {| class="prettytable" | |
| − | + | | 1 | |
| − | + | | Go to '''Menu >> Services >> Voice mail >> ON/OFF'''.''' '''Confirm your option pressing down the '''''Next''''' key. Exit the '''Menu''',''' ''': for instance, press the SPK OFF button. | |
| − | + | |- | |
| − | | | + | | 2 |
| − | + | | The system will display the letter '''V''' at the top right-hand corner of the screen to confirm that the service has been switched on. | |
| − | + | ||
|} | |} | ||
| − | + | ''See the Operations Manuals of the Slican PABX for more information on this service (how to record your own welcome message - service #79; notification and play new messages). | |
| − | + | == Conference Call == | |
| + | ''Important: The CTS-102.HT system telephone does not support conference calls.'' | ||
| − | + | This service ensures simultaneous calling many persons and setting up conference calls. The participants may use any type of phone; they may be either PABX subscribers or external participants. The maximum number of participants is: | |
| − | + | * 8 in the case of CCT-1668, | |
| + | * 31 in the case of CXS-0424, | ||
| + | * 30 in the case of MAC-6400. | ||
| − | + | The caller of a conference call can manage the session (to act as a ''custodian''). | |
| − | |||
| − | + | 1. Select '''Menu >> Services >> Conference'''. The system will display information (see the figure). From now on, your phone is deemed busy and nobody can contact you.<br> | |
| + | 2. To add a new participant to the conference, press the '''''Options''''' key and select '''Add participant'''. Once you do this, select another participant as follows:<br> | ||
| + | * Enter the applicable phone book or external number; | ||
| + | * press the '''''Book''''' key and select a number from any of the phone book or extension number list<ref name="ftn9">You can also open the applicable phone book or subscriber list using the navigation keys: see section – Phone Menu (navigation via the phone menu).</ref>, | ||
| + | * Press a apeed access key dedicated to a specific subscriber/number. | ||
| + | Once you add a participant using the '''''Next''''' key or automatically (by pressing the key dedicated to the subscriber/number), the system will come back to the screen in order to add more participants to the list.<br> | ||
| + | 3. Press '''''Back''''' once you have added all the persons with whom you wish to have a conference call. To view the list of participants, press '''''Participants''''' and scroll the list using the '''''Up/Down arrow''''' keys. You can delete a participant: select the '''Delete''' option from the '''''Options''''' context menu.<br> | ||
| + | 4. How to set up a conference call:<br> | ||
| + | '''''First method:''''' | ||
| − | + | When viewing the list of participants pick up the handset and press '''SPK ON'''. The system will activate the ringers on the telephones of the persons eligible for the conference. Once a participant receives the call, he or she will hear the message "Teleconference". | |
| − | < | + | '''''Second method:'''''<br> |
| − | + | ||
| − | + | ||
| − | + | ||
| − | + | ||
| − | + | ||
| − | + | ||
| − | + | ||
| − | + | ||
| − | + | ||
| − | + | In the conditions described in section 3 of this table and press the '''''Options''''' key and select '''Ring'''.<br> | |
| + | The system will activate the ringers on the telephones of the persons eligible for the conference. Once a participant receives the call, he or she will hear the music until the custodian joins the conference, by e.g. picking up the handset or pressing '''SPK ON'''.<br> | ||
| + | 5. The conference call is now set up (the call has been answered by at least one participant and the custodian has become an active participant, i.e. he or she has picked up the handset)<br> | ||
| + | The elements available after pressing '''''Options''''': | ||
| + | # '''Add participant '''– adding a new participant to the current conference call<ref name="ftn10"> You can also add a new participant using the '''FLASH'''button: press it, dial the number and press the key dedicated to the "Conference" service while talking with this participant (or else, select this service from the menu which is available when you talk with this participant).</ref>, | ||
| + | # '''Ring''': set up a "cold" conference call (caller's handset on the cradle) - see ; | ||
| + | # '''Disconnect all '''– the conference call is over; | ||
| + | # '''Mute all '''– switch off microphones in all the participants' phones (the voice belongs to the conference custodian only); | ||
| + | # '''Switch on all '''– switch on microphones in all participants' phones, and | ||
| + | # '''Leave '''– leave the conference call without disconnecting it.<ref name="ftn11"> You can do the same when you hang up the handset or press '''SPK OFF'''</ref>. If you select this option, the system will leave the message "Conference" on the screen, which means that the conference is not over yet. | ||
| − | |||
| − | + | In this condition, you can return to the conference call by means of two methods:<br> | |
| − | + | a) Press the '''''Options''''' key and select the option '''Conference''': the system will allow you to view the conference status (you can do the same by pressing down the quick dial key dedicated to the "Conference" service). You will return to the conference call the same moment you pick up the handset or press the '''SPK ON''' button. | |
| + | b) Pick up the handset or press the '''SPK ON''' button, and then press the key dedicated to the "Conference" service. | ||
| − | |||
| − | |||
| − | |||
| − | |||
| − | |||
| − | |||
| − | ''''' | + | The '''''Participants''''' button allows viewing the list of participants. You can scroll this list using the '''''Up/Down'''''<ref name="ftn12"> This feature is also available to the participants who use the CTS-202 series system telephones.'''''</ref> arrow keys. The system will display information on particular participants. |
| − | + | Shown below are the '''''Options''''' available for a selected participant: | |
| − | + | # '''Delete''': deletes a participant from the conference; | |
| + | # '''Microphone OFF/ON''': switches off/on the microphone of a specific participant [his or her status will change to (MUTE)/(call)]; | ||
| + | # '''Speaking''': switches on the microphone of a defined participant only (the remaining microphones are switched off), and | ||
| + | # '''Personal call''' – direct call to a participant. Once this call is terminated, you can:<br/> a) Add this person again to the conference: press the key dedicated to the "Conference" service or select this service from the menu that is available when you call this subscriber, or,<br/> b) Delete this participant: hang up the handset or press '''SPK OFF'''.<br/> | ||
| − | + | The custodian can return to the conference call using the procedure described in section 5 in the table. | |
| − | + | ||
| − | + | ||
| − | + | ||
| − | + | ||
| − | + | ||
| − | + | ||
| − | + | ||
| − | + | ||
| − | + | ||
| − | + | '''Custodian''': assignment of the custodian function - Only the subscribers who use CTS-202 series system telephones may use this function. | |
| − | + | ||
| − | + | ||
| − | + | ||
| − | + | ||
| − | + | ||
| − | + | ||
| − | + | ||
| − | + | ||
| − | + | ||
|} | |} | ||
| − | |||
| − | |||
| − | |||
| − | |||
| − | |||
| − | |||
| − | |||
| − | |||
| − | |||
| − | |||
| − | |||
| − | |||
| − | |||
| − | |||
| − | |||
| − | |||
| − | |||
| − | |||
| − | |||
| − | |||
| − | |||
| − | |||
| − | |||
| − | |||
| − | |||
| − | |||
| − | |||
| − | |||
| − | |||
| − | |||
| − | |||
| − | |||
| − | |||
| − | |||
| − | |||
| − | |||
| − | |||
| − | |||
| − | |||
| − | |||
| − | |||
| − | |||
| − | |||
| − | |||
| − | |||
| − | |||
| − | |||
| − | |||
| − | |||
| − | |||
| − | |||
| − | |||
| − | |||
| − | |||
| − | |||
| − | |||
| − | |||
| − | |||
| − | |||
| − | |||
| − | |||
| − | |||
| − | |||
| − | |||
| − | |||
== Call override == | == Call override == | ||
| + | The CTS system telephone supports the "override" service. You can join a call between two other subscribers and disconnect it, if required, or leave the call without disrupting it. A person "override" can also leave the call without disconnecting the two other subscribers. This service is available subject to the applicable privileges and under the condition that none of the two subscribers is protected from a call override. The service does not depend on the subscriber's status (subscriber registered with PABX or external subscriber). This service is also performed when one of the pair of subscribers from the call you want to join is not an extension subscriber of the PABX. | ||
| + | If busy, proceed as follows: | ||
| − | + | To join the call, select the '''''Override''''' option using the right-hand context key. Having joined the call you can disconnect it. Select '''''Disconnect''''' using the left-hand context key. To leave the call and let the subscribers continue talking, hang up the handset or press '''SPK OFF'''. | |
| + | == Automatic Redial: AutoRD == | ||
| + | The subscriber you wish to contact is: | ||
| + | * busy, or | ||
| + | * unavailable, | ||
| − | + | or | |
| − | + | * or all the lines in your PABX are busy at this time. | |
| − | + | ||
| − | + | ||
| − | + | ||
| − | + | ||
| − | + | ||
| − | + | ||
| − | + | ||
| − | + | ||
| − | + | ||
| − | + | ||
| − | + | ||
| − | + | ||
| − | + | ||
| − | + | ||
| − | + | ||
| − | + | ||
| − | + | ||
| − | + | ||
| − | + | ||
| − | + | ||
| − | + | ||
| − | + | ||
| − | + | , then if you select this service, when the subscriber: | |
| − | + | * is free (formerly busy), | |
| − | + | * is available (formerly unavailable), | |
| − | + | ||
| − | + | ||
| − | + | ||
| − | * is | + | |
| − | * | + | |
or | or | ||
| − | * | + | * or when any PABX line becomes free. |
| − | + | you will be notified by the ringer and after lifting the handset the system will automatically dial that subscriber's number. This service is available for extension numbers and outgoing calls. | |
| − | |||
| − | |||
| − | + | The service will remain valid for: | |
| − | * | + | * 90 minutes in the case of extension numbers (for busy and unavailable subscribers); |
| + | * 60 minutes in the case of outgoing calls (for unavailable targets); | ||
| + | * 30 minutes in the case of PABX busy lines, and | ||
| + | * 10 minutes in the case of outgoing calls (for busy targets).<br/> | ||
| − | + | NOTE: You can stand queue in the case of: | |
| + | * PABX subscribers using analogue telephones; | ||
| + | * PABX subscribers using system telephones; | ||
| + | * External subscribers available via the ISDN trunk; | ||
| + | * External subscribers available via the GSM trunk <br/> or | ||
| + | * any busy trunk on the PABX. | ||
| − | + | To use this service, proceed as follows: | |
| − | |||
| − | |||
| − | |||
| − | + | 1. If your target does not answer, the system will wait approx. 5-10 seconds and display '''''AutoRD''''' for the context button (bottom left corner of the screen), which enables activating the service. | |
| + | (The CTS-102.HT phone does not display this message.)<br> | ||
| + | 2. If your target is busy, the system will immediately display the '''AutoRD''' option for the context key (bottom left corner of the screen). You can now activate the service.<br> | ||
| + | 3. If the service is accepted, the system will display applicable information and the time of activity of the service. You can cancel the service: press the '''''Stop''''' context key.<br> | ||
| + | 4. If your redial target is now available or free, the system will notify you by ringing and displaying the message "Back again" for the unavailable target or "Queue" for the busy target.<br> | ||
| − | + | If you pick up the handset at any of the abovementioned messages, the system will dial the target number again. | |
| − | + | == MobilePhone service == | |
| − | + | This menu option enables switching on and off the MobilePhone service provided that the phone number defined as MobilePhone for the specific subscriber and any parameters of this service are defined in ConfigMAN. | |
| − | + | ||
| − | + | ||
| − | + | ||
| − | |||
| − | |||
| − | |||
| − | {| | + | {| class="prettytable" |
| − | | | + | | <center>1</center> |
| − | + | | Select '''Menu >> Services >> Mobile Phone'''.''' '''Confirm your selection. | |
| − | + | ||
| − | + | ||
| − | + | ||
| − | + | ||
| − | + | ||
|- | |- | ||
| − | | | + | | |
| − | | | + | | |
| − | + | ||
| − | + | ||
| − | + | ||
| − | + | ||
| − | + | ||
| − | + | ||
| − | + | ||
| − | + | ||
|- | |- | ||
| − | | | + | | <center>2</center> |
| − | | | + | | Select '''Activate''' or '''Cancel'''. |
| − | + | |- | |
| − | | | + | | |
| − | + | | | |
| − | + | ||
| − | + | ||
| − | + | ||
| − | + | ||
| − | | | + | |
|- | |- | ||
| − | | | + | | <center>3</center> |
| − | | | + | | Confirm your selection. |
| − | + | |- | |
| + | | | ||
| + | | | ||
| − | |||
| − | |||
| − | |||
| − | |||
| − | |||
| − | |||
| − | |||
|} | |} | ||
| + | '''''IMPORTANT!''''' ''This service is available provided the firmware version installed in the PABX is at least 4.05.'' | ||
| − | + | = Bluetooth in CTS-202.BT = | |
| + | '''''IMPORTANT! '''The Bluetooth base installed in CTS-202.BT phone enables connecting devices such as a Bluetooth headphone with PIN ”0000”. Most of the available headphones have this PIN code. If the PIN code of the headphone can be changed, set the code to “0000” before attempting to log into the Bluetooth base in the CTS-202.BT phone.'' | ||
| + | == Switching the Bluetooth system on and off == | ||
| + | The Bluetooth system can be switched on and off using two methods. | ||
| − | + | 1) In ConfigMAN, after selecting the '''BT''' box on the tab '''''Peripherals/ CTS / Settings'''''. This field is active only if the field '''DevTyp''' located on the same sheet has the ''CTS-202.BT'' option enabled; in the case of the remaining options the field is greyed out. | |
| − | + | ||
| − | + | ||
| − | + | ||
| − | + | ||
| − | + | ||
| − | + | ||
| − | + | 2) The Bluetooth system can be also switched on and off by the subscriber from the system phone CTS-202.BT. The procedure is as follows: | |
| − | |||
| − | + | # Select '''Menu >> Bluetooth >> Switch off BT'''.''' '''Confirm your selection. | |
| + | # '''Switch off BT'''? will display | ||
| + | # Confirm switching off Bluetooth. | ||
| − | + | If the Bluetooth module is switched off, it is necessary to perform the following | |
| − | ''''' | + | # Select '''Menu >> Bluetooth >> Switch on BT'''.''' '''Confirm your selection. |
| − | ''''' | + | # '''Switch on BT'''? will display |
| + | # Confirm switching Bluetooth on. | ||
| + | == Registering a headphone == | ||
| + | # Select '''Menu >> Bluetooth >> Register headphone'''. | ||
| + | # If any headphone has been registered before, the following question will be displayed '''Delete current headphone?''' | ||
| + | # After confirming the deletion of the headphone, the '''Deleted''' will appear. | ||
| + | # After pressing '''OK''', the phone will begin searching for a headphone with activated broadcasting<ref name="ftn16">If there is more than one headphone with broadcasting activated, the phone will register the one that was found first.</ref>. | ||
| + | # The name of the found headphone will appear on the display. | ||
| + | # The phone will finish the registration after confirmation. | ||
| + | After the Bluetooth headphone is registered, the letter B appears in the upper right corner of the display which signals that the Bluetooth headphone is available for conversations. “B” is displayed as long as the registered Bluetooth headphone is located near the Bluetooth base integrated in the phone. | ||
| − | == | + | == Status == |
| − | + | {| class="prettytable" | |
| − | + | ||
| − | + | ||
| − | {| | + | |
| <center>1</center> | | <center>1</center> | ||
| − | | | + | | Select '''Menu >> Bluetooth >> Status'''. |
| + | |||
| + | |- | ||
| + | | | ||
| + | | | ||
|- | |- | ||
| <center>2</center> | | <center>2</center> | ||
| − | | | + | | The name of the registered headphone and its address will appear on the display. |
| + | |||
| + | |- | ||
| + | | | ||
| + | | | ||
|- | |- | ||
| <center>3</center> | | <center>3</center> | ||
| − | | | + | | Press the '''OK''' key. |
| − | | | + | |- |
| − | + | | | |
| + | | | ||
| − | |||
| − | |||
| − | |||
| − | |||
| − | |||
| − | |||
| − | |||
| − | |||
| − | |||
| − | |||
| − | |||
| − | |||
| − | |||
| − | |||
| − | |||
| − | |||
| − | |||
| − | |||
| − | |||
| − | |||
| − | |||
| − | |||
| − | |||
| − | |||
| − | |||
| − | |||
| − | |||
| − | |||
|} | |} | ||
| + | == Using Bluetooth headphone == | ||
| + | If the Bluetooth module is on and the headphone has been registered, the subscriber can accept incoming calls and make outgouing calls using the Bluetooth headphone. | ||
| − | + | === Setting up outgoing calls === | |
| + | An outgoing call can be set up using two methods. | ||
| − | + | '''Method I''' | |
| − | + | 1. Press SPK ON. The user will hear the PABX dialling tone in the Bluetooth headphone. | |
| − | + | ||
| − | + | ||
| − | + | ||
| − | + | ||
| − | + | ||
| − | + | ||
| − | + | ||
| − | + | ||
| − | + | 2. Dial the desired number using the phone keyboard. | |
| − | + | 3. After the call is set up you can talk using the Bluetooth headphone. | |
| − | + | '''Method II''' | |
| − | + | 1. Dial the desired number using the phone keyboard. | |
| + | 2. Press SPK ON, you will hear the dialling tone in the Bluetooth phone. | ||
| + | 3. After the call is set up you can talk using the Bluetooth headphone. | ||
| − | |||
| − | |||
| − | |||
| − | + | '''''IMPORTANT!''''' ''Please note that the button located on the Bluetooth headphone is only used to answer a call and not to initiate one. This is why when using the 2nd method of setting up an outgoing call II, you cannot initiate calling by pressing the button on the headphone. '' | |
| − | + | ||
| − | + | ||
| − | + | === Receiving incoming calls === | |
| − | + | To answer an incoming call using the Bluetooth headphone, press the call answer button on the headphone or SPK ON key on the phone. You can start a conversation using the Bluetooth headphone. | |
| − | + | ||
| − | + | === Using different sound sources during a conversation === | |
| − | + | Switching on the Bluetooth headphone support does not lock other conversation interfaces of the CTS-202.BT phone. If you press SPK ON during the call (incoming or outgoing), then the sound sent to the Bluetooth headphone will be directed to the 'Hands Free' system. Pressing SPK ON again will direct the sound back to the Bluetooth headphone. This button acts as a switch. SPK OFF always ends the active call. Using SPK ON is also important when using the phone's handset as an alternative sound source. If you pick up the handset during an active call in the Bluetooth headphone, then the sound will be directed to the handset. Hanging up the handset will finish the conversation. If you want to continue the conversation using a Bluetooth headphone after hanging up the handset, press SPK ON before doing that. | |
| − | + | ||
| − | + | = Phone Special Functions = | |
| + | == Pause in Selected Number == | ||
| + | If you set a pause in a number, the system will suspend dialling for a period of 5 seconds. | ||
| − | |||
| − | + | '''''Example of dialling an outgoing call number plus extension number:''''' | |
| − | |||
| + | 1. Enter the first part of the number (e.g. main number 0523251111) during cold calling (entering the number before picking up the handset) or when entering a new number to the phone directory (1.2.1 Adding a New Entry to the Directory). | ||
| − | * | + | 2. Press twice the "*" key and wait for the letter "p" (if you want to double the waiting time, repeat this step). |
| + | 3 .Enter the remaining part of the number (e.g. extension number: 168). | ||
| − | |||
| − | + | '''''IMPORTANT! '''You can also add pauses when you enter new numbers to the personal or private directories.'' | |
| − | + | ||
| − | + | ||
| − | + | ||
| − | + | ||
| − | + | ||
| − | + | ||
| − | ''''' | + | |
| − | + | ||
| − | + | ||
| − | + | ||
| − | + | ||
| − | + | ||
| − | + | ||
| + | = Information about busy line and on PBX failures = | ||
| + | The busy status of the public lines for the specific phone and the displaying of PBX failure information are shown on the phone's display if the PBX admin switches these functions on. | ||
| + | <center> | ||
{|{{CTS}} | {|{{CTS}} | ||
| | | | ||
| − | + | Monday | |
| − | + | 30.07.2010 09:22 | |
| − | + | ||
| − | (02/ | + | (02/19)(03) |
| − | + | Menu Book | |
| − | Menu | + | |
|} | |} | ||
| + | </center> | ||
| + | Information on the PBX alarms, such as e.g.: call buffer overflow; emergency power supply, trunk failure, etc., is displayed in the third line from the top. | ||
| − | + | The second line from the bottom displays the busy status of lines in the PBX using the following key: | |
| − | |||
<center>(aa/bb)(cc)</center> | <center>(aa/bb)(cc)</center> | ||
| Line 2,728: | Line 2,758: | ||
| − | aa – number of busy lines, | + | aa – the number of busy lines, |
| − | bb – number of available lines, | + | bb – the number of available lines, |
| − | cc – number of damaged trunks, | + | cc – the number of damaged trunks, |
| − | + | a line is understood here as: | |
| − | * | + | * a single analogue link, |
| − | * | + | * single ISDN link channel (2B+D), |
| − | * | + | * single ISDN link channel (30B+D), |
| − | * | + | * a single VoIP channel, |
| − | * | + | * a single GSM link. |
| − | + | The so called VoIP anonymous trunks are never presented as damaged. Note also that when a damaged trunk is presented, if it refers to an ISDN link (2B+D), then 2 lines (i.e. 2 B channels) will be eliminated from the '''bb''' field. Similarly, in the case of a ISDN link (30B+D) 30 lines will be subtracted. | |
| − | + | Also, if a VoIP trunk is presented as damaged, then no VoIP channel will be subtracted from the '''bb''' field because it can be used by other trunk; and damaged trunk does not mean a damaged channel. | |
| − | = | + | = Safety Requirements applicable to the Operations and Maintenance of CTS System Telephones = |
| + | It is essential to comply with the rules governing safety and use to ensure correct operation of this device. | ||
| + | Below are the basic elements to be taken into account by the manufacturer in the case of any complaints and claims submitted by users. | ||
| − | |||
| − | + | The rules relate to the installation, location and the requirements for the electrical power supply and data communication network. | |
| − | + | ||
| − | + | ||
| − | + | ||
| − | + | ||
'''Installation:''' | '''Installation:''' | ||
| − | * | + | * Only authorised or qualified manufacturer's service teams are allowed to install and initialise the device. |
| − | + | * All the installation procedures should be performed in compliance with the assembly principles as well as any occupational health and safety regulations. | |
| − | * All installation | + | |
| − | + | ||
| − | + | ||
| − | + | ||
| − | + | ||
| − | + | ||
| − | + | ||
| − | + | ||
| − | + | ||
| − | + | ||
| − | + | ||
| − | + | '''Working Environment:''' | |
| − | + | ||
| − | + | ||
| + | # The system telephones must not be installed in closed rooms featuring high humidity levels. Such rooms may reduce the service life and quality of electronic component functions. | ||
| + | # Given the risk of flooding, the system telephones should not be located near water containers or water sources (such as water pools, valves, etc.). | ||
| + | # The device must not be installed in rooms featuring considerable dust levels or a strong electromagnetic field. | ||
| − | + | The system telephones may demonstrate irregular operations, interferences, or box discoloration if installed at the places exposed to: | |
| + | # Direct sunlight, | ||
| + | # Frequent or strong vibrations or mechanical impacts, | ||
| + | # Live antenna radiation. | ||
| − | + | All devices connected to the telephone must have certificates of conformity with the standards in force in the European Union. | |
| + | = Certificate of Conformity and Correct Product Disposal = | ||
<table width=99% border="1" bordercolor=black rules=all style="margin:1em 1em 1em 0;border:solid 1px #AAAAAA; border-cellapse;empty-cells:show"> | <table width=99% border="1" bordercolor=black rules=all style="margin:1em 1em 1em 0;border:solid 1px #AAAAAA; border-cellapse;empty-cells:show"> | ||
<tr> | <tr> | ||
| Line 2,792: | Line 2,813: | ||
<tr> | <tr> | ||
<td width=25%> ''Manufacturer:''<br> | <td width=25%> ''Manufacturer:''<br> | ||
| − | '''SLICAN | + | '''SLICAN Sp. z o.o.'''<br> |
ul. M. Konopnickiej 18<br> | ul. M. Konopnickiej 18<br> | ||
85-124 Bydgoszcz<br></td> | 85-124 Bydgoszcz<br></td> | ||
<td width=25%> ''Type:''<br><br> | <td width=25%> ''Type:''<br><br> | ||
| − | '''System phone | + | '''System phone'''<br><br>'''Console''' |
| − | <td width=25%> ''Model:''<br> | + | |
| − | ''' | + | <td width=25%> ''Model:''<br><br> |
| + | '''Slican CTS-202,'''<br><br>'''Slican CTS-232''' | ||
| + | </td> | ||
</tr> | </tr> | ||
<tr> | <tr> | ||
| − | <td colspan="4"> '' | + | <td colspan="4"> ''Product Description:''<br> |
| − | + | Slican CTS-202 sets are system telephones designed for integration with Slican PABXs. They feature an LCD display and 12 programmable quick dial backlit keys. This line of telephones can be integrated with CTS-232 consoles (one console is 30 additional keys). The telephones are connected to PABXs via a single cable pair (CTS-202 and CTS-202.BT - are digital system telephones compliant with the U terminal) or a LAN/WAN using Ethernet cables (CTS-202.IP VoIP system telephone). | |
</tr> | </tr> | ||
<tr> | <tr> | ||
| − | <td colspan="4"> | + | <td colspan="4"> The product complies with Directive No. 99/5/EC '''R&TTE''' and meets the requirements specified in the harmonised standards mentioned below:<br> |
| + | EN 60950-1:2001 + A11:2004;<br> | ||
| + | EN 55022:1998 + A1:2000 + A2:2003; EN 55024:1998 + A1:2001 + A2:2003 | ||
| − | + | </td> | |
</tr> | </tr> | ||
<tr> | <tr> | ||
| − | <td colspan="4"> ''Additional | + | <td colspan="4"> ''Additional Information:''<br> |
| − | + | The device has been tested in a typical configuration, including connection with the SLICAN PABXs: CCA-2720, CCT-1668, MAC-6400 and CXS-0424. It complies with the requirements applicable to admissible interference levels for B Class products. | |
| − | + | If the device is installed improperly, it is categorised as class A and the following warning shall apply: | |
| − | + | “The device is a class A product. It may cause interference with radio waves when used in household environments, which requires the user to undertake appropriate measures”. </td> | |
| − | + | ||
| − | + | ||
| − | + | ||
| − | + | ||
</tr> | </tr> | ||
<tr> | <tr> | ||
<td colspan="2"><center>Bydgoszcz, 20-11-2007</center> </td> | <td colspan="2"><center>Bydgoszcz, 20-11-2007</center> </td> | ||
| − | <td colspan="2">[[Image: | + | <td colspan="2"><center>[[Image:Signature.png|150px]]</center> </td> |
</tr> | </tr> | ||
</table> | </table> | ||
| − | + | <center>[[File:Disposal.jpg|600px]]</center> | |
| − | <center>[[ | + | ---- |
| + | <references/> | ||
Latest revision as of 12:53, 20 December 2016

Contents
- 1 Introduction
- 2 Functionalities
- 3 Equipment
- 4 Design
- 5 Connecting CTS-202 phones up to the PBX
- 6 Phone Settings
- 7 Phone Operations
- 8 Receiving and finishing a call
- 9 Dialling Numbers on the Phone Keypad
- 10 Dialling from the Lists
- 11 Use of Speed Access Keys
- 12 Phone books
- 13 Services
- 13.1 Call Transfer
- 13.2 DND Service (Do Not Disturb)
- 13.3 Park
- 13.4 Phone Locking
- 13.5 Fixed Account
- 13.6 Urgent Ringing
- 13.7 Call forwarding
- 13.8 Malicious Calls (MCID)
- 13.9 Three-Party (3PTY) Calls
- 13.10 Call interception in a PickUp group
- 13.11 Temporary CLIR
- 13.12 Private Call
- 13.13 Urgent Call
- 13.14 Operating Modes
- 13.15 Voice Mail
- 13.16 Conference Call
- 13.17 Call override
- 13.18 Automatic Redial: AutoRD
- 13.19 MobilePhone service
- 14 Bluetooth in CTS-202.BT
- 15 Phone Special Functions
- 16 Information about busy line and on PBX failures
- 17 Safety Requirements applicable to the Operations and Maintenance of CTS System Telephones
- 18 Certificate of Conformity and Correct Product Disposal
Introduction
|
Slican CTS-202.CL, CTS-203.BT and CTS-203.IP system phones that enable work with CTS-232 consoles have been designed for integration with the new family of Slican PBX-type units. CTS-202.CL and CTS-203.BT are digital system phones that comply with the Up0 terminal, while CTS-202.IP and CTS-203.IP-POE are VoIP system phones.
The most important functional features of these products are shown in the table below:
| |
|
|
|
| |
|---|---|---|---|---|---|
| |
Backlit display | |
|
|
|
| |
AUDIO OUT recording output | |
|
|
|
| |
Integrated Bluetooth phone base | |
|
|
|
| |
PoE power supply | |
|
|
|
| |
External power pack | |
|
|
|
| |
'Hands Free' mode | |
|
|
|
| |
Works with CTS-232 consoles | |
|
|
|
| |
Support of the CTI application | |
|
the same local area network with PBX) |
the same local area network with PBX) |
| |
Available colors | |
|
|
|
CTS-202.CL telephones are available in two colours. The CTS-202.CL-GR model is available in grey and CTS-202.CL-BK in black. These telephones work with the following consoles: grey CTS-232-GR and black CTS-232-BK.
The products ensure trouble-free work on any assistant or manager’s work stand. With no doubt, they will comply with the requirements applicable to any lobby terminals. An intelligible menu ensures intuitive setup of phone parameters and adaptation to the user's preferred features. Due to the entire integration of the product and telephone exchange applications the user will be able to promptly change the settings of individual phone sets on the PBX configuration platform.
Programmable multiple-function keys ensure easy access to the PBX features, extension numbers and phone book entries. The user can check with three phone number registers:
- Public phone book: managed on a global basis, available to all PBX subscribers,
- Personal phone book: property of a specific phone user,
- List of subscribers: list of PBX extension numbers.
The number of system telephones to be integrated with the PBX depends on the type of PBX and is presented in below table:
| MAC-6400 | CCT-1668 | CXS-0424 | |
|---|---|---|---|
| CTS-202.CL/CTS-202.BT | 120 | 18 | 12 |
| CTS-202.IP | 18 | 18 | 18 |
| CTS-203.IP-PoE | 18 | 18 | 18 |
A maximum of five CTS-232 consoles can be connected to up to four system phones connected to the PBX, and the other system phones enable connecting up to two CTS-232 consoles. This enables expanding the number of speed access keys. This also enhances the capabilities for the management of calls with the preview showing if individual subscribers are busy.
IP system phones are equipped in following codecs:
| CTS-202.IP | CTS-203.IP-PoE |
|---|---|
| G711;GSM | G711 |
Depending on distance between PBX and phone CTS-202.CL or CTS-202.BT and number of connected consoles it may be necessarily to use external power supply.
CTS-202.IP and CTS-203.IP-PoE phones can be powered directly from computer network, if adequate equipment is used. Otherwise external power supply is obvious. Recommended types of power supply for specified phones are presented in following table:
| No | System phone | Power supply 36V/160mA |
Power supply 12V/1,25A |
|---|---|---|---|
| 1 | CTS-202.CL | ||
| 2 | CTS-202.BT | ||
| 3 | CTS-202.IP | ||
| 4 | CTS-203.IP-PoE |
Functionalities
- 12 general purpose programmable keys, such as: subscriber status signal; speed access; PBX services; shortcuts for entries into phone books.
- Each speed access key may be dedicated to any PBX function;
- Menu navigation keys: up/down arrow keys; two context keys;
- +/- volume keys;
- Keys: Flash, SPK ON, SPK OFF, Mute, Redial;
- Two phone books: public and personal, plus the list of extension numbers;
- Cache call register of the last ten numbers: dialled, received, and missed numbers;
- Presentation of incoming subscribers, inclusive of the names, consistent with the entries in the phone book or PBX database;
- Presentation of waiting calls;
- Presentation of outgoing call numbers dialled by the caller;
- Presentation of call time during the calls;
- Programmable settings: menu language; ringing volume; speakerphone and handset, as well as the LCD display contrast;
- Five types of ringing tones;
- Option to program telephone settings via the PBX configuration program;
- AUTO-Redial function: automatic redialling of busy or unavailable numbers;
- Digital transmission via one pair of wires using the U terminal, up to 1 km, compatible with the PBX;
- The phone can be enhances by additional CTS-232 consoles (increasing the number of programmable keys from 42 to 162 – see section 1).
- Multiple-line LCD screen supporting two font types.
- Phone replacement will not delete the entries
- Support for headphones.
IMPORTANT!
The phone functionality strictly depends on the PBX software release. This manual describes telecom operations and functions that are accessible only with the present software version. Some of them may be unavailable. In such a case, please contact our customer service department.
Equipment
| |
|
|
|
|
|---|---|---|---|---|
Phone set
 |
|
|
|
|
Handset
 |
|
|
|
|
Handset cord
 |
|
|
|
|
| Phone line cable
|
|
|
|
|
| Phone's power pack | |
|
|
|
Console
 |
|
|
|
|
Console – phone or console - console connecting cable
 |
|
|
|
|
Connecting element console – phone or console - console
 |
|
|
|
|
Mounting screws
 |
|
|
|
|
Design
Phone
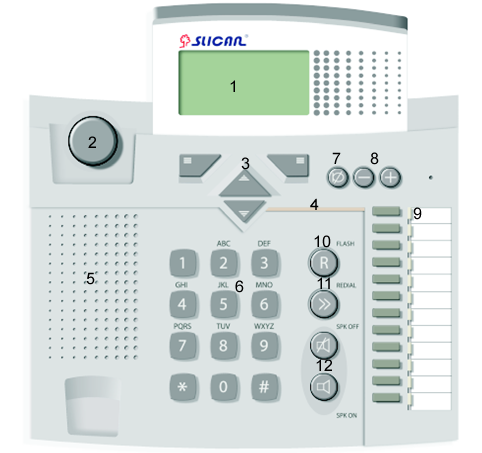
| 1. Display | 7. Mute key |
| 2. Cradle switch | 8. Volume control buttons |
| 3. Menu navigation keys | 9. Programmable keys with LED signalling |
| 4. Ringer LED | 10. Flash key |
| 5. Loudspeaker | 11. Redial key |
| 6. Keyboard | 12. 'Hands Free' mode ON/OFF buttons (headphone or speakerphone) |

| 13. CTS-232 console socket | 16. Handset socket |
| 14. POWER 36V/0.1A socket - power pack socket | 17. AUDIO OUT(CTS -202.IP) |
| 15. LINE socket | 18. Additional socket for headphones with microphone |
Display
|
System screen: the first screen that appears when the PBX and the phone (CTS-202.CL and CTS-202.BT) are ON. | |
|
System screen: the first screen that appears when the phone's (CTS-202.IP) PBX is ON. | |
|
This message notifies of a lost connection with the PBX. It will appear if no connection with the PBX is established within 30 seconds from the moment when the power supply is ON (CTS-202.CL and CTS-202.BT). After another 5 seconds the system will reset and attempt another connection. | |
|
This message will appear if the phone loses its connection with the PBX during normal operations (CTS-202.CL and CTS-202.BT). | |
|
No cable connected message (CTS-202.IP). | |
|
No connection with VoIP message (CTS-202.IP). | |
|
Display screen in the standby mode (all types of phone). | |
|
Display screen during a call (all types of phone).
Caller's name – the name of a subscriber assigned in PBX or the name of an entry in the personal or public directory; 1044 – an example number presented by the subscriber or extension number. 1:22 – Call time. Menu and Save – Current context menu function dedicated to the key. | |
|
Preview of an ACD group status:
Comment of the group – max. 10 characters Calls – the number of calls in queue/calls being processed by the speaking agents Waiting time - actual waiting time of a call that has been the longest in the queue Estimated time - estimated waiting time calculated on the basis of the average time of call including the number of waiting calls and the number of active agents/declared waiting time that defines the queue overflow Missed % - the number of calls lost due to the originator's cancellation given as a percentage/number of rejected calls due to the queue overflow during last 15 minutes given as a percentage Agents – the number of available agents/total number of agents
|
Console


| 1. Programmable keys |
| 2. Output socket to second console |
| 3. Input socket to phone |
Connecting CTS-202 phones up to the PBX
Physical connection of CTS-202 phones with the PBX
The regularity of CTS-202.CL and CTS-202.BT phone operations depends on the distance between the PBX and the phone, the number of connected consoles as well as on the quality of the wiring system inside the building.
| |
 |
Plug the handset cord into the handset socket. |
| |
 |
Connect the handset free plug with the socket marked with the following symbol on the telephone body: Then connect:
|
| |
|
In the case of CTS-202.CL and CTS-202.BT system phones, connect the other end of the phone line cord with the socket of the telecom service provider.
In the case of CTS-202.IP and CTS-203.IP-POE system phones, connect the other end of the Ethernet cable to the computer network socket. Important! Before you plug in the phone contact your network administrator to make sure whether or not the socket complies with your system telephone model. The products must be connected with dedicated sockets only. |
| |
 |
Regular phone operations: PBX icon on the display and acoustic signal in the user's handset. |
See below several useful hints about the proper installation of CTS-202.CL and CTS-202.BT telephones:
- Always connect the phone up by the phone cord or computer cable whose cross section must not be smaller than 0.5 mm2..
- Observe the pair compatibility condition (cord/cable).
- Do not connect the phone and other facilities (such as e.g. ISDN lines, other analogue phones) by means of a single shared phone cord.
- We suggest maintaining the phone-to-PBX distances specified below:
- Up to 200 m: in the case of phones that need no power supply; this distance ensures regular phone operations;
- More than 200 m: the phone will demonstrate some irregularities if you fail to use additional power supply unit, and
- More than 400 m: a power supply unit will be required to ensure regular phone operation.
REMEMBER!
For the CTS-202.CL, CTS-202.BT and CTS-203.IP-POE the power pack is not included as standard but is available as an option. In the case of an extended PBX-to-phone distance and the poor quality of cables you may have trouble with regular operation of CTS-202.CL, CTS-202.BT and CTS-203.IP-POE system phones. A solution to this problem is a power pack.
CTS-202.IP and CTS-203.IP-POE phone configuration for integration with a PBX
Configuration of phones for work in the company LAN
IMPORTANT! CTS-202.IP telephones will work only with pre-programmed PBXs. The admin must set the PBX parameters and program the keys, subject to the individual requirements of the customer. A phone is authorized in the PBX by entering its MAC address. This number is assigned individually to each phone and can be found on the label placed on the bottom of phone cover. It can also be viewed in the phone menu (VoIP - status).
Example 1 – a DHCP server operates in the local area network; network settings are defined automatically in the device.
CTS-202.IP phone is by default configured for operation in local area network and for integration with a DHCP server. The phone will automatically search for the PBX and connect with it after connecting to the network and power. The phone is ready to make calls after the connection is made.
Example 2 – a DHCP server is not used in the local area network, network settings are defined manually in the device.
You must perform the initial configuration before connecting the CTS-202.IP phone to a LAN. To do that, connect the phone to the 230V mains using the power pack. After initializing a phone connected only to the mains, only one menu is available – VoIP.
| VoIP(1) | |
| Network settings (1) | |
| VoIP server (2) | |
| Status (3) |
Using the context keys ![]() and
and ![]() , select Network settings from the menu VoIP.
, select Network settings from the menu VoIP.
Network settings – this menu enables entering phone settings for the network it will be used in. The procedure is:
- cancel downloading settings from a DHCP server,
- enter the phone's IP address,
- enter the subnet mask,
- enter the default gateway address,
- enter the DNS server address.
The phone will display the final question Set? Answer Yes. The phone will restart and perform initialisation. If no VoIP server address has been entered before, you will be informed that there is no connection with the PBX.
To set the IP address of a VoIP server, use the left context key ![]() to select VoIP Menu. Press
to select VoIP Menu. Press ![]() to scroll the menu list for the VoIP Server option and click Select
to scroll the menu list for the VoIP Server option and click Select ![]() to go to a submenu and enter the address.
to go to a submenu and enter the address.
If the CTS-202.IP phone is connected to the same local area network with the PBX, then the VoIP (PBX) server address can be acquired automatically and it is not required to enter it manually. Open the VoIPmenu and then VoIP server menu and use the left context key to select ![]() the option Auto.
the option Auto.
The IP Address and the name of VoIP server are supplied by the local area network administrator or PBX admin.
Status: DHCP On IP Number: 192.168.0.100 Subnet Mask: 255.255.255.0 Next OK |
Status – enables viewing the current VoIP settings of the phone
After connecting the phone to the local network and establishing a PBX connection, the VoIP menu is available as item 6 and has the following structure. Additional submenu appears – Codec.
| VoIP(6) | |
| Network settings (1) | |
| VoIP server (2) | |
| Codec (3) | |
| Status (4) |
Codec – this menu enables selecting the audio codec to be used by the phone for establishing calls. The selection of an audio codec affects the size of band that will be required for establishing the call. The available options:
- G.711 – broader band,
- GSM – smaller band,
- Auto – a codec will be selected automatically depending on whether the phone is used in the same local area network with the CCT-1668, MAC-6400 or CXS-0424 PBX that the phone works with. If the network is the same – G.711 codec will be used and GSM codec will be used outside the network.
Configuration of phones for work in a WAN (Internet)
NOTE1! CTS-202.IP or CTS-203.IP-POE system phones will work only with pre-programmed PBX. The administrator must set the PBX parameters and program the keys, subject to the individual requirements of the customer. A phone is authorized in the PBX by entering its MAC address. This number is assigned individually to each phone and can be found on the label placed at the bottom of the phone's cover. It can also be viewed in the phone menu (VoIP - status).
NOTE2! The phone uses port 5522 for operation.
You must perform initial configuration before connecting the CTS-202.IP phone to WAN (Internet). To do that, connect the phone to 230V mains using the power pack. Only one menu is available in the phone connected only to the mains – VoIP.
| VoIP(1) | |
| Network settings (1) | |
| VoIP server (2) | |
| Status (3) |
To enter the settings, use the left context key ![]() Menu to select VoIP menu. Press Select
Menu to select VoIP menu. Press Select ![]() , to enter Network settings. You can scroll the menu using the
, to enter Network settings. You can scroll the menu using the ![]() key.
key.
Network settings – this menu enables entering phone settings for the network it will be used in. First decide if the settings will be downloaded from a DHCP server. If not, enter the following items in sequence:
- phone's IP address,
- Subnet mask,
- default gateway address,
- DNS server address.
VoIP server – enter the IP address of the VoIP server (or name) in this menu, i.e. the address of CCT-1668, MAC-6400 or CXS-0424-type PBX.
Status – enables viewing the current VoIP settings of the phone. Also shows the phone's MAC address.
After connecting the phone to the WAN (the Internet) and establishing a PBX connection, the VoIP menu is available as item 6 and has the following structure. Additional submenu appears – Codec.
| VoIP(5) | |
| Network settings (1) | |
| VoIP server (2) | |
| Codec (3) | |
| Status (4) |
Codec – this menu enables selecting the audio codec to be used by the phone for making calls. The selection of an audio codec affects the size of band that will be required for making the call. The available options:
- G.711 – broader band,
- GSM – smaller band,
- Auto – a codec will be selected automatically depending on whether the phone is used in the same local area network with the CCT-1668, MAC-6400 or CXS-0424 PBX that the phone cooperates with. If the network is the same – the G.711 codec will be used and GSM codec will be used outside the network.
Error messages and troubleshooting when connecting the CTS-202.IP phone to a PBX
| Message text | What to do |
|---|---|
| Set the parameters of VoIP server | Enter the valid IP address and the VoIP server (PBX) name. |
| Set the LAN parameters | Switch on downloading the phone's network settings from a DHCP server or enter them manually. |
| Check network cable | Missing network connection. Check network cable. |
| PBX not found | The phone has automatic PBX search enabled but the PBX was not found in the network the phone is in. Enter the PBX (VoIP server) IP address and check the phone configuration. |
| No answer from DNS server | The PBX name was entered but connecting the DNS server was unsuccessful. |
| No answer from VoIP server | Cannot connect with the PBX. The PBX settings, PBX IP address might have been configured incorrectly or the PBX is switched off. |
| No answer from DHCP server | The DHCP server was not found in the local area network. Contact the network admin. |
| Connection established, waiting for authorization | Your phone has been configured correctly and connected to the PBX. You do not have the privileges assigned to use the phone in a PBX. Contact the PBX admin. |
| Wrong VoIP server name | The entered PBX name is incorrect. The PBX name was not found on the DNS server. |
Connecting the CTS-232 console
|

|
Screw the connecting element to the console and the telephone using the attached fixing screws. | |

|
Connect the plug of the connecting cable to the console's IN socket and to the phone's CONSOLE socket | |
|
Press any key to check the console's operation. The number assigned to the key should be shown on the display. |
|
Hooking up headphones and an external microphone
The phone enables connecting headphones or standard headphones with a microphone used with computers.

- Connect the headset plug to the socket marked with the following symbol on the telephone:
 .
. - Connect the external microphone cord plug to the socket marked with the following symbol on the phone:
 .
.
Important! Microphone and headphone earthing points must be separated.
Remember! When headphones are connected to the CTS-202.CL and CTS-202.BT phones, the system automatically switches to the headphones support mode which is signalled by the letter H shown on the display. In CTS-202.IP phones the headphones must be enabled in the phone menu. The Switching the headphones on/off function can be assigned to a programmable key.
Connecting the CTS-202.IP phone to the external call recording system
The CTS-202. phones are designed to support an external call recording system. Use the AUDIO OUT (RJ-11) to connect the phone with a recording device:
| No. of terminal | Meaning | 
|
|---|---|---|
| 1 | not connected | |
| 2 | STERa controlling the recorder | |
| 3 | VOICEa analogue signal from the phone | |
| 4 | VOICEb analogue signal from the phone | |
| 5 | STERb controlling the recorder | |
| 6 | not connected |
The analogue signal from the telephone is supplied continuously on the central part of the AUDIO OUT – VOICEa, VOICEb socket.
The STERa, STERb pair is used for starting the recording. The “connection” status (resistance approx. 35Ω) is present from the moment of picking up the handset (switching on the 'Hands Free' system) to hanging up the handset (switching off the 'Hands Free' mode).
The polarization of the sound signal and control signal does not matter.
The parameters of the control output (AUDIO OUT):
| max. activation current: | 100 mA | continuous |
| max. applied voltage: | 200 V | peak |
| cut-off current: | <1 mA | for 200 V |
| output capacity: | 25 pF | for signal 50 V; f=1 MHz |
WARNING: If you are using TelefonCTI the AUDIO OUT socket in the CTS-202.IP system phone is used for connecting the phone directly with line or microphone input on the computer's sound card.
Phone Settings
| Ringing tone | You may choose from among five ringer signals. |
| Ringing Volume | This function allows either selecting from among seven ringer volume levels (incoming call signals) or switching off the ringer. |
| Contrast | You may configure the optimum visibility on the LCD display. |
| Language | The phone enables displaying messages in different languages. The Polish language is the default setting. |
| Auto answer | The phone ensures automatic receipt of incoming calls: it will switch on the sonic circuit of either the headphone or 'Hands Free' system. You need not be involved. The call will be disconnected after 5 seconds from the moment the call originator has hung up the phone. |
| Auto dial | Automatic number dialling: press (for one second) and release the programmable key that is dedicated to an extension number or directory numbers. You need not pick up the handset. |
| Amplification | Sp-ph power adjustment of 'Hands Free' or headphone (if active) loudspeaker volume. Handset power adjustment of the handset loudspeaker volume. |
| Own number | Presentation of the number that has been assigned to your phone at the PBX level. |
| Outgoing digit | You can program a flag digit that should be dialled when you make an outgoing call (usually '0'). This setting is required for correctly redialling the received and missed calls as well as for dialling directory phone numbers. |
| Headphones | This feature allows switching on/off the headphones. If the headphones are ON, press the SPK ON button to hear the acoustic signals in the headphones instead of the 'Hands Free' speakerphone. |
| Telephone name | Using this option you can enter a phone name (e.g. secretary) which will be displayed on the standby screen. |
| Factory settings | This feature will delete all your current settings. You must not forget that it will also delete any and all numbers saved to your personal directory and to dedicated keys. |
| Program version | You can view the phone firmware release number. |
Phone Operations
To navigate via the phone menu, use the keys located in the top part of the keypad under the display. The functions are saved to every key.
![]()
![]()
The system will present them on the display and change descriptions in real time, depending on the menu item.
| |
The main context-related key functions are:
The current key function is displayed on the left side above the key. |
| |
The main context-related key functions are:
The current key function is displayed on the right side above the key. |
| |
* Scrolling up the menu.
|
| |
|
Quick Return to the Main Screen
You may leave any menu item at once and immediately return to the main screen (for instance, if you want to view the presentation of an incoming call number). To do so, press SPK OFF.
Function Buttons
The phone is equipped with function buttons designed for support manufacturer-defined programmable features.
| |
Flash | This button supports a selection of PBX services or dialling another subscriber during an active call. If you press this button in the standby mode, you will enter the Menu >> Services. |
| |
Redial | If you press this button in the standby mode:
|
| |
SPK ON |
|
| |
SPK OFF |
|
| |
Microphone OFF |
|
| |
Control Button |
|
| |
Control Button |
|
Menu Structure
| Call register (1) | ||
| Missed calls(1) | ||
| Received calls (2) | ||
| Dialed numbers (3) | ||
| Erase last call (4) | ||
| Last call time (5) | ||
| Last call cost (6) | ||
| Program keys (2) | ||
| Press a key | ||
| Set default | ||
| Services (3) | ||
| Call forward. (1) | ||
| Don't disturb (2) | ||
| Urgent call (3) | ||
| Phone lock(4) | ||
| Temporarily CLIR (5) | ||
| Park (6) | ||
| 3PTY (7) | ||
| Fixed account (8) | ||
| Urgent ringing (9) | ||
| Call intercept. (10) | ||
| Private call (11) | ||
| Working mode (12) | ||
| MCID (13) | ||
| Voicemail (14) | ||
| Conference (15) | ||
| MobilePhone (16) |
| Settings (4) | ||
| Ringing tone (1) | ||
| Ringing volume (2) | ||
| Contrast (3) | ||
| Language (4) | ||
| Auto answer (5) | ||
| Auto dial (6) | ||
| Amplification (7) | ||
| Own number (8) | ||
| Outgoing digit (9) | ||
| Headphones (10) | ||
| Telephone name (11) | ||
| Factory settings (12) | ||
| Program version (13) | ||
| Bluetooth (5) * | ||
| Switch BT on/off (1) | ||
| Register headphone (2) | ||
| Status(3) | ||
| VoIP (5)** | ||
| Network settings (1) | ||
| VoIP server (2) | ||
| Codec (3) | ||
| Status (4) |
* - this menu is available only in CTS-202.BT phones
** - this menu is available only in CTS-202.IP phones
You can quickly go to a selected menu item using a special shortcut.
| |
Press Menu. |
| |
Type the code of the menu item you want to select: for instance, if you want to open the Settings >> Own number menu, select 4 and next, 8. |
Receiving and finishing a call
| |
The incoming call is announced by the ringer, flashing LED strip, and display of the number or subscriber name on the screen. |
| |
If you want to refuse a call, press SPK OFF or the left context key Options, and then select Reject. In this case the call will be saved to the Received Calls category (see section 3.3). |
| |
If you wish to decrease the volume of the incoming call ringer, press the Mute button. Once the call originator hangs up the handset, the call will also be saved to the Received Callscategory. |
| |
If you wish to receive the call, pick up the handset or press the SPK ON button to go to the 'Hands Free' mode. |
| |
Having set the call, start talking. |
| |
If you wish to terminate the call, hang up the handset or press the SPK OFF button. |
Dialling Numbers on the Phone Keypad
Hot Dialling
| 1 | Pick up the handset or press the SPK ON |
| 2 | Dial the number you wish to call. |
| 3 | Having set the call, start talking.
|
| 4 | If you wish to terminate the call, hang up the handset or press the SPK OFF button. |
Once you pick up the handset, the phone leaves you 15 seconds for dialling the number (from the directory or keypad). After 15 seconds the PBX will play the unavailable signal.
“Cold” Dialling
| 1 | Dial the number you wish to call. |
| 2 | Pick up the handset or press the SPK ON |
| 3 | Having set the call, start talking.
|
| 4 | If you wish to terminate the call, hang up the handset or press the SPK OFF |
Dialling from the Lists
Quick Dialling of the Last Dialled Number
| 1 | Press the REDIAL button. The phone will display the last dialled number which will be the first item on the last-dialled numbers list; you can browse the list using the |
| 2 | Pick up the handset or press the SPK ON |
| 3 | Having set the call, start talking.
|
| 4 | If you wish to terminate the call, hang up the handset or press the SPK OFF |
Dialling Extension Numbers from the Subscriber List
| 1 | The phone must be set in the standby mode. Press |
| 2 | Type in the initial letters of the entry. The system will go to the beginning of the group with these initial letters. |
| 3 | Scroll the subscriber list up or down until you find your entry. |
| 4 | Pick up the handset or press the SPK ON |
Presentation of the Extension Number Status
If you select a single subscriber or subscriber group from the list of PBX extension numbers, the system will display the busy status on the screen. In the case of a group, the 'busy' status will be displayed if all the phones in this group are busy and the waiting queue is full.
The subscriber list will contain no subscribers without any comments. Select the left context key Pr. key (Program key) when browsing the list of subscribers and the system will go to the option of assignment of a specific subscriber to the quick dial key.
---Extension numbers---
Subscriber name
                  1044
Subscriber       (Free)

Program           Back
|
Call History (Call Register)
The call register is a cache record of the last calls initiated from a specific phone.
Such calls are saved to the categories specified below:
- Missed calls;
- Received calls, and
- Dialled numbers.
If you want to call a number that has been saved to the call history:
| |
Select Menu >> Call Register >> Missed, Received Calls or Dialled Numbers. |
| |
Dial the number you wish to call. |
| |
Pick up the handset or press the SPK ON |
Similar functionality is available by pressing the redial key ![]() and then up/down key
and then up/down key ![]()
![]() Pressing "Redial" several times toggles specific call lists, i.e.:
Pressing "Redial" several times toggles specific call lists, i.e.:
- First press displays the last-dialled numbers list.
- Second press displays the list of received calls.
- Third press displays the list of missed calls.
Use of Speed Access Keys
The quick dial keys are programmable backlit keys grouped in a column on the right of the CTS-202.CL, CTS-202., CTS-202.IP system phones and on the additional consoles dedicated for these phones.

The term 'programmable' means you can dedicate each of these keys to the parameters specified below:
- Extension number (subscriber, account, or group),
- Entry shortcut (personal or public directory),
- Service,
- Function, and
- Line (trunk status signal or trunk group status signalling): this parameter may be programmed by the PBX administrator only.
If the key is not programmed, its LED will remain OFF. If you press this key for a short period of time, the system will display a message reading that no feature has been assigned to this key.
Key (F8) Free Change Back |
The following sections will show you how to program and use the quick dial keys as well as how to interpret their LED signalling code. We will use either the terms 'key' or 'button'. Where you find a command "press and hold a key/button”, it will mean you have to press a key and hold it for about three seconds until a specific feature becomes active.
Speed Access Key Programming
| 1 | 
|
Select and press the quick dial key on the phone or console. |
| 2 | Change
|
Press the Change key. |
| 3 | or |
Select the type of function to be programmed for the key:
and press the Select context key. After selecting the type specify the extension number, shortcut, service or function you want to assign to the key. |
| 4 | Save
|
Confirm the selected entry. |
You can do the same from the phone menu: select Menu / Keys / Select Key.
Assignment of translation or the trunk quick selection function to a quick dial key is allowed to the PBX administrator only.
Speed access Keys: Subscribers and accounts
Interpretation of the LED Colour Code.
Speed access keys may be dedicated to specific extension numbers or subscriber accounts. Their LEDs will let you know the status of particular subscribers or accounts by means of a special colour code as follows:
- OFF: the subscriber/account is available,
- Continuous light: the subscriber/account is busy at this time,
- Even flashing: the subscriber/account is being called, and
- Odd flashing at irregular intervals: nobody calls this account or the subscriber has activated the DND service.
IMPORTANT! In the case of subscriber accounts, the LED signalling code will apply to the key dedicated to the account and to the subscriber whose phone is used for calling the account.
Using the Keys.
- Press and release the preset subscriber/account key. The system will display information on this subscriber/account [3].
- Press and hold the preset subscriber/account key. The system will call up this subscriber/account provided it is free. If the caller activates the function Urgent Ringing, the target phone will answer by means of a special ringing (analogue telephones) or the call will be immediately forwarded to the loudspeaker (if the subscriber has a CTS system phone).
- Press and hold the preset subscriber/account key. If this subscriber/account is being called, your phone will intercept the call [4].
Speed Acces Keys: Groups
Interpretation of the LED Colour Code.
Speed access keys may also be dedicated to specific groups. Their LEDs will let you know the status of particular groups:
- OFF: nobody calls this group and the system has not achieved the maximum capacity of this group;
- Continuous light: the system has achieved the maximum capacity of this group,
- Even flashing: someone is queuing and waiting for the call.
Using the Keys.
- Press and release the preset group key. The system will display information on this group, especially data such as: the number of queuing group agents/number of busy group agents / total capacity of the group. Press and release again the same key. The system will present the next persons from the group who are waiting for setting up a call to this group, if any. If the queue is empty, you will be able to call the group: press and release the key and pick up the handset. If the queue is not empty, you will be able to intercept the call of anyone from the waiting list: pick up the handset once you see the presentation of that agent on the display.
- Press and hold the key. The system will call it up if the queue is empty. If the queue is not empty, you will not be able to call the group even if you press and hold the key. Instead, pick up the handset and dial the number or press the group key.
IMPORTANT! In the case of a conference group in the standby mode or in the call setup mode, the system will not present information on the group even if you press the key dedicated to this conference group; neither will it view or intercept the calls from this conference group.
Speed Access Keys: Phone Book Entries and Services
Interpretation of the LED Colour Code.
Speed Access keys may be dedicated to phone book entries or services (such as e.g. DND, re-routing, etc.). If you dedicate a speed access key to a phone book entry, the LED will be always OFF. If you dedicate a speed access key to a service (except "Voice Mail"), its LED will let you know the status of this service:
- OFF: the service is not available, and
- Continuous light: the service is available.
Using the Keys.
- Press and release the preset service key. The system will activate the service and display a confirmation message. Press and release this key again. The system will switch off the service.
- Press and release the preset phone book entry key. The system will display the preset phone book entry.
- Press and hold the preset phone book entry key. The system will start setting up the call.
Interpretation of the LED Colour Code for Individual / Group Voice Mail.
If you dedicate a key to a preset the "Voice Mail" service or to an extension number of a public voice mailbox, its LED will let you know the status of this service:
- OFF: no messages (subscriber / public mailbox is empty);
- Slow flashing (1 sec. light/1 sec. break): new messages (the records have not been played);
- Continuous light: the records have been played, and
- Quick flashing (0.5 sec. light/0.5 sec. break): subscriber/public mailbox is full.
Using the Preset Individual / Group Voice Mail Key. Press down and release the preset key.
- Short press of the key will display the mail directory number (similar to the preset subscriber key) and information on the number of messages [number of new (not played) messages/number of all messages][5].
- Press and hold the "Voice Mail" service preset key. The system will activate this service and display the confirmation message. Press and hold this key again. The system will switch off this service.
- Press and hold the mailbox extension number preset key. The system will set up the call to the group voice mail.
Speed Access Keys: Functions
You may dedicate speed access keys to the features specified below:
- Personal phone book: access to the entries saved to the personal phone book (shortcut to the first option of the Book menu);
- Public phone book: access to the entries saved to the public directory (shortcut to the second option of the Book menu);
- Search - search for names in the personal and public phone books (shortcut to the third option of the Books) menu);
- Headphone: headphone ON/OFF (or else, select Menu >> Settings >> Headphone >> ON/OFF),
- Auto answer - switching on/off the [#Auto answer Auto answer] function (or else select Menu >> Settings>> Auto answer >> Yes/No).
Interpretation of the LED Colour Code.
If you dedicate the key to Functions No. 1÷3, the LED will be always OFF.
If you dedicate the key to Function No. 4, the LED will let you know the status:
- OFF: the headphone is OFF, and
- Continuous light: the headphones are ON (and additionally, letter H is shown on the display).
If you dedicate the key to Function No. 5, the LED will let you know the status:
- OFF: the automatic call receipt is OFF, and
- Continuous light – the automatic call receipt is ON (and additionally, letter A is shown on the display).
Using the Keys.
- Press and release the preset Function 1÷3 key. The system will display a corresponding Book menu option.
Using the keys Up or Down search the required item in the phone book. The record can also be searched by entering the name using the numerical keyboard. Pick up the handset or press the SPK ON button to dial the currently selected number from the phone book.
- Press and release the preset Function 4 or 5. The system will switch on this function and show the corresponding confirmation letter on the phone display. Press and release this key again. The system will switch off this function.
Speed Access Keys: Lines
The speed access keys may be dedicated to individual external lines that are connected with the PBX. The term "lines" means either individual trunks or trunk groups.
IMPORTANT! Speed access keys may be dedicated to the lines only by the admin at the PBX level. This procedure is not feasible at the phone level.
Interpretation of the LED Colour Code.
The preset line key LEDs will let you know the status of individual lines:
- OFF: the line is free;
- Continuous light: the line is busy;
- even flashing quick (0.5 sec /0.5 sec) – the line is damaged, and
- even flashing slow (1 sec /1 sec) – the line is being called.
Using the Keys.
- Press and release the preset line key. The system will display information on this line, especially data on the line name and busy status.
- Press and hold the preset line key. The system will book the line in order to set up the call by means of this line. To make this call, pick up the handset or press down the SPK ON button and dial the number you want to contact.
- If you pick up the handset when you view the status of the line you are calling, the system will intercept the call.
Speed access Keys: Benefits
Viewing and changing the Dedicated Keys
If you wish to view the assignment of a programmable key, set up the standby mode, press down the Menu, and then, press your programmable key. The system will display information on this key. Now you can change the assignment: press the left Change context key.
Call Interception
If the key is dedicated to a subscriber number, you will be able to intercept his or her calls subject to relevant authorisation. If this subscriber is being called, just press and hold the key for about 3 seconds; the system will intercept the call and forward it to your phone.
If the key is dedicated to the "Intercept ringing" service, the system will intercept the call from any phone belonging to the same PickUP group once you press and release this key.
Call Transfer without Call Answering
You need not answer the call. Instead, you may forward it to another subscriber or to an individual/group voice mail. Just press and hold the key dedicated to a subscriber or voice mail service/group voice mailbox extension number during an incoming call.
IMPORTANT!
This option will not be available if the admin sets limits on a subscriber at the PBX level.
A connection can also be transferred to the selected phone or to a group from the subscriber directory. You can do this in two ways:
First method:
| 1 | If you want to forward an incoming call without answering it, press |
| 2 | Select the number to which you want to forward the call (you may use the quick dial keys for searching the Subscriber List). |
| 3 | Press the |
Second method:
| 1 | If you want to forward an incoming call without answering it, press the |
| 2 | Select the Forward option. |
| 3 | Enter the number to which you want to forward the call or press the |
| 4 | Press the |
Urgent Call
If a key is dedicated to an extension number, press and hold this key for 3 seconds in order to call this number using the Urgent Call service.
IMPORTANT!
The 'Urgent Call' service is available subject to specific privileges of the subscriber. In the absence of such privileges, the subscriber who wants to use this service makes the call while the recipient hears a standard tone.
See another section of this text for another method of calling the 'Urgent Call' service.
List of Programmable Keys
The Keys menu allows viewing the status of the phone’s programmable keys.
| 1 | After entering the Keys menu, press the |
| 2 | Scroll the list up and down using the Up/Down arrow keys. The system will backlight the key whose status is being viewed. |
| 3 | If you press the Change key, the system will open the key programming menu. |
Phone books
The CTS telephones support three kinds of phone books:
- Personal phone book: the entries to this phone book are available with this phone only;
- Public phone book: the entries to this phone book are available to all the PBX users, and
- Subscriber list: list of all the PBX extension numbers.
Only the PBX admin is allowed to update the subscriber list. Phone books are saved to the PBX and will not be lost in the case of phone replacement or failure.
Search for Internal numbers in Subscriber list
| 1 | Press Arrow key down key. |
| 2 | Enter part of the name you are looking for or select desired subscribers group. |
| 3 | Using the UP and DOWN arrow keys search for the entry among the selected entries. |
After displaying searched subscriber, user can call it by picking the handset or assigning the contact to BLF button.
Search for Entries to Phone book (Personal and Public)
| 1 | Press the Book context key. |
| 2 | Select a personal or public phone book. |
| 3 | Select the Search option. |
| 4 | Enter part of the name you are looking for and then press Search context key. |
Entry to the phone book
Adding a New Entry to the Directory
| |
Press the Book key. |
| |
Select the phone book where you want to add a new entry (Personal book or Public book). |
| |
Press the Options key and then select Add name[6]. |
| |
Enter the name you wish to assign to the new entry. |
| |
Go to assignment of the number. |
| |
Enter the number you wish to save to the phone book. |
| |
Confirm the entry. |
Saving Numbers to the Phone book during the Call
You can add the incoming call number to the phone book during the call provided the caller has presented this number.
| 1 | Press the Options key. |
| 2 | Select the Directory option. |
| 3 | Select the Add to personal or Add to public option |
| 4 | Enter the name you wish to assign to the number and press the Numberkey. |
| 5 | Confirm the entry: press the Save key. |
Entry from Call History
| |
Open the Call Register menu. |
| |
Search for your specific call in the call history. |
| |
Once you find this entry, press the Options key. |
| |
Select the Add to personal or Add to public option |
| |
Enter the name and confirm the entry: press the Save key. |
Entry Processing
How to Edit Entries
You will be able to edit entries in the public phone book if you have the applicable privileges. You need no specific privileges to edit your own entries in the personal phone book.
| 1 | In the standby mode, open the Book menu. |
| 2 | Select the directory where you want to edit the entries. |
| 3 | Search for the entry you want to edit. |
| 4 | Press the Options key and select Edit. You can edit descriptions or numbers. |
| 5 | Confirm changes: press the Save key. |
How to Copy Entries (from and to Phone books)
You will be able to copy entries from and to the personal and public phone book provided you have acquired the applicable privileges to copy and save entries to the public phone book.
| 1 | In the standby mode, open the Book menu. |
| 2 | Select the phone book from where you want to copy an entry. Once you confirm your selection, the system will start searching for the entries to this phone book. |
| 3 | Find the entry you want to copy. |
| 4 | Press the Options key and select Copy. Confirm your entry. |
How to Move Entries (from and to Phone books)
You will be able to transfer the entries from and to personal and public phone book provided you have acquired the applicable privileges to save entries to the public phone book.
| 1 | In the standby mode, press the Book key. |
| 2 | Select the phone book from where you want to transfer an entry. Once you confirm your selection, the system will start searching for the entries to this phone book. |
| 3 | Find the entry you want to transfer. |
| 4 | Press the Options key and select Move. Confirm your entry. |
How to Delete Entries from Phone book
Only a subscriber who has acquired the applicable privileges will be able to delete entries from the public phone book.
| 1 | Press the Book key. Select the Search option. |
| 2 | Enter part of the name you want to delete. |
| 3 | If the entry displayed on the screen is not the desired one but only includes the desired phrase, then you can go to the desired element using the menu scrolling keys (up/down). |
| 4 | Open the Options menu. Select Erase. Confirm the entry erasing operation. |
How to Dedicate Speed Access Keys
If you use an entry repeatedly (you often dial an outgoing number that is saved to one of the phone books), you will find it useful to save this number to one of the speed access keys. Using a key programmed with this method is described in above.
| 1 | In the standby mode, press the Bookkey. |
| 2 | Search for the phone book from where you wish to select the entry and assign it to a speed access key. Once you confirm your selection, the system will start searching for the entries to this phone book. |
| 3 | Search for the entry you want to assign to the key. |
| 4 | Press the Options key and select Assign Key. |
| 5 | Press the key you want to dedicate to this entry. |
| 6 | Confirm your selection: press the Save key. |
Services
Each of the services that are available from the PBX may be directly selected on your phone. Just pick up the handset and use the keypad.
See the Slican CCT-1668.S, L, EU, or MAC-6400 and CXS-0424 PBX Operations Manuals for a description of all the services and methods of selection. From this manual, you will learn how to select the services directly from your phone menu.
You can smooth this process by dedicating specific services to the programmable keys of your phone.
Call Transfer
| 1 | Your current call may be transfered to any subscriber registered with the PBX or an external caller provided you have acquired the applicable privileges from the PBX admin. |
| 2 | To forward a call, press FLASH. |
| 3 | Dial the number to which you want to forward the call. |
| 4 | If you forward a call with announcement, wait until your selected subscriber answers the call. If you refrain from call announcement, immediately hang up the handset. |
| IMPORTANT! Press the FLASH button twice to come back to the number that awaits the transfer. Repeat the steps of the present procedure from para. 2 above in order to continue searching for the number to which you want to forward further the call. | |
| 5 | Once you hang up the handset, the PABX will set up the call between the subscribers. |
DND Service (Do Not Disturb)
The "Do Not Disturb" service locks the incoming calls on your phone. The caller will receive the message: "Subscriber unavailable now; please call again later" or your own message. The system telephone will display the following message: "Do Not Disturb".
The "Do Not Disturb" function has different effects depending on the selected number type:
- If the caller selects a group number, the subscriber who has activated the DND service and who belongs to this group will be treated as a busy subscriber.
- If the caller selects a direct number with active DND service, the caller will receive the message: "Subscriber unavailable now; please call again later."
| 1 | Go to Menu >> Service >> Do not disturb >> ON/OFF. Confirm your option pressing down the Next key. |
| 2 | Exit the Menu, for instance, press the SPK OFF button. |
| 3 | The system will display Do not disturb message confirming that the service is active. |
IMPORTANT! If you dial a number with an active DND service, your system telephone will display the "Do Not Disturb" message.
Park
First method:
| 1 | Having set a call with a number or having answered an incoming call, press the Options key and select Menu >> Services >> Park. |
| 2 | Wait for the message: "Service Accepted", hang up the handset or press the FLASH button to dial the number you want to contact, e.g. to talk about the parking caller. The call will be parked for 3 minutes and the subscriber on the hold will hear a musical signal. |
| 3 | To return to a parked call, go again to the Menu >> Services >> Park. |
| 4 | Wait for the call that is announced on the screen by the Return call... message. |
Second method:
| 1 | Having set a call with a number or having answered an incoming call, press the Park key. |
| 2 | Wait for the message: "Service Accepted", hang up the handset or press the FLASH button to dial the number you want to contact, e.g. to talk about the parking caller. The call will be parked for 3 minutes and the subscriber on the hold will hear a musical signal. |
| 3 | To return to a parked call, press the Unpark key. |
| 4 | Wait for the call that is announced on the screen by the Return call... message. |
Phone Locking
The "Phone Locking" function means that your phone has got the lowest level rights. You will be allowed to call extension or emergency numbers only (subject to the PABX-defined 'A' category). Using a locked phone you can call temporary or fixed accounts. If this function is active, you will not be able to access the phone menu, system keys, directories, or subscriber lists. The "Phone Locking" service will be valid until cancellation.
The phone may also be locked at the PABX administrator level. You cannot cancel this lock.
| 1 | Go to Menu >> Services >> Phone locking. |
| 2 | Switch this service on or off. Type a four-digit lock code, e.g. 6565 (the first code is assigned by the service team and you should change it using the #55 service). |
| 3 | Confirm your entry. Exit Menu. |
| 4 | The system will display the LOCK message confirming that the service is active. |
| 5 | To cancel the lock, press the Unlock key and type the lock code. |
Fixed Account
The "Fixed Account" feature recalls the privileges of another phone or virtual subscriber to your phone. If the account is recalled on a phone itself, the system will cancel it on other phones, if applicable. A fixed account may also be called up on a locked phone.
| 1 | Select Menu >> Services >> Fixed account. Switch the service on or off. |
| 2 | Type the account number.IMPORTANT! By pressing the |
| 3 | Confirm your entry. |
| 4 | Enter a four-digit PIN account code (the code is individually assigned by the service team; you can change it using the #55 service). Confirm your entry. |
| 5 | Exit Menu. The system will display account message confirming that the service is active. |
Urgent Ringing
If you call a subscriber using this service, the system will automatically open the interphone mode on the target CTS phone or generate a specific signal on the target analogue phone.
IMPORTANT! For another method of calling the 'Urgent Ringing' service - see in another part of instruction.
| 1 | Select Menu >> Services >> Urgent ringing. |
| 2 | Exit Menu. The system will display the URGENT RINGING message confirming that the service is active. |
| 3 | This service is available only for the number you dial immediately after selection of the URGENT CALL option. |
Call forwarding
The Call Forwarding function is a PABX service that consists in re-routing of the incoming calls to another phone or account. The service is active until cancellation.
| 1 | Select Menu >> Services >> Call forwarding. |
| 2 | Switch the call forwarding option on or off. |
| 3 | Enter the number to which you want to forward the call, e.g. 123. IMPORTANT! You can also use the arrow keys to select the type of phone book from which you want to select a target number for call forwarding. Select the phone book and look for the number using the up and down arrow keys or typing the first few letters of the subscriber’s name. |
| 4 | Confirm and select the type of call forwarding:
|
| 5 | Confirm your selection and select the forwarding criteria:
|
| 6 | Confirm your selection and exit Menu. |
| 7 | The system will display call forwarding and letter F[6] on the display. |
IMPORTANT! In addition, if the phone rings to group instead of individual subscriber, only "Calls from group" and "Unconditional" forwarding options will be active.
Malicious Calls (MCID)
This service allows recording a call as a malicious call on the master PABX and marking it as a malicious incident in the PABX event buffer.
1 How to select this service during the call:
Press the Options key and select Menu >> Services >> MCID[7] Confirm the service.
2 How to switch on this service once the call is terminated by the caller:
Press the MCID key within 30 seconds from the moment the caller has hung up the phone.
IMPORTANT! Wait until the caller of the malicious call hangs up the phone! The target phone cannot be the first to be hung up!.
Three-Party (3PTY) Calls
First method:
| 1 | Set up the call with your first interlocutor and hold the line using the FLASH button. |
| 2 | Dial the number of the second interlocutor and open the Options >> Set up 3PTY menu while talking. |
| 3 | Confirm the service. The three-party call has been successfully set up. |
| 4 | During the call, the caller of the three-party call can change interlocutors. In such a case, one of the partners will stay on hold. |
Second method:
| 1 | Dial the number of the first interlocutor, set up the call, and hold the line using the FLASH button. |
| 2 | Dial the number of the second interlocutor and press FLASH#3 while talking. |
| 3 | The three-party call has been successfully set up. |
IMPORTANT! The caller of the three-party call can switch between the partners. To do so, press the Optionskey and select the partner with whom you wish to talk, using the navigation keys.
IMPORTANT! The three-party call can be terminated by its caller who should press FLASH#0.
IMPORTANT! Once the caller hangs up the phone, the system terminates the 3PTY call.
IMPORTANT! To switch over to one partner only (the other partner hearing a musical signal), the caller should press either FLASH#1 or FLASH#2 (where: 1 - means that the caller wants to talk with the first selected partner to this call, and 2 stands for the talk with the second partner). To restore the 3PTY call, the originator should press FLASH#3 .
Call interception in a PickUp group
This service ensures interception of the incoming calls addressed to another PABX user provided that the subscriber who calls up this service has acquired the applicable privileges (the subscriber must belongs to the same PickUp group, i.e. call interception group).
| 1 | If you want to intercept a call addressed to another number of the PickUp group and your own phone belongs to the same group, select Menu >> Services >> Call Interception. |
| 2 | Pick up the handset to answer your intercepted call.IMPORTANT! Apart from the above mentioned method (picking up the handset) you can also intercept the call (i.e. enter the call status and skip the ringer) pressing down the SPK ON button and typing #37. |
Temporary CLIR
This service switches off presentation of the number for the period of a single call.
| |
Select Menu >> Services >> Temporary CLIR. Confirm your selection. |
| |
Pick up the handset or press the SPK ON button. |
| |
Dial the number you wish to call. |
Private Call
This function will change the privileges to set up the calls (subscribers' personal privileges) and register the call as a private one with the PABX buffer. Such calls are identified by the billing application for the purpose of separating business calls from private calls.
| |
Select Menu >> Services >> Private calls. Confirm your selection. |
| |
Pick up the handset or press the SPK ON button. |
| |
Dial the number you wish to call. |
Urgent Call
An urgent call means that the subscriber will be given a special category of access in the outgoing traffic for the period of a single call. Due to this service the call may bypass standard routes. The Urgent Call service is available only to subscribers who have acquired the applicable privileges. The service is active for the period of a single call made from the telephone.
| |
Select Menu >> Services >> Urgent calls. Confirm your selection. |
| |
Pick up the handset or press the SPK ON button. |
| |
Dial the number you wish to call. |
Operating Modes
This service ensures a manual change in the operating mode at the PABX level. The subscriber must acquire the applicable rights to change the PABX operating mode. A special option allows dedicating the operating mode to a selected key on the system telephone.
| 1 | Select Menu >> Services >> Operating Modes. Using the menu navigation keys select the operating mode you wish to use (e.g. Day - Manual Mode). |
| 2 | Press Next after you find the operating mode. The PABX will ask you to type the access code. |
| 3 | After entering the Key the PABX will ask you to enter the validity period (deadline) of your operating mode (if you fail to enter the time limit, your operating mode will be cancelled during the first scheduled change in the operating mode of the PABX). |
Voice Mail
Due to this service the caller may leave a voice message for a specific subscriber.
IMPORTANT!
If the subscriber wishes to use this service, the PABX admin will have to assign an individual voice mail for saving the messages, as well as a voice mail extension number for the purpose of service activation, new message notification, and message management.
To switch on this service, you must set the call transfer to the extension number of the individual voice mail:
| 1 | Select Menu >> Services >> Call forwarding >> Switch on. Confirm your selection by pressing the Next key. |
| 2 | Type the directory number of the individual voice mail (the default value is 1000) and confirm your entry. |
| 3 | Select the type of calls you wish to send to the voice mail:
Confirm your selection. |
| 5 | Select the criteria of call transfer to voice mail:
|
| 6 | Confirm your selection and exit Menu. |
| 7 | The system will display the letter V[8] at the top right-hand corner of the screen to confirm that the service has been switched on. |
To switch on/off the active service (switch on/off the call transfer to voice mailbox):
| 1 | Go to Menu >> Services >> Voice mail >> ON/OFF. Confirm your option pressing down the Next key. Exit the Menu, : for instance, press the SPK OFF button. |
| 2 | The system will display the letter V at the top right-hand corner of the screen to confirm that the service has been switched on. |
See the Operations Manuals of the Slican PABX for more information on this service (how to record your own welcome message - service #79; notification and play new messages).
Conference Call
Important: The CTS-102.HT system telephone does not support conference calls.
This service ensures simultaneous calling many persons and setting up conference calls. The participants may use any type of phone; they may be either PABX subscribers or external participants. The maximum number of participants is:
- 8 in the case of CCT-1668,
- 31 in the case of CXS-0424,
- 30 in the case of MAC-6400.
The caller of a conference call can manage the session (to act as a custodian).
1. Select Menu >> Services >> Conference. The system will display information (see the figure). From now on, your phone is deemed busy and nobody can contact you.
2. To add a new participant to the conference, press the Options key and select Add participant. Once you do this, select another participant as follows:
- Enter the applicable phone book or external number;
- press the Book key and select a number from any of the phone book or extension number list[9],
- Press a apeed access key dedicated to a specific subscriber/number.
Once you add a participant using the Next key or automatically (by pressing the key dedicated to the subscriber/number), the system will come back to the screen in order to add more participants to the list.
3. Press Back once you have added all the persons with whom you wish to have a conference call. To view the list of participants, press Participants and scroll the list using the Up/Down arrow keys. You can delete a participant: select the Delete option from the Options context menu.
4. How to set up a conference call:
First method:
When viewing the list of participants pick up the handset and press SPK ON. The system will activate the ringers on the telephones of the persons eligible for the conference. Once a participant receives the call, he or she will hear the message "Teleconference".
Second method:
In the conditions described in section 3 of this table and press the Options key and select Ring.
The system will activate the ringers on the telephones of the persons eligible for the conference. Once a participant receives the call, he or she will hear the music until the custodian joins the conference, by e.g. picking up the handset or pressing SPK ON.
5. The conference call is now set up (the call has been answered by at least one participant and the custodian has become an active participant, i.e. he or she has picked up the handset)
The elements available after pressing Options:
- Add participant – adding a new participant to the current conference call[10],
- Ring: set up a "cold" conference call (caller's handset on the cradle) - see ;
- Disconnect all – the conference call is over;
- Mute all – switch off microphones in all the participants' phones (the voice belongs to the conference custodian only);
- Switch on all – switch on microphones in all participants' phones, and
- Leave – leave the conference call without disconnecting it.[11]. If you select this option, the system will leave the message "Conference" on the screen, which means that the conference is not over yet.
In this condition, you can return to the conference call by means of two methods:
a) Press the Options key and select the option Conference: the system will allow you to view the conference status (you can do the same by pressing down the quick dial key dedicated to the "Conference" service). You will return to the conference call the same moment you pick up the handset or press the SPK ON button. b) Pick up the handset or press the SPK ON button, and then press the key dedicated to the "Conference" service.
The Participants button allows viewing the list of participants. You can scroll this list using the Up/Down[12] arrow keys. The system will display information on particular participants.
Shown below are the Options available for a selected participant:
- Delete: deletes a participant from the conference;
- Microphone OFF/ON: switches off/on the microphone of a specific participant [his or her status will change to (MUTE)/(call)];
- Speaking: switches on the microphone of a defined participant only (the remaining microphones are switched off), and
- Personal call – direct call to a participant. Once this call is terminated, you can:
a) Add this person again to the conference: press the key dedicated to the "Conference" service or select this service from the menu that is available when you call this subscriber, or,
b) Delete this participant: hang up the handset or press SPK OFF.
The custodian can return to the conference call using the procedure described in section 5 in the table.
Custodian: assignment of the custodian function - Only the subscribers who use CTS-202 series system telephones may use this function. |}
Call override
The CTS system telephone supports the "override" service. You can join a call between two other subscribers and disconnect it, if required, or leave the call without disrupting it. A person "override" can also leave the call without disconnecting the two other subscribers. This service is available subject to the applicable privileges and under the condition that none of the two subscribers is protected from a call override. The service does not depend on the subscriber's status (subscriber registered with PABX or external subscriber). This service is also performed when one of the pair of subscribers from the call you want to join is not an extension subscriber of the PABX.
If busy, proceed as follows:
To join the call, select the Override option using the right-hand context key. Having joined the call you can disconnect it. Select Disconnect using the left-hand context key. To leave the call and let the subscribers continue talking, hang up the handset or press SPK OFF.
Automatic Redial: AutoRD
The subscriber you wish to contact is:
- busy, or
- unavailable,
or
- or all the lines in your PABX are busy at this time.
, then if you select this service, when the subscriber:
- is free (formerly busy),
- is available (formerly unavailable),
or
- or when any PABX line becomes free.
you will be notified by the ringer and after lifting the handset the system will automatically dial that subscriber's number. This service is available for extension numbers and outgoing calls.
The service will remain valid for:
- 90 minutes in the case of extension numbers (for busy and unavailable subscribers);
- 60 minutes in the case of outgoing calls (for unavailable targets);
- 30 minutes in the case of PABX busy lines, and
- 10 minutes in the case of outgoing calls (for busy targets).
NOTE: You can stand queue in the case of:
- PABX subscribers using analogue telephones;
- PABX subscribers using system telephones;
- External subscribers available via the ISDN trunk;
- External subscribers available via the GSM trunk
or - any busy trunk on the PABX.
To use this service, proceed as follows:
1. If your target does not answer, the system will wait approx. 5-10 seconds and display AutoRD for the context button (bottom left corner of the screen), which enables activating the service.
(The CTS-102.HT phone does not display this message.)
2. If your target is busy, the system will immediately display the AutoRD option for the context key (bottom left corner of the screen). You can now activate the service.
3. If the service is accepted, the system will display applicable information and the time of activity of the service. You can cancel the service: press the Stop context key.
4. If your redial target is now available or free, the system will notify you by ringing and displaying the message "Back again" for the unavailable target or "Queue" for the busy target.
If you pick up the handset at any of the abovementioned messages, the system will dial the target number again.
MobilePhone service
This menu option enables switching on and off the MobilePhone service provided that the phone number defined as MobilePhone for the specific subscriber and any parameters of this service are defined in ConfigMAN.
| |
Select Menu >> Services >> Mobile Phone. Confirm your selection. |
| |
Select Activate or Cancel. |
| |
Confirm your selection. |
IMPORTANT! This service is available provided the firmware version installed in the PABX is at least 4.05.
Bluetooth in CTS-202.BT
IMPORTANT! The Bluetooth base installed in CTS-202.BT phone enables connecting devices such as a Bluetooth headphone with PIN ”0000”. Most of the available headphones have this PIN code. If the PIN code of the headphone can be changed, set the code to “0000” before attempting to log into the Bluetooth base in the CTS-202.BT phone.
Switching the Bluetooth system on and off
The Bluetooth system can be switched on and off using two methods.
1) In ConfigMAN, after selecting the BT box on the tab Peripherals/ CTS / Settings. This field is active only if the field DevTyp located on the same sheet has the CTS-202.BT option enabled; in the case of the remaining options the field is greyed out.
2) The Bluetooth system can be also switched on and off by the subscriber from the system phone CTS-202.BT. The procedure is as follows:
- Select Menu >> Bluetooth >> Switch off BT. Confirm your selection.
- Switch off BT? will display
- Confirm switching off Bluetooth.
If the Bluetooth module is switched off, it is necessary to perform the following
- Select Menu >> Bluetooth >> Switch on BT. Confirm your selection.
- Switch on BT? will display
- Confirm switching Bluetooth on.
Registering a headphone
- Select Menu >> Bluetooth >> Register headphone.
- If any headphone has been registered before, the following question will be displayed Delete current headphone?
- After confirming the deletion of the headphone, the Deleted will appear.
- After pressing OK, the phone will begin searching for a headphone with activated broadcasting[13].
- The name of the found headphone will appear on the display.
- The phone will finish the registration after confirmation.
After the Bluetooth headphone is registered, the letter B appears in the upper right corner of the display which signals that the Bluetooth headphone is available for conversations. “B” is displayed as long as the registered Bluetooth headphone is located near the Bluetooth base integrated in the phone.
Status
| |
Select Menu >> Bluetooth >> Status. |
| |
The name of the registered headphone and its address will appear on the display. |
| |
Press the OK key. |
Using Bluetooth headphone
If the Bluetooth module is on and the headphone has been registered, the subscriber can accept incoming calls and make outgouing calls using the Bluetooth headphone.
Setting up outgoing calls
An outgoing call can be set up using two methods.
Method I
1. Press SPK ON. The user will hear the PABX dialling tone in the Bluetooth headphone.
2. Dial the desired number using the phone keyboard.
3. After the call is set up you can talk using the Bluetooth headphone.
Method II
1. Dial the desired number using the phone keyboard.
2. Press SPK ON, you will hear the dialling tone in the Bluetooth phone.
3. After the call is set up you can talk using the Bluetooth headphone.
IMPORTANT! Please note that the button located on the Bluetooth headphone is only used to answer a call and not to initiate one. This is why when using the 2nd method of setting up an outgoing call II, you cannot initiate calling by pressing the button on the headphone.
Receiving incoming calls
To answer an incoming call using the Bluetooth headphone, press the call answer button on the headphone or SPK ON key on the phone. You can start a conversation using the Bluetooth headphone.
Using different sound sources during a conversation
Switching on the Bluetooth headphone support does not lock other conversation interfaces of the CTS-202.BT phone. If you press SPK ON during the call (incoming or outgoing), then the sound sent to the Bluetooth headphone will be directed to the 'Hands Free' system. Pressing SPK ON again will direct the sound back to the Bluetooth headphone. This button acts as a switch. SPK OFF always ends the active call. Using SPK ON is also important when using the phone's handset as an alternative sound source. If you pick up the handset during an active call in the Bluetooth headphone, then the sound will be directed to the handset. Hanging up the handset will finish the conversation. If you want to continue the conversation using a Bluetooth headphone after hanging up the handset, press SPK ON before doing that.
Phone Special Functions
Pause in Selected Number
If you set a pause in a number, the system will suspend dialling for a period of 5 seconds.
Example of dialling an outgoing call number plus extension number:
1. Enter the first part of the number (e.g. main number 0523251111) during cold calling (entering the number before picking up the handset) or when entering a new number to the phone directory (1.2.1 Adding a New Entry to the Directory).
2. Press twice the "*" key and wait for the letter "p" (if you want to double the waiting time, repeat this step).
3 .Enter the remaining part of the number (e.g. extension number: 168).
IMPORTANT! You can also add pauses when you enter new numbers to the personal or private directories.
Information about busy line and on PBX failures
The busy status of the public lines for the specific phone and the displaying of PBX failure information are shown on the phone's display if the PBX admin switches these functions on.
Monday 30.07.2010 09:22 (02/19)(03) Menu Book |
Information on the PBX alarms, such as e.g.: call buffer overflow; emergency power supply, trunk failure, etc., is displayed in the third line from the top.
The second line from the bottom displays the busy status of lines in the PBX using the following key:
where:
aa – the number of busy lines,
bb – the number of available lines,
cc – the number of damaged trunks,
a line is understood here as:
- a single analogue link,
- single ISDN link channel (2B+D),
- single ISDN link channel (30B+D),
- a single VoIP channel,
- a single GSM link.
The so called VoIP anonymous trunks are never presented as damaged. Note also that when a damaged trunk is presented, if it refers to an ISDN link (2B+D), then 2 lines (i.e. 2 B channels) will be eliminated from the bb field. Similarly, in the case of a ISDN link (30B+D) 30 lines will be subtracted.
Also, if a VoIP trunk is presented as damaged, then no VoIP channel will be subtracted from the bb field because it can be used by other trunk; and damaged trunk does not mean a damaged channel.
Safety Requirements applicable to the Operations and Maintenance of CTS System Telephones
It is essential to comply with the rules governing safety and use to ensure correct operation of this device.
Below are the basic elements to be taken into account by the manufacturer in the case of any complaints and claims submitted by users.
The rules relate to the installation, location and the requirements for the electrical power supply and data communication network.
Installation:
- Only authorised or qualified manufacturer's service teams are allowed to install and initialise the device.
- All the installation procedures should be performed in compliance with the assembly principles as well as any occupational health and safety regulations.
Working Environment:
- The system telephones must not be installed in closed rooms featuring high humidity levels. Such rooms may reduce the service life and quality of electronic component functions.
- Given the risk of flooding, the system telephones should not be located near water containers or water sources (such as water pools, valves, etc.).
- The device must not be installed in rooms featuring considerable dust levels or a strong electromagnetic field.
The system telephones may demonstrate irregular operations, interferences, or box discoloration if installed at the places exposed to:
- Direct sunlight,
- Frequent or strong vibrations or mechanical impacts,
- Live antenna radiation.
All devices connected to the telephone must have certificates of conformity with the standards in force in the European Union.
Certificate of Conformity and Correct Product Disposal
 |
|||
| Manufacturer: SLICAN Sp. z o.o. |
Type: System phone | Model: Slican CTS-202, |
|
| Product Description: Slican CTS-202 sets are system telephones designed for integration with Slican PABXs. They feature an LCD display and 12 programmable quick dial backlit keys. This line of telephones can be integrated with CTS-232 consoles (one console is 30 additional keys). The telephones are connected to PABXs via a single cable pair (CTS-202 and CTS-202.BT - are digital system telephones compliant with the U terminal) or a LAN/WAN using Ethernet cables (CTS-202.IP VoIP system telephone). | |||
| The product complies with Directive No. 99/5/EC R&TTE and meets the requirements specified in the harmonised standards mentioned below: EN 60950-1:2001 + A11:2004; |
|||
| Additional Information: The device has been tested in a typical configuration, including connection with the SLICAN PABXs: CCA-2720, CCT-1668, MAC-6400 and CXS-0424. It complies with the requirements applicable to admissible interference levels for B Class products. If the device is installed improperly, it is categorised as class A and the following warning shall apply: “The device is a class A product. It may cause interference with radio waves when used in household environments, which requires the user to undertake appropriate measures”. |
|||
 |
|||

- ↑ Provided the subscriber has acquired the right to access the public directory (this right is assigned by the administrator).
- ↑ The CTS-202.IP phone does not feature a 'Hands Free' mode microphone
- ↑ Provided no [#Auto dial Auto dial] function has been set on this phone.
- ↑ Provided no protection from call intercepting has been activated by the admin on this subscriber/account.
- ↑ If you pick up the handset or press the SPK ON button when the phone displays these data, the system will connect you to voice mail.
- ↑ 6.0 6.1 You can add new entries to the public phone book(the Add new entry option is active) provided you have acquired the applicable privileges from the PABX administrator.
- ↑ 'From Malicious Call IDentification.
- ↑ From Voicemail
- ↑ You can also open the applicable phone book or subscriber list using the navigation keys: see section – Phone Menu (navigation via the phone menu).
- ↑ You can also add a new participant using the FLASHbutton: press it, dial the number and press the key dedicated to the "Conference" service while talking with this participant (or else, select this service from the menu which is available when you talk with this participant).
- ↑ You can do the same when you hang up the handset or press SPK OFF
- ↑ This feature is also available to the participants who use the CTS-202 series system telephones.
- ↑ If there is more than one headphone with broadcasting activated, the phone will register the one that was found first.