Difference between revisions of "SKD Instruction manual v1.03"
(→Programming options) |
(→Previous version) |
||
| (2 intermediate revisions by the same user not shown) | |||
| Line 675: | Line 675: | ||
<center>[[Image:io skd proper equipement.png]]</center> | <center>[[Image:io skd proper equipement.png]]</center> | ||
| + | |||
| + | = Previous version = | ||
| + | Previous version of this Instruction manual can be found [[SKD Instruction manual v1.01|here]]. | ||
= Notes = | = Notes = | ||
Latest revision as of 09:15, 14 March 2011
Contents
- 1 SKD
- 2 Features of Slican doorphones
- 3 Installation
- 4 Using access control system
- 5 Safety requirements while using SKD series doorphones
- 6 Certificate of conformity, proper device disposal
- 7 Previous version
- 8 Notes
SKD
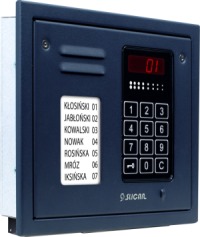
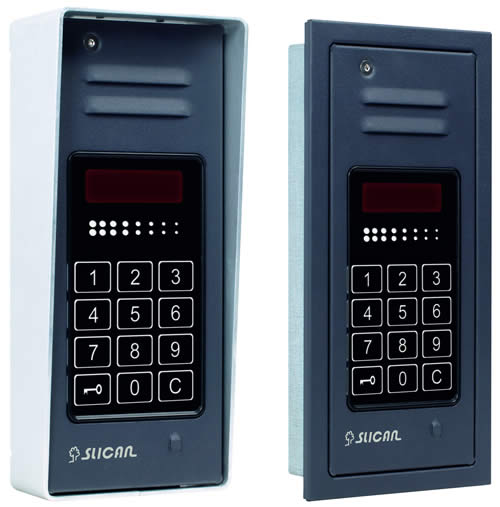
KD12N KD12P KN12N KN12P
Features of Slican doorphones
SKD series doorphones are equiped in numeric keyboard and display. There are manufactured as following models:
| Code | Description |
|---|---|
| SKD.RF-KN12P | Underplaster, without apartment list |
| SKD.RF-KN12N | Overplaster, without apartment list |
| SKD.RF-KD12P-graph | Underplaster, with apartment list |
| SKD.RF-KD12N-graph.al | Overplaster, with apartment list and protection frame |
SKD doorphones can work with following Slican PBXes[1]:
- Slican CMT,
- Slican PMS-08,
- Slican CCA-2720,
- Slican NCT-1248,
- Slican CCT-1668,
- Slican MAC-6400.
Following table presents number of doorphones possible to connect, depending on PBX type (Table 1).
| PBX type | Maximal number of doorphones |
|---|---|
| Slican CMT | 2 |
| Slican PMS-08 | 2 |
| Slican CCA-2720 | Half of maximal number of internal analogue lines |
| Slican NCT-1248 | Half of maximal number of internal analogue lines |
| Slican CCT-1668 | 20 |
| Slican MAC-6400 | 20 |
| Slican ITS-02XX; ITS-01XX | 6 |
Doorphone connection method is the same for all PBX types, differences are visible only while PBX programming (to know how to programm PBX to working with doorphone, see PBX programming instruction).
SKD doorphones are devices, which enable following activities:
- dialing PBX extension number to establish call, using touch keypad (phone like),
- extablish call after dialing doorphone number (listening),
- switching electro-lock (opening door) directly from phone while conversation, using PIN codes or using proximity identifiers (card or pendant),
- possibility of connecting additional button or movement detector for opening door,
- possibility of connecting opening door button,
- audio status signaling – pressing button, disconnection, etc.,
- call time duration – not longer than 3 minutes,
- power supply by save voltage 12VAC or 12VDC,
- proximity identifiers reader included in doorphone + possibility of connecting one additional (external) proximity reader Slican SKD.CKZ-10,
- maintenance up to 500 proximity identifiers (users),
- 2 working modes: local and global.
Cassete dimensions

Dimensions of doorphone cassete SKD.RF.KD12N and SKD.RF.KD12P


Installation
Doorphones are available in several versions – see Table 2. They are connected to the PABX using two wires. Additionally button or movement detector can be connected to doorphone, they enable to opening door from inside.
| Symbol | Mounting method |
|---|---|
| SKD.RF-KN12P | underplaster |
| SKD.RF-KN12N | overplaster |
| SKD.RF-KD12N | overplaster |
| SKD.RF-KD12P | underplaster |
Doorphones require appropriate transformer[2] or DC power supply[3], which is needed for supplying doorphone and electrolock. Electrolock should be acquired separately, depemding on needs – control voltage 12VAC or 12VDC (while doorphone supply with DC).
Opening doorphone casing
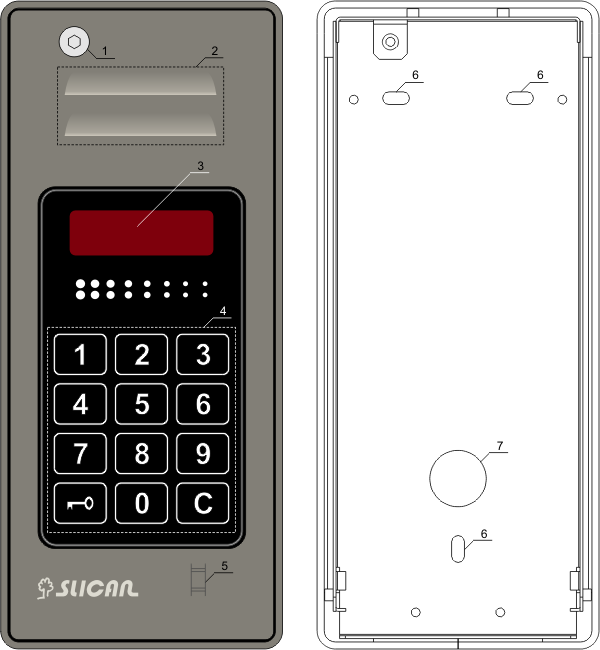
Fig. 2: Elements of SKD series doorphone
| Symbol | Element |
|---|---|
| 1 | Top panel fixing bolt |
| 2 | Loudspeaker cover |
| 3 | Display and proximity identifiers reader |
| 4 | touch keypad |
| 5 | Microphone cover |
| 6 | Mounting holes |
| 7 | Hole for providing cables |
Casing can be open by unscrew bolt located in front panel (see pos. 1 on Fig. 3). After unscrewing bolt following operations are possible:
- Front panel disassembly – Lift front panel about 30° from vertical and draw it up from the hinges – see pos. 2 on Fig. 3.
- Front panel lifting by 90° (perpendicular to the rest of casing) – this position is helpful during connecting wires to terminal (front panel is locked)– see pos. 3 on Fig. 3.
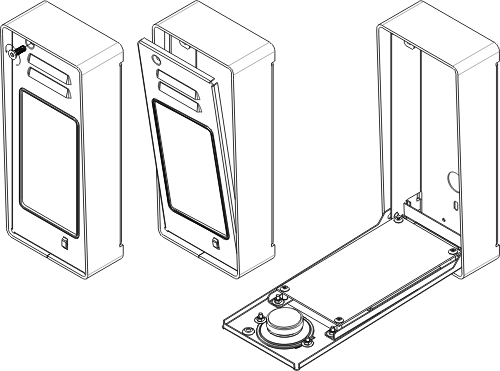
Fig. 3: Opening and inclination of front panel of KN casing
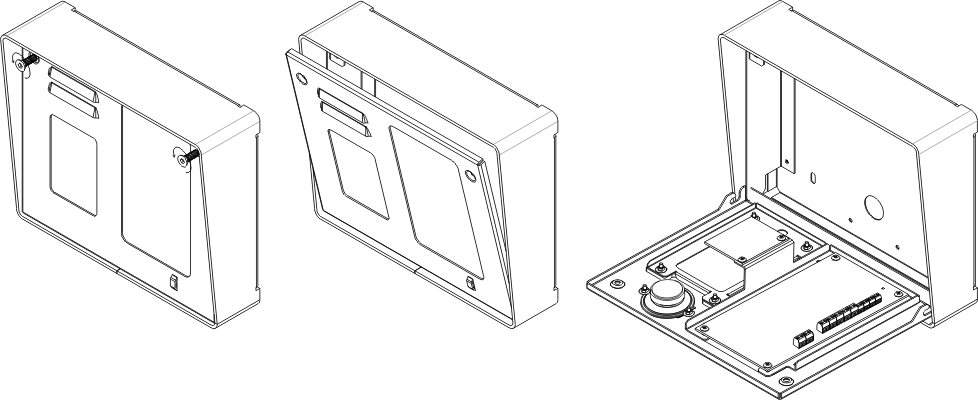
Fig. 4 Opening and inclination of front panel of KD12 casing
Doorphone installation
As standard, doorphone can be used for over- and under-plaster mounting. To mount doorphone, front panel should be removed (see chapter 2.1).
Over-plaster installation
Doorphone can be mounted on the outside of wall or column (Fig. 5). Housing for over-plaster mounting should be fixed by three stretcher pins fi 8. Wires should be entered by hole in the back side.
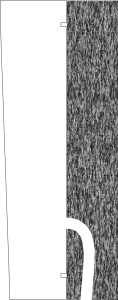
Fig. 5. Over-plaster SKD doorphone mounting
Under-plaster installation
Appropriate hole should be forge and brick up evenly to the wall face, as it is seen on Fig. 5. Wires should be conducted on the back side, under the plaster.

Rys. nr 5: Montaż podtynkowy bramofonu SKD
Doorphone connection
Doorphone power supply circuit should include easy to access disconnecting device, which is part of building installation, due to this device it is possible to perform service activities while power supply is on.
If power supply source is included in PBX, which dooz którą bramofon ma współpracować, to do bramofonu należy doprowadzić co najmniej3-parowy kabel[4]:
- 2 wires (1 para) – connection with PBX analogue port, which works as doorphone port,
- 2 wires (1 para) – power supply,
- 1 wire – earthing.
Supply cable should not be longer then 20m and cross-section 0,5mm2 (standard phone cable), while for longer distances wire should be thicker. Voltage drop on wires while electro-lock is on (depends on type of used electro-lock) can causes improper device operation.
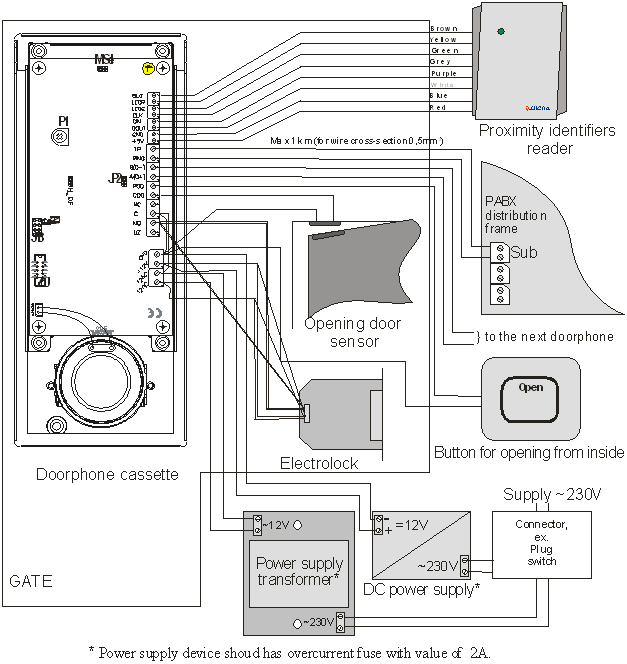
Fig. 6: Connection of SKD doorphone
Description of terminals
| Terminal description | Terminal destination | |||
|---|---|---|---|---|
| 12V AC | Terminals for connecting external doorphone power supply source – voltage12VAC. To these terminals secondary winding of the transformer included in doorphone set. | |||
| +12V / GND | Terminals for connecting external doorphone power supply source – voltage12VDC. Polarity of connection wires should be observed. Device is protected against improper polarity connection, but doesn't operate. | |||
| ||||
| C / NO[5] (NC) | Terminals for relay output used to controll electro-lock. They should be connected in series in electro-lock supply circuit. Due to using NO terminal (terminals stay closed for a programmed time) or NC (terminals stay open for a programmed time) it is possible to connect any device controlling opening door. | |||
| POD /GND | To these terminals button or movement sensor can be connected, which are used to opening door from inside. Closing these terminals (pressing button) causes relay switching on, for a time of pressing button plus time defined during doorphone programming, this time starts running after releasing button. Such button (movement sensor) operate independently on doorphone status (call, standby mode). | |||
| COD / GND | These terminals can be used for connecting opening door sensor (reed relay). COD terminal is used to immediate switchng off electro-lock while door is open. | |||
| TIP / RING | These terminals can be used for connecting one of PABX analogue port, which is used as doorphone port. Wires polarity has no meaning. | |||
| A(D+)/B(D-) | Terminals to connect wires for data transmission between doorphones acordingh RS-485 standard. | |||
| UZ | Earting terminal – for earthing doorphone. Earting wire can be also connected to the bolt assigned as | |||
| +5V / GND | Terminals for connecting power supply to additional proximity card reader. | |||
| DIN, DOUT, CLK | Terminals for data transmission between doorphone and additional proximity card reader. | |||
| LEDG, LEDR, BUZ | Terminals for connecting remain wires required for additional proximity card reader operation. | |||
Remain configurational elements:
Configuration of PBX for doorphone cooperation
To assure proper operation of SKD doorphone, PBX should be apropriatelly configured, analogue port with doorphone connected should be defined as doorphone.
PABX programming method depends on PBX type – see manual attached to the PBX.
Installation of proximity card reader SKD.CKZ-10
SKD doorphone includes proximity idetifiers reader, althiugh it is possible to connect additional reader SKD.CKZ-10. It is mounted to the wall using two fixing bolts 5 and appropriate screws (attached to the set). Mounting surface should be flat. Reader is resistant for moisture, so it can be mounted otside the building.
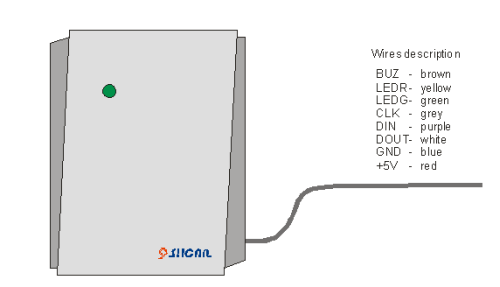
Reader is connected to the doorphone via 8-wires cable, this cable is integral part of reader. All wires are assigned by colours and these colours should be observed while connecting.
|
| No. | Reader wire colour | Doorphone terminal description |
|---|---|---|
| 1 | Red | +5V |
| 2 | Blue | GND |
| 3 | Brown | BUZ |
| 4 | Green | LEDG |
| 5 | White | DOUT |
| 6 | Purple | DIN |
| 7 | Yellow | LEDR |
| 8 | Grey | CLK |
Table 3: Connecting reader SKD.CKZ-10 cable to doorphone terminals
Connecting cable is 5 meters long and due to assuring working parameters this cable can't be extend. So distance between doorphone and reader location should be observed. Range of proximity identifiers reader is up to 10cm and depends on type of used proximity identifier (card, pendant).
Doorphone programming
Doorphone working modes
Doorphone can operate in local or global mode. In local mode doorphone is not connected to any other doorphone (RS-485 bus terminals RS-485 bus terminals are not used) in opposite in global mode all doorphones are connected between themselves. Due to such connection parameters changes made on one doorphone are visible in remain doorphones, but only some settings are copy:
- Access code (code for opening door) – option P12,
- list of proximity identifiers - option P31.
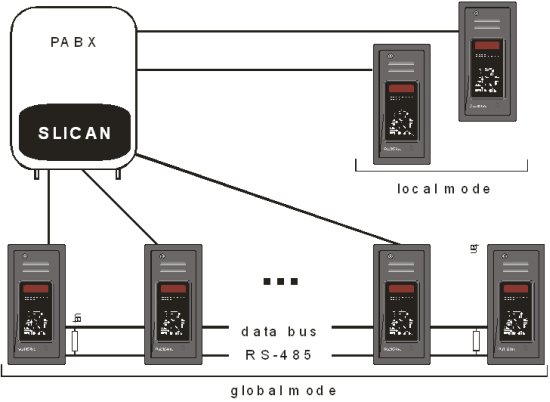
Used in RS-485 differential transmission protect data against external disturbances (ex. inductive devices – motors), it is recommended to use shielded twisted pair cat.5 (STP cat.5[6]) to assure additional protection. Maximal distance between extreme doorphones cannot be longer than 1200 meters (in extreme doorphones it is recommended to instal JP2 jumper, it is equal to use terminators).
If in global mode on any doorphone in standby status dot on display flashes, it means that connection between this doorphone and MASTER cassette (in this cassette the most current database version is stored) was broken for one of following reasons:
- damage of RS-485 databus wire
- no MASTER cassette power supply
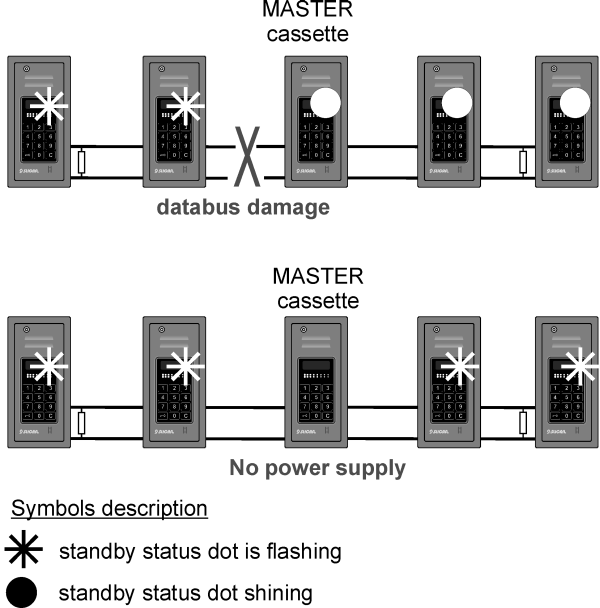
In such situation programming procedure mustn't be executed from doorphone with no connection until failure will be fixed. After fixing this failure standby status dot stop flashing.
Entering programming mode
To enter programming mode:
- Press 3 time
 button – on display|----| flashes.
 - Select standard access code to the programming menu: 1234 (this access code is set as default – there is possibility of change this code). Time to entering this code is limited to 10 seconds, starting from first pressing
 key. Return to the standby mode (| .| on display) takes place after this time (if access code isn't entered) or immedietelly (after entering wrong value of access code).
 - |P--| is shown on display, it means that you entered programming mode[7].
|
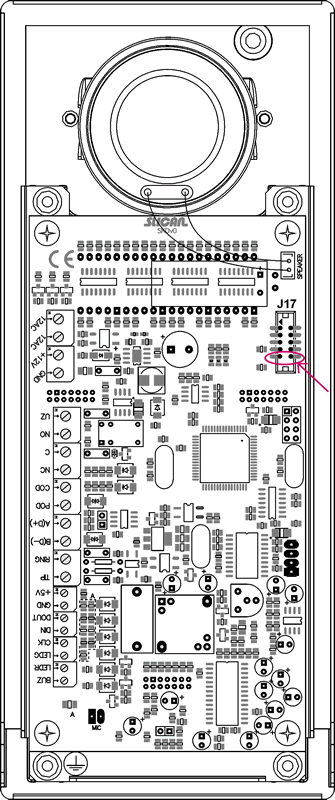 Fig. 10: Entering programming mode omitted access code
Programming options
|
Programming is base on sellection and setting value of specified doorphone options (P11 to P41). Detailed description of these options is presented in Table 4.
In programming process following keys are used:
| 1 | 2 ↑ | 3 |
| ← 4 | 5 | 6 → |
| 7 | ↓ 8 | 9 |
| 0 | C |
- 2 (up) and 8 (down) – option selection,
- 6 – entering selected option,
-
 (Enter) – entering parameter edition/accepting entered value or selected option,
 - C (Cancel) – return to enter position without any changes.
|
Example:
To change programming access code, following steps should be done:
- In entering mode select option P41 [after displaying text |P--| on doorphone display, use keys ↑↓ or selecting
 key (text |P--| starts flashing), next pressing 41 and accept with
  key].
key]. - Select option with → key (digit 6) – current value, access code to programm menu is displayed (as default 1234).
- Press
 key - text |----| starts flashing.
 - Enter new access code and accept it by pressing
 .
. - New value is displayed, it confirms entering this value.
- Exit this option by pressing C key (after single pressing causes exit changed option – display |P41|, double pressing - display |P--|).
| Option | Description |
|---|---|
| General settings | |
| P11 | Cassette phisical number (ID).
This field has information meaning and depends on jumper location on CONFIG terminal (allowed value are from 0..15). Every cassette number must be unique if there are few doorphones in the system. |
| P12 | [4321][8] = Access code (PIN) – is used to opening door electro-lock.
Value change: <Enter> |----| entering new PIN This number is one for all system and its change on one cassette changes number in whole system. It should cosists of 4 digits. Setting value 0000 lock possibility of entering usung access code [opening electro-lock can occurs only from PABX (by PABX subscriber) or using proximity identifiers reader]. |
| P13 | [5] = Time of opening electro-lock in seconds.
Value change: <Enter> |--| entering new time It is a time while electro-lock is open after releasing * key by PABX subscriber, after entering access code (PIN) or reads proximity card (pendant). Adjustement range = 1..30 |
| P14 | [no][9] = Hot line after entering "0" digit.
Value change: <Enter> <up> or <down> - pressing up or down key changes value to opposite (no --> YES or YES --> no) Pressing 0 key causes only short-cirquit – calls in PABX should be routed appropriately via „hot line”. |
| Forwarding [10] | |
| P21 | [1] = Extension number assigned to button 1.
After pressing this key doorphone dials stored extension number in DTMF tone. |
| P22 | [2] = Extension number assigned to button 2. |
| P23 | [3] = Extension number assigned to button 3. |
| P24 | [4] = Extension number assigned to button 4. |
| P25 | [5] = Extension number assigned to button 5. |
| P26 | [6] = Extension number assigned to button 6. |
| P27 | [7] = Extension number assigned to button 7. |
| P28 | [8] = Extension number assigned to button 8. |
| P29 | [9] = Extension number assigned to button 9. |
| P31 | Adding proximity identifiers to the system.
Maximal number of identifiers is equal to 500.
|
| P32 | Erasing all proximity identifiers.
|
| Security | |
| P41 | [1234] = Access code for programming menu.
Value change: <Enter> |----| enter new access code This code is required to enter doorphone programming mode. It must consists of 4 digits. |
Using access control system
Using doorphone
Doorphone → Subscriber call
Pressing any doorphone key is signaled by single beep, and for digits they are additionally presented on display. From doorphone keypad any extension number can be selected (subscriber or group) or one of digit from range 0..9[8], if doorphone and PABX are properly configured it causes phone ringing of programmed extension number. During dialing, dialed number is visible on display[9] and in the laudspeaker appropriate signal can be heared (it depends on PABX type, where the doorphone is connected). After lifting handset on the phone assigned to dialed extension number call is established. If after the call, subscriber hang on the handset, disconnecting command is sended to doorphone – single beep can be hears in the doorphone laudspeaker and display returns to the standby status (| .|). Call duration time is limited to the 3 minutes – after this time call is disconnected, three beeps can be heared and display returns to standby mode.
When after dialing extension number noone answer this call for a specified time (this time depends on PABX cooperate with doorphone), dialing finishes. Also pressing ![]() key during dialing causes its finishing (if call is already established, it will be disconnected) and doorphone standby status returns.
key during dialing causes its finishing (if call is already established, it will be disconnected) and doorphone standby status returns.
Subscriber → Doorphone call
If PABX subscriber dials doorphone extension number, call between subscriber and doorphone is immediately established. During such call (listening) on doorphone display text „CALL” is displayed. If subscriber hangs on the handset after finishing call, to the doorphone disconnection command is sended – in doorphone loudspeaker single beep can be heared,display returns to standby status (| .|). Call duration time is limited to the 3 minutes – after this time call is disconnected, three beeps can be heared and display returns to standby mode. Subscriber will be hear busy signal (the same signal after finishing call by doorphone - by pressing C button).
Opening door
Subscriber can open electro-lock connected to the doorphone, by pressing – on the phone with DTMF dialing - „*” sign (while subscriber press this key in doorphone loudspeaker appropriate signal can be heared), after releasing this key call between subscriber and doorphone can be continued, electro-lock stay open by the programmed time. For instance it is possible to assign to phone speed access code following number: [„doorphone extension number” pause *], dialing this number causes opening door without any conversation.
dditionally it is possible to use opening door button (POD) or movement sensor. In this situation opening door is signal by beep.
Acces control system enables to open door using specially defined access code (see [#Option P12 option P12 in programming mode]). Procedure is as follows:
- In btandby mode press
 key.
key. - Text ---- is shown on display.
- Enter defined access code – on display, instead of digits, appropriate symbols can be seen, due to this security operation access code can't be recognized.
- If access code is proper, on the display text OPEn can be seen, this text signals opening electro-lock. Otherwise doorphone returns to standby mode - |----|.
Using proximity card readers
Opening electro-lock using stored earlier proximity identifier is possible in following situations:
- in any doorphone status (standby, call or dialing) – when using additional reader SKD.CKZ-10,
- only in standby mode – when using reader included in doorphone.
To do this card (pendant) should be bring closer to the display (there is aerial located around the display) or to external reader. Next unique number stored in card is verified and if this code is equal to one stored in doorphone memory, electro-lock is open – it is signaled by single beep and text OPEn on doorphone display. If verification is negative (no identifier in doorphone database), doorphone signals it by two beeps and electro-lock doesn't open. If as a reader SKD.CKZ-10 is used, mentioned above statuses are also presented using two-colour LED and audio signals, it is described in following table:
| |
|
|
|
|---|---|---|---|
| |
|
|
|
| |
|
|
|
| |
|
|
|
| |
|
|
|
Safety requirements while using SKD series doorphones
Security rules and proper using must be obligatory observed for assuring device proper operation.
Below basic rules concerning doorphones are presented. Without fulfiling these rules any claim or notice presented by users cann't be accepted by manufacturer.
Rules presented here concerns installation, premises and requirements concerning power supply network.
Installation
- Device should be installed and startup by service with manufacturer authorization.
- All installation activities should be performed according assembly and safety rules.
Working environment
- Due to durability and operating quality of electronic elements device should not be installed inside buildings or spaces with high humidity. Doorphone housing is resistant on weather circumstances, but when installed outside building it is recommended to install in sheltered places to avoid rain and wind, which can disturb conversation from doorphone.
- Due to risk of flood of water, device should not be located near water reservoirs (pools, taps, etc.).
- Doorphone should not be installed in premises with high dustiness or electromagnetic field intensity.
It is strictly forbidden to instal doorphone in following permises:
- in premises with direct influence of solar light,
- in premises where vibration are very often or strong,
- near radio aerials.
All devices connected to doorphone should have certificates of conformity with EU regulations.
Certificate of conformity, proper device disposal
 |
|||
| Manufacturer: SLICAN sp. z o.o. |
Type: Access control system |
Model: SKD Doorphone |
|
| Device description: Access control system SKD and BRV are devices to cooperation with Slican PABXes, they are connected to analogue port. They realize basic doorphone functionality. They enable to establish call between any phone connected to Slican PABX and device installed by door as well as opening electro-lock. |
|||
| Product fulfiles following EU Directive 99/5/WE R&TTE, it also fulfiles requirements of following harmonized standards: EN 60950-1:2001 + A11:2004; EN 55022:1998 + A1:2000 + A2:2003; EN 55024:1998 + A1:2001 + A2:2003; | |||
| Additional information: Current text of certificate of conformity can be downloaded from website www.slican.com Device was tested in typical configuration, while connect to SLICAN PABXes. It fulfiles requirements concerning allowed disturbances level for B class devices. While wrong installation of device, it is assigned to A class and following warning is valid: „This device ia A class product. In normal circumstances it may caused radio disturbances, which required user to undertake proper activity”. |
|||
 |
|||
Previous version
Previous version of this Instruction manual can be found here.
Notes
- ↑ PBX must be equiped with DTMF module (CCA, PMS, NCT, CCT i MAC - standard, CMT - option).
- ↑ Transformer 230V/12Vac, min 10VA with overcurrent protection of 2A. In our offer there are different transformers, which fulfils these conditions.
- ↑ Power supply 230Vac/12Vdc, min 10W with overcurrent protection of 2A
- ↑ If doorphone installation is located inside the building gelating cable should be used.
- ↑ NO (Normally Open), NC (Normally Closed); maximal load capacity of NO and NC is equal to 24V, 2A
- ↑ STP cat.5 - Shielded Twisted Pair category 5
- ↑ Exiting programming mode proceed automatically after 3 minutes of inactivity.
- ↑ 8.0 8.1 In brackets [ ] default values are shown.
- ↑ 9.0 9.1 Two options are available – no and yes
- ↑ Used if doorphone is connected to the PABX.
