Difference between revisions of "User:Leszekj"
(→Dialing and picking up calls) |
(→Transfering calls - version 1.07) |
||
| Line 250: | Line 250: | ||
Call can be transfered by choosing contact or number from: Recent or Contacts. | Call can be transfered by choosing contact or number from: Recent or Contacts. | ||
* "blind transfer" - without checking target extensions state | * "blind transfer" - without checking target extensions state | ||
| − | <center>[[File: | + | <center>[[File:MessengerCTI.Desktop_1.07_blind_transfer_pptx_en.png | 1400px]]</center> |
* no announcing - check target extension state without announcing | * no announcing - check target extension state without announcing | ||
| − | <center>[[File: | + | <center>[[File:MessengerCTI.Desktop_1.07_transfer_no_announcing_pptx_en.png | 1400px]]</center> |
* with annoucing - check target extension state with announcing | * with annoucing - check target extension state with announcing | ||
| − | <center>[[File: | + | <center>[[File:MessengerCTI.Desktop_1.07_transfer_with_announcing_pptx_en.png | 1400px]]</center> |
==Sending messages== | ==Sending messages== | ||
Revision as of 08:53, 7 June 2022
Contents
Program structure
Main window
Main windows of MessengerCTI.Desktop application contains interface which show information and allows access to chat windows and main functions.

Top panel
- hyperlink to software version
- application name
- default window position button
- close - minimizing to tray button
- changing application status button
- user name from Contacts
- description - editable comment field set by user that allows him to add additional descriptive information, e.g. inform about upcoming or being on vacation, about dealing with selected project
- keyboard - button to open keyboard for dialing numbers with computer mouse
- magnifier/search - button / field for searching for number or subscriber's name
- access to tabs:
- Recent - history of most recent calls and messages
- Contacts - phonebook from PBX with sorting options
- red dot - information:
- about missed calls
- about calls to be called back in CallCenter
Bottom panel
- preferences - access to program settings
- add contact
- add to clipboard - sending messages and files between user MessengerCTI.Desktop and MessengerCTI.Mobile
- creating text conference
- ACC - subscriber's account login
- DND - configuration/ activation of "Do Not Disturb" service
- FWD - configuration/ activation of "Forward" service
- change size of window
Status of application and user
MessengerCTI.Dekstop software allows to show current status of user with coloured symbol and display it inside applications of other users. Applications status is informing about user availability, depending on user actions status can be changed by him or application can change it automatically. More information can be added through text status of user. User can choose different icons/symbol to set his status manually. Additionally there is graphic informing about ringing phone or current call.
List of icons and symbols
Chart presents list of icons available in Contacts and Recent tabs:
-
 - for internal PBX users - different icon color represent current applications status. It can be set manually through main application window, by icon
  , also is set automatically for Be right back status.
 -
 - for public subscribers.
 -
 - for DPH.IP doorphones connected to open/closed door sensor
Chart 1: Meaning of icon status of application, users and doorphones.
Chart is showing list if icon that appear on the left side of subscriber name in tab Contacts and Recent. Internal phone will have status icon being displayed
Preferences
Clicking Preferences icon in main program window will display window with program settings. In every tab there is available button with info "About software" and reseting default window position.
Connection
In Connection field you must enter settings neccesary for application to connect:

Application login setting
To login, application must have correct settings configured by PBX administrator:
- subscriber number - extension from PBX
- CTI access and password:
- for IPx, MAC, CCT - ConfigMAN chart Subscribers/CTI settings - CTI - access level to CTI and Pss - Password
- for NCP - ConfigWEB chart Extensions/Subscribers/CTI setting - Access to CTI and Password
- Server address - PBX network settings
CTI access level determines what options are available to application:
- CTI.user - MessengerCTI without VoIP and camera preview
- CTI.userPlus - MessengerCTI with VoIP and camera preview
These connections settings must be filled:
- Subscribers number" field - extension number for which MessengerCTI.Dekstop will login.
- Password field - defined CTI password (may contain from 4 to 16 characters, excluding ";" or "~"). After first application login to PBX password change may be necessary. Password can be remembered in application by putting tag in appropriate field (on right side of the password); if tag is not inserted, application will ask for it every time you log in.
- Server - IP address of PBX network interface. In case of application logging outside PBX network - IP address of edge router (port forwarding on router is necessary)
After correct configuration all of above fields, using "Connect" button will allow application to Connect with PBX and synchronize phone book and other information related to that extension. "Login successful" will apear in lower part of window.
If login credentials, configuration settings aren't correct or there are issue with network connection those error messages may appear:
- Wrong login or password. Check if correct login or password was used
- Connecting to PBX alternating with:
- No connection to PBX Check IP address that was entered and check computer LAN connection
In order to facilitate configuration of application, functionality of generating configuration files sent to user's e-mail box has been introduced in NCP PBX. After receiving e-mail, simply use From file button to select right file and application will log in to NCP automatically.
In case of problems with application - its stability, functionality, logging, etc. - after detailed description of irregularities, you can submit report using Send Logs button.
General
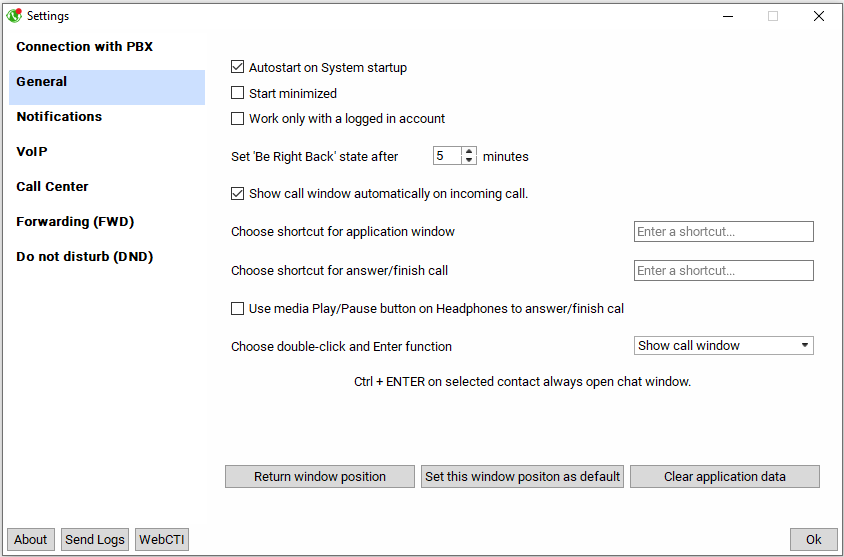
This window allows to configure settings defining how program works and startup options.
Available settings:
- Auto start on System startup - automatic start of application.
- Start minimized - application will run hidden in system task bar.
- Set "Be right back" state after x minutes - status icon will change automatically, informing about user being away from computer after defined time
- Show call window automatically on incoming call - Enables/ disables popup window when there is an incoming call
- Choose shortcut for application window - changes application from Windows task bar to desktop and vice versa
- Choose shortcut for answer/finish call - answer call/ end call with selected keyboard shortcut
- Use media Play/ Pause button on Headphones to answer/finish cal
- Choose double click and Enter function (for contact or number):
- show call window - choice windows is displayed with options - number, phone call, opening chat/SMS window, closing current window
- call primary number - automatic number dialling
- show chat window - opens text chat window
- Return window position - return to previous window position
- Set this window position as default - allows to set up default application's window potion on screen
- Clear application data - deletes all application configuration data, attachments, history
Notifications
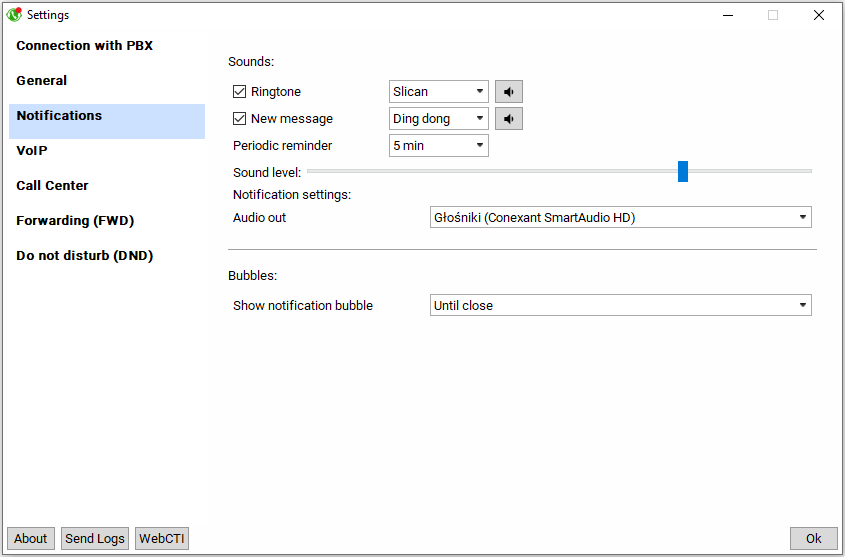
These setting allow to set up audio notifications informing about incoming calls, messages and audio setting of computer audio devices.
VoIP
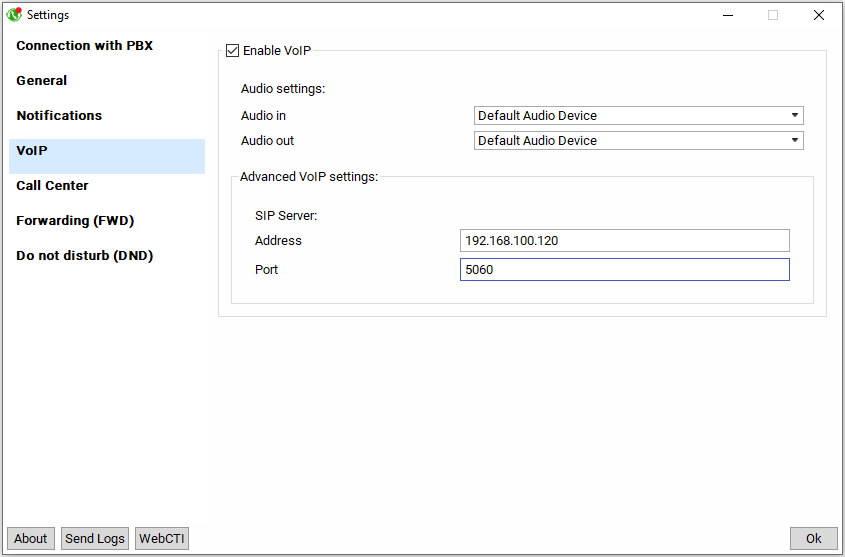
- Enable VoIP on when available - allows application to work as VoIP client (VoIP phone). Advanced VoIP settings also allow to connect application with PBX on non-standard ports (e.g. from Internet to client's edge router, MAC PBX)
CallCenter
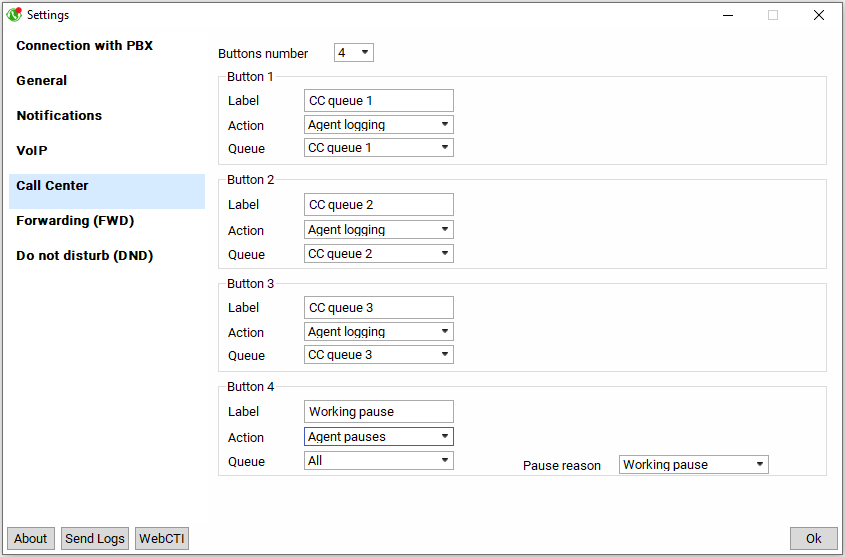
This window allows to configure some options related to agent's handling of CallCenter queues, e.g. buttons for logging in to one, many, all queues, buttons for agent breaks
Services management
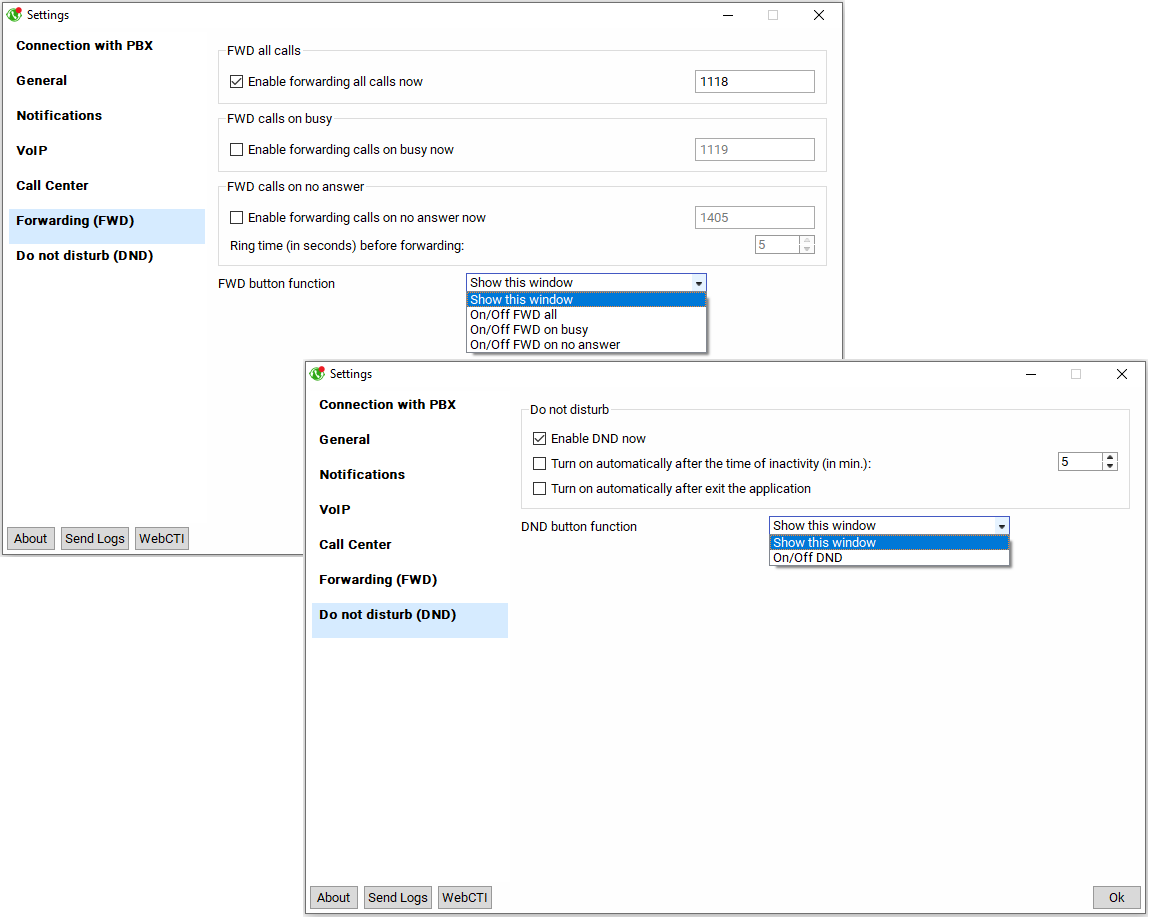
This window allows to configure Forwardings and DND services
Dialing and picking up calls
To make phone call between two users, particular hardware, software and proper configuration must be supplied:
- Slican PBX
- computer with installed and configured MessengerCTI.Desktop software
- software logged to PBX with subscriber extension (Settings tab, Connection field)
- analog, VoIP or Slican system phone
- for video preview - DPH.IP doorphone with camera or phone associated with external camera (not applicable VoIP phones with integrated camera)
Making and answering phone call can be done using computer mouse and computer screen. Conversation (transmission of acoustics) between subscribers takes place using phone connected to PBX associated with MessengerCTI.Desktop or can be done with application itself - if it's running in VoIP mode.
After dialing required subscriber number from MessengerCTI and initiating connection - in case of:
- CTS system telephone - PBX will activate acoustics on it in hands-free mode and establish call to destination subscriber
- VoIP and analogue telephone - PBX will automatically call back telephone first (notify caller that it is ready for call) and, after picking up handset, it will establish call
- MessengerCTI in VoIP mode (MCTI) - will automatically establish call
Dialing calls to particular number
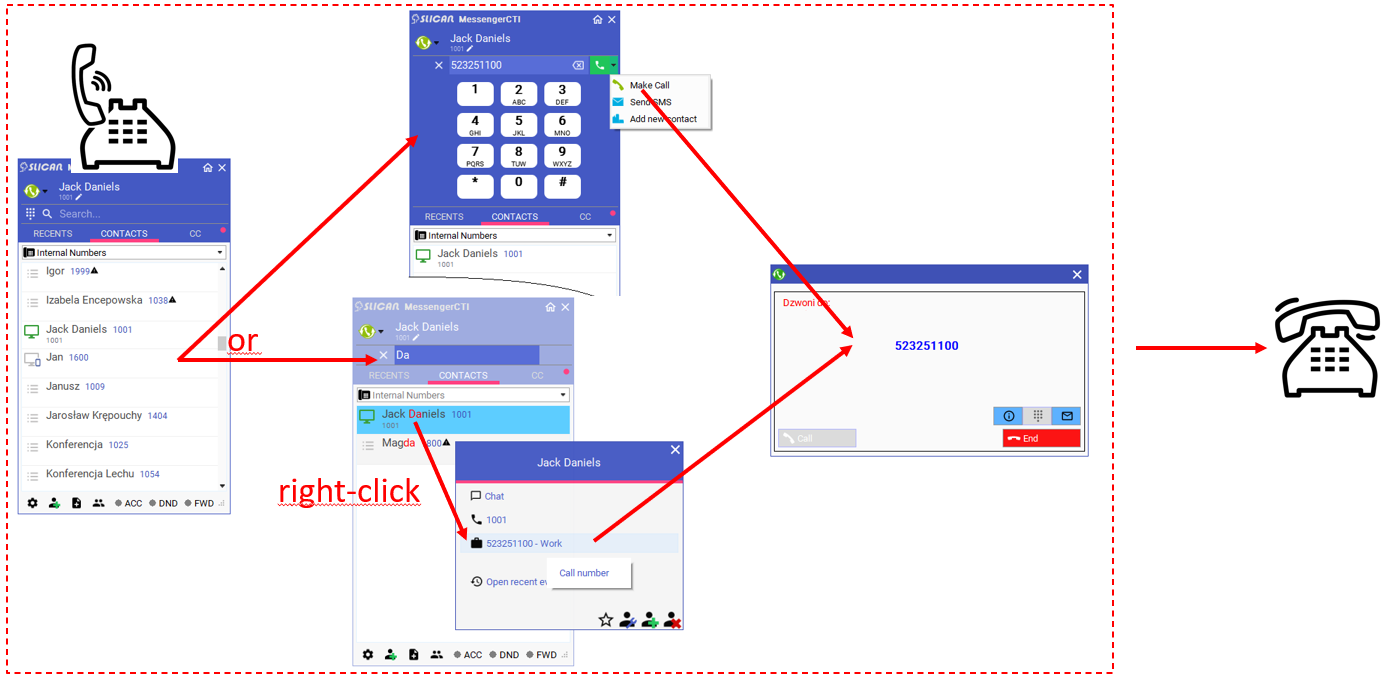
Making calls can be realised in few different way. Depending on how configured are general setting on application - option "Set double click function".
- from Contacts tab
- choose subscriber from proper group (from drop-down list - if it exist) or from group "All contacts" by double clicking on number or contact
- right-click on subscriber from proper group (from drop-down list - if it exist) and then select one of his numbers (associated with contact details)
- clicking on one of icons next to selected contact:


and then, after opening Messages window --> Call button
- using numeric keypad of application
- Search field - by enter telephone number directly using computer keyboard, then click on green icon handset associated with field
- Recent tab - call history:
- we find subscriber call with whom we had contact (he called us or we called him) and then we make call by double clicking on his number or contact
- right-click on call from/ to subscriber with whom we had contact and then select one of his numbers (related to contact details)
- clicking on one of icon by past call


and then, after opening Messages window --> Call button
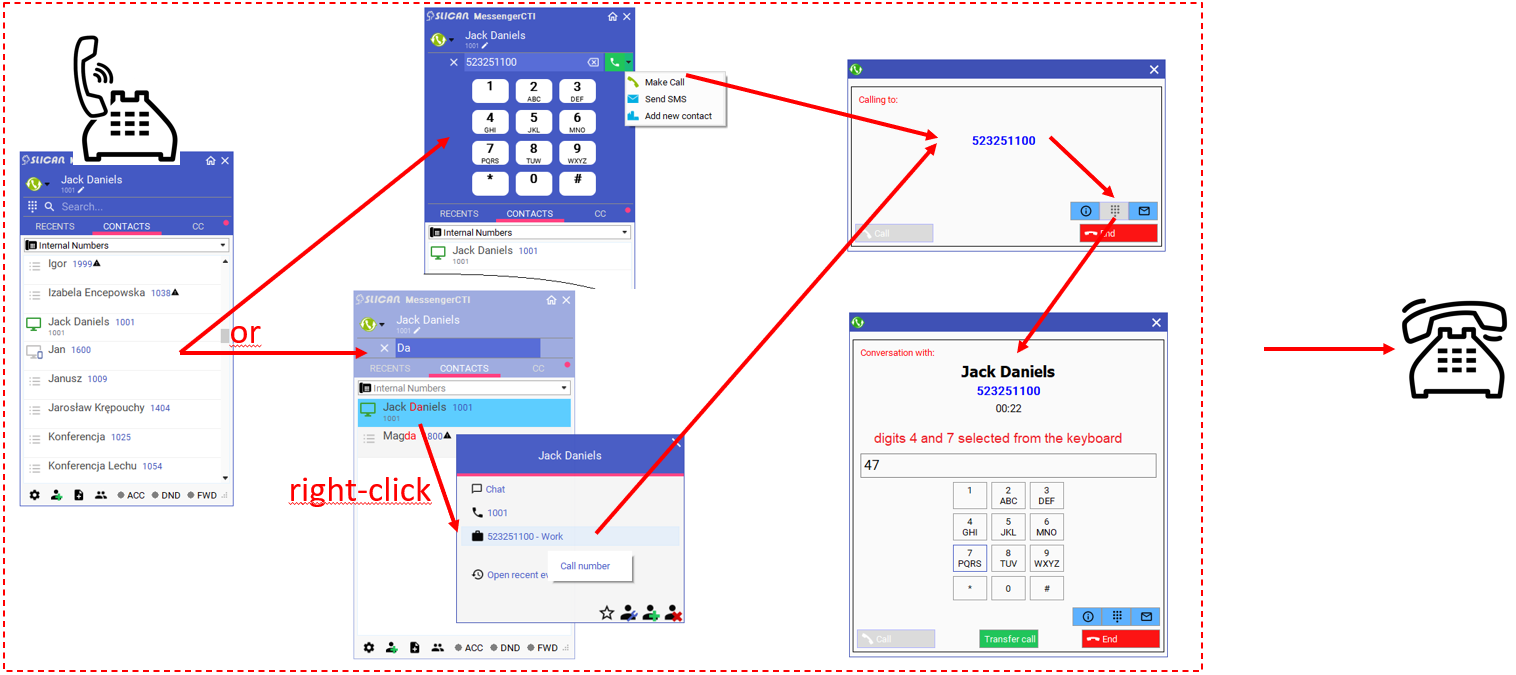
In version 1.03, possibility of selecting digits in DTMF was introduced. This may be applicable in case of a call to Hotline, where you can navigate through menu on active acoustics.
Exemplary scheme of making call from MessengerCTI directly to another subscriber:
Exemplary scheme of making call from Messenger to hotline:
Incoming calls
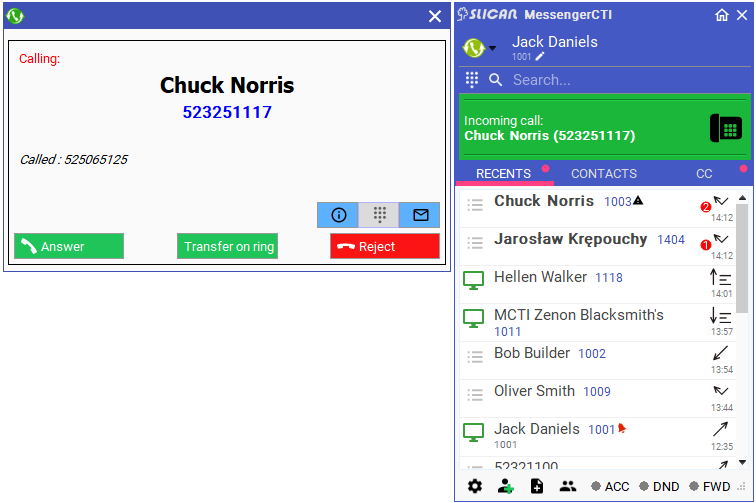
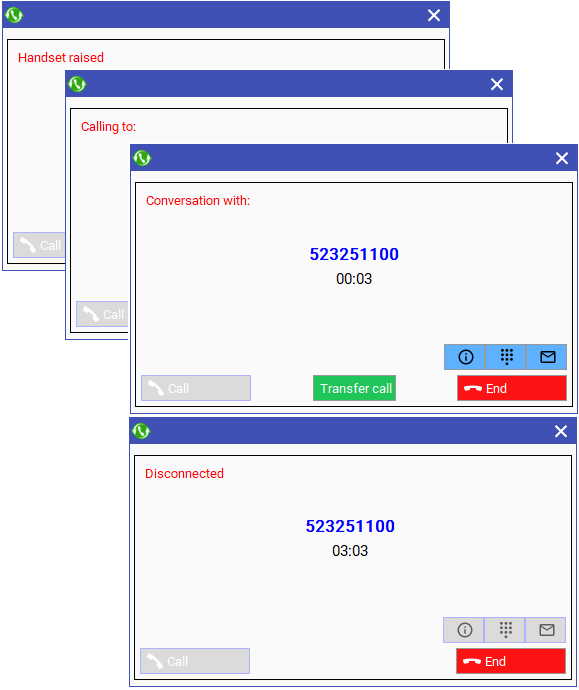
Calls are displayed on computer screen with pop-up window, ringing application and ringing phone. Depending on applied configuration call can be answered, rejected and/ or transferred using application or phone. It is also possible to send text or SMS message back.
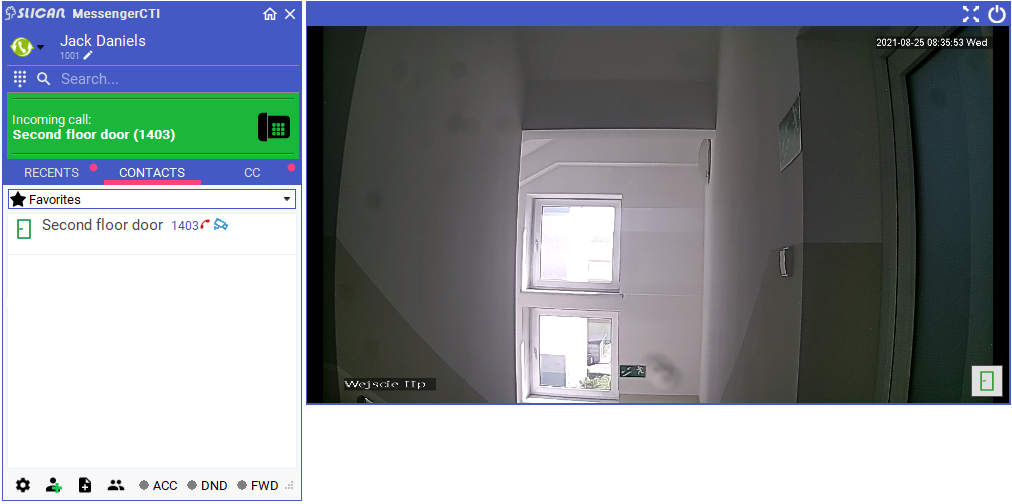
Connecting to camera video preview
Connecting to/from DPH.IP with integrated camera or associated phone or external IP camera(doesn't apply to VoIP phone with integrated cameras)will display automatically new window on computer screen. Connecting to doorphone allows to identify visible person and open door/gate with ![]() without picking up call.
without picking up call.
Transfering calls - version 1.07
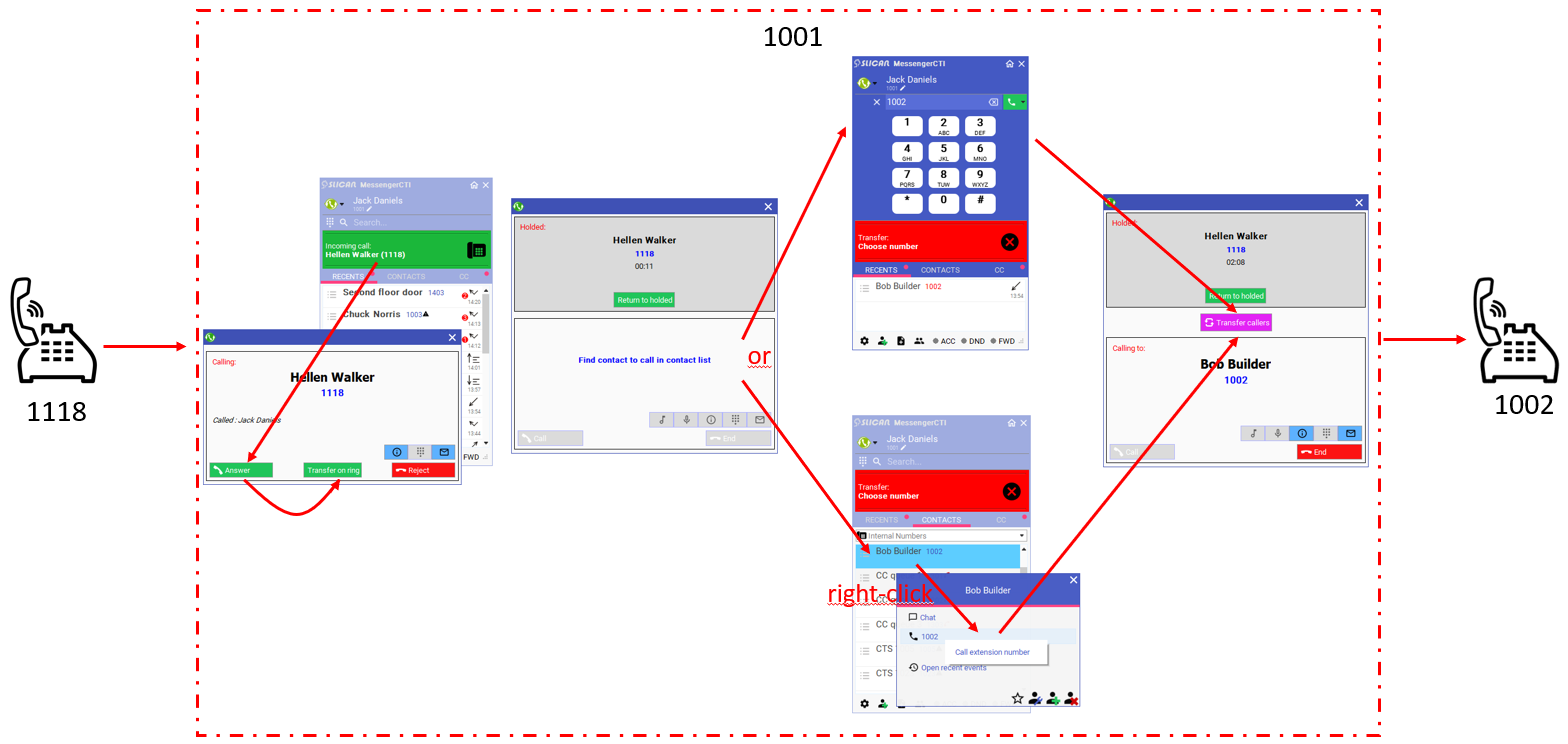
Call can be transfered by choosing contact or number from: Recent or Contacts.
- "blind transfer" - without checking target extensions state
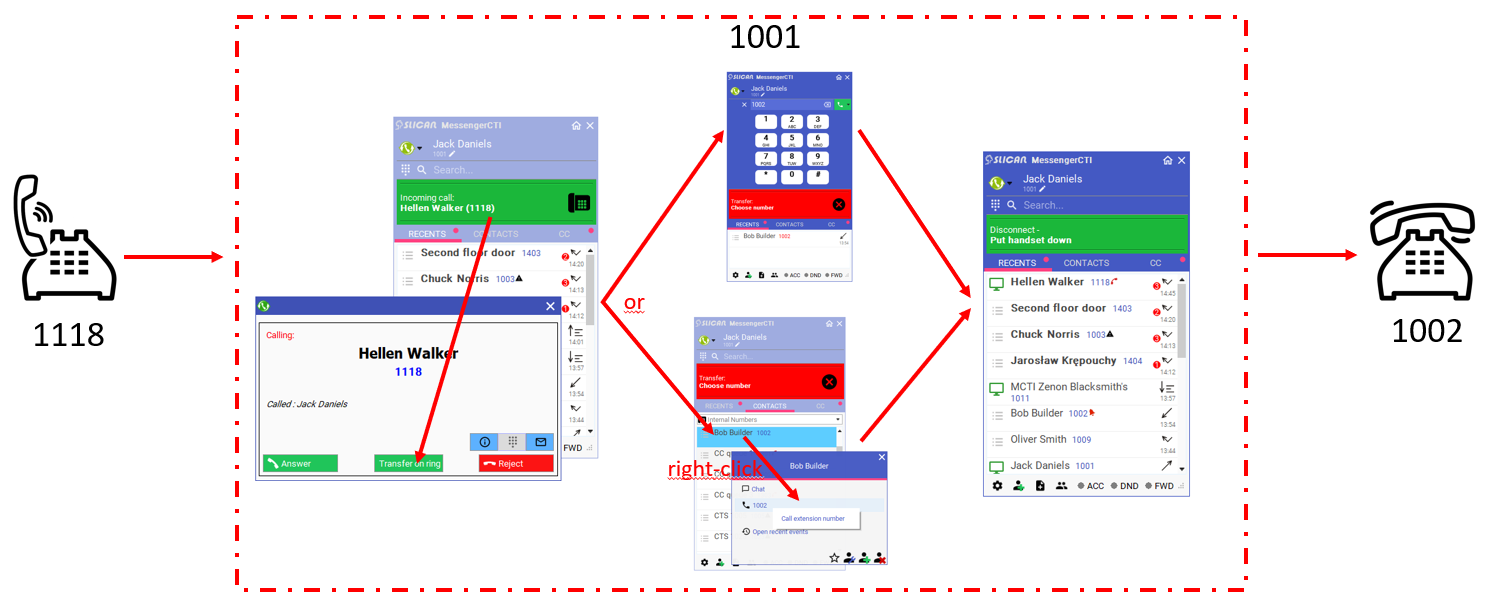
- no announcing - check target extension state without announcing
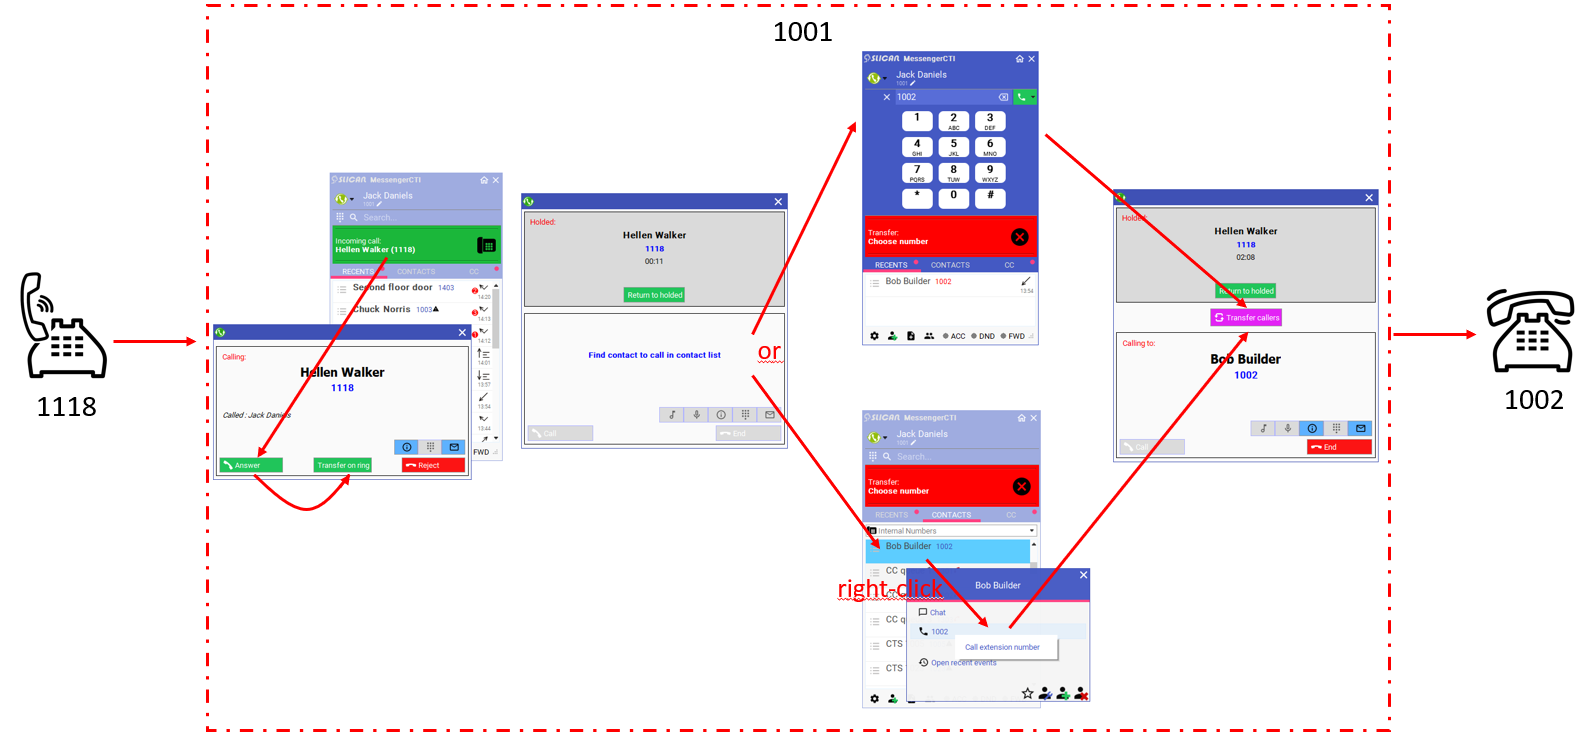
- with annoucing - check target extension state with announcing
Sending messages
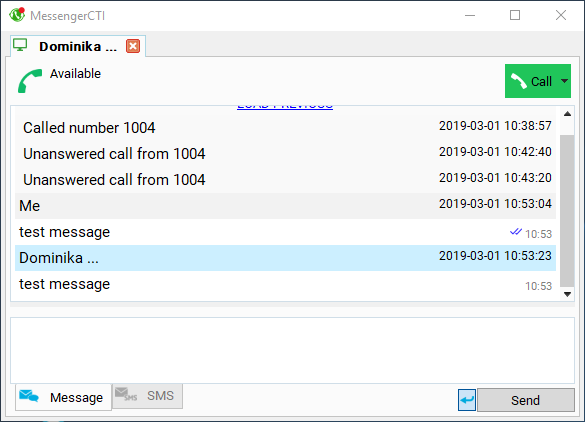
Application allow sending(sending and receiving) text messages between application users(internal chat) or by SMS. Message can be sent using ![]()
![]() or by typing GSM number in search field of main application window. If in PBX phone book there is GSM number associated with extension number, user sending message can choose between chat message or SMS.
or by typing GSM number in search field of main application window. If in PBX phone book there is GSM number associated with extension number, user sending message can choose between chat message or SMS.
Receving new message is signalised on Windows system task bar with two icons alternating ![]() ,
, ![]() and popping up
and popping up ![]() .
.
Messages history is available through hyper link Load previous. It is stored on computer local hard drive.
Searching data
MessengerCTI is using advanced way or text search. Searching can be accessed through Contacts tab in Search:

During entering characters/signs in search field, software automatically searches in database. Entries found in subscribers group displayed on left field side will be displayed under it. Entries from other group are classified as Suggested.
Contacts
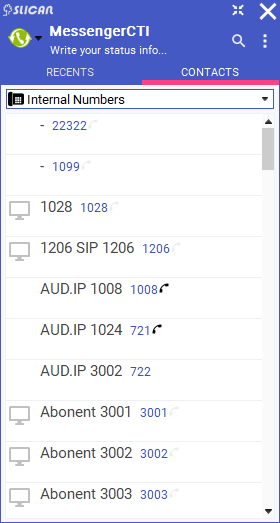
This field allows for searching, displaying, customising and running actions related to contact. By default Favourites group is displayed. Subscribers from other groups can be accessed by extending groups list with mouse.
Adding contacts is possible:
- from search field - entering number and adding it with green handset icon
- from Contacts or Recent tab - right clicking on connection
From contact list we gain access to:
- favourites
- all contacts
- extensions
- created subscriber groups
- public contacts
- private contacts
Call history
Choosing Recent tab - in main program window will display call history of currently logged extension to MessengerCTI.Desktop. Window will look like this.

History is displaying all calls associated with logged in extension. Each list segment represents at least one call or message. If same subscriber(number)called/send message more then once, contact status icon will show that number. Each segment is showing caller number, his text status(for outgoing calls - chosen number and text status), length of call or call date and time. For extensions call status is also displayed. Beside text information each line have icon status for each call:
Upward arrow for outgoing call, isn't distinguished between picked up and missed call.
Downward arrow for incoming call that was picked up.
or
Turned arrow for missed incoming calls, digit is showing number of these calls.
Arrow with listed lines or text bubble for text chat or sent SMS. Digit is showing number of missed messages.
If history contains missed calls or unread messages icon in Recent field will be in colour red.
From History window call can be dialled or messages be send to chosen users by right clicking on subscribers text status
, clicking on icons ![]()
![]() and
and
. If internal subscriber have other number listed in their phone book, choice can be made between them. For internal subscribers there is option of editing, deleting contact and deleting from favourite list.
