RecordMAN2 v1.01
Contents
Introduction
RecordMAN2.client application can be used for recording and listening phone calls realized using embedded recording (EbdRec) system installed in Slican PABXes. RecordMAN2.client application, after defining recordings server address and appropriate access parameters, log into server and download its content, presenting list of recordings which can be listen or save in location defined by user (under only one condition, PABX admin assigned appropriate privileges in ConfigMAN application). Complete description of functions and configuration of embedded recording system installed in Slican PABXes can be found in ConfigMAN programming instruction. As recordings server any Slican PABX (CXS-0424, CCT-1668, MAC-Zero or MAC-6400) or PC with RecordMAN2.server application installed (description of this application functionality can be found in appropriate instruction manual) can be used. Using RecordMAN2.client application, it is possible to listen recordings stored in local archive create earlier using this application. Chapter 2 describes requirements needed to using any of mentioned recordings source.
Hardware requirement
- Operating system - Windows 2000/XP/Vista/7
- Processor Pentium 300MHz or better
- At least 128 MB RAM memeory
- At least 5GB free space on hard drive
Operation with recordings server
During first launching of RecordMAN2.client application following window appears:
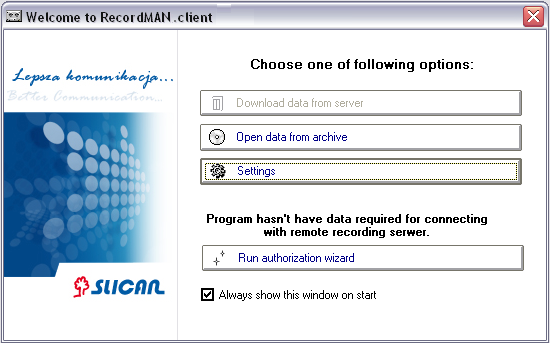
If you choose „Run authorization wizard” option, window of authorization wizard will display, in this window data according PABX settings should be entered:
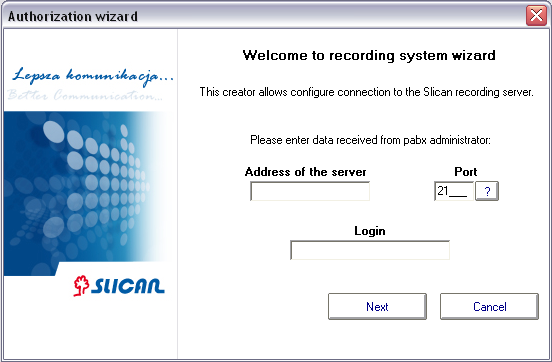
Into field Address of the server IP address of recordings server should be entered, while into field Login content of field Log from appropriate record in sheet Embedded recording / RecordMAN2.client accounts, in ConfigMAN application. After fulfilling above mentioned fields and pressing Next following window will appear:
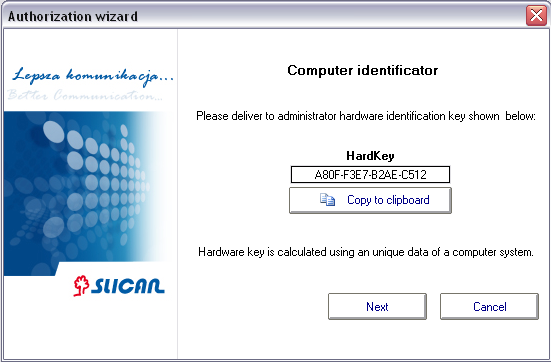
During installation of RecordMAN2.client application, computer hardware identifier is generated, this hardware identifier should be entered into ConfigMAN application (sheet Embedded recording / RecordMAN2.client accounts, field HardKey). By pressing appropriate button, existing hardware identifier is copied to clipboard and can be pasted to appropriate field in ConfigMAN application. Hardware identifier is some kind of password and enables log into recording server only from PC with this hardware identifier. After pressing Next button, widow with information about finishing configuration will display on the screen. After finishing configuration following window appears:
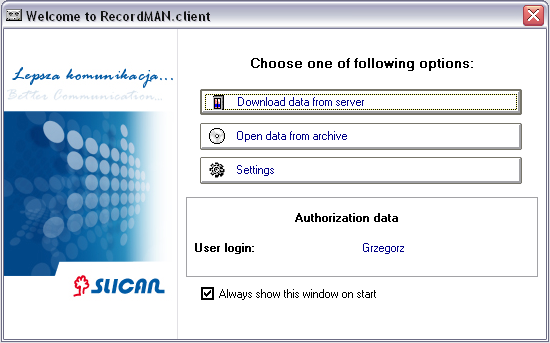
Window visible above is very similar to widow presented on figure 1. However it is possible now to download data from defined previously recording server. Additionally instead of „Run authorization wizard” button, information about authorization data is presented. Entered data can be always changed after pressing Settings button. In window (visible on figure 5) which appear after pressing Settings button there is possible also change server which RecordMAN2.client log into.
Log into PABX
As mentioned above, after pressing Settings button window which enables to change server which RecordMAN2.client log into.
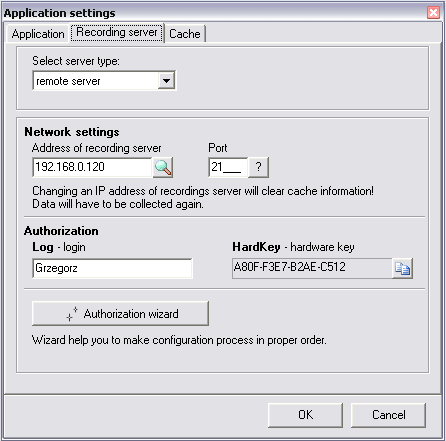
If in field Address of recording server PABX IP address is entered, PABX with this address is recording server, under condition that in sheet Embedded recording / RecordMAN2.client accounts, in ConfigMAN application there is an appropriate entry with login and hardware identifier as in window above.
Log into server
If in window visible on figure 5, field Address of recording server is fulfilled with IP address of computer with RecordMAN2.server application installed, RecordMAN2.client application connects to this computer an reads data downloaded from PABX. Login and hardware identifier should be the same as defined in PABX. There is a possibility of reading data from server installed on the same computer as RecordMAN2.client application. To do this, field Select server type should be fulfilled with option Local server. In this situation there is no necessarily to enter login and password. It is assumed as default, that PC user is authorized to access to all files stored on this computer (lock can be set at OS level), so there is no needed to duplicate lock to recordings inside RecordMAN2.client application.
Recordings archive
After selecting option Local disc from File menu special browse window with list of folders is displayed, in this widow RecordMAN2.client user can select a location on disc, to store recordings archive. After selecting folder with name Data, including day folders with call recordings, all recorded calls will be show in application main menu. Until option EbdRec server from File menu is selected, all operations are executed on recordings files stored in recordings archive.
Recordings operation
Independent on recordings server (PABX, remote server, local server, local disc) in main window you can see recordings available for RecordMAN2.client user. On the left side of window, list of day folder is visible and in the main part of window you can see the recordings included in selected day folder. In the pane on the right side there is visible legend with descriptions used for stored recordings.
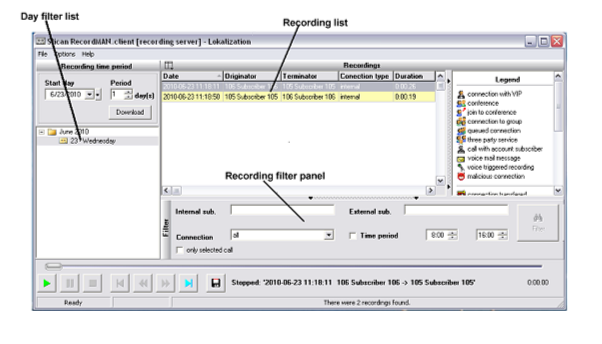
RecordMAN2.client application user can see in main window only recordings according his/her access privileges granted in ConfigMAN application. These privileges are detailed define in chapter 3.4. At the bottom of RecordMAN2.client application main window, there are standard icons for play, stop and wind back or wind forward selected recordings, as also store recordings to computer disc as .wav file. Detailed description of actions, which can be executed is included in next chapters.
Recordings filtering
As presented on fig. 6, in main window of RecordMAN2.client application there is a filtering pane, which enables to select specified recordings from all available for user.

For searching recordings following fields are used:
- Internal sub. – after entering a PABX extension number into this field and pressing Filter button, all calls with specified extension number as a part of this call will be selected. If in this field several extension numbers, separated by spaces, are entered, selected will be all calls with at least one of above mentioned extension numbers as a part of call.
- External sub. – after entering this field with any external number, selected will be all calls with this number as one of call part. Similarly as for Internal sub. field, if you enter several external numbers, separated with spaces, selected will be all calls with at least one of above mentioned numbers as a part of call.
- Connection – in this field you can select one of five possible options, depending on kind of call. Possible are following options: incoming, outgoing, internal, or transit. If call type isn't important, option all should be checked.
- Time period – in this field you can define time period when searching call started.
- Only selected call – if this field is checked and you select specified records from list of recordings, application searches all recordings created during call including selected recording, if call was transferred there are more than one recordings created during this call.
After fulfilling all fields, which are important for searching specified call or calls, press Filter to execute search according defined conditions.
Example: If in field Internal sub. there is number 105, field External sub. is empty, option outgoing is selected in field Connection and period from 9:00 to 11:00 is entered to field Time period, after pressing Filter button all outgoing calls established between 9:00-11:00, dialed from extension number 105 will be search.
Defined search conditions are valid independently on selected day folder. So, if you change day folder, only calls according filter conditions will be selected and shown. Pressing Reset button filter condition settings will be erased. After erasing filter condition settings all recordings from selected day folder will be shown.
After checking field only selected call there is no necessary to press Filter button. Application automatically shows recordings, which are parts of the same call.
Recordings playing
It is possible to make following operations:
- After pressing
 button, recording will be played.
 - After pressing
 button, just played will be finished.
 - After pressing
 button just played recording will be stopped. Next pressing this button will resume playing.
Next group of buttons can be visible only after selection of recording stored as a several files (transfered between subscribers). Following operations are possible: - After pressing
 button previous recording of specified call will be selected. This button is not active if selected recording is first recording of specified call.
 - After pressing
 button, selected recording will be reviewed by 15s.
 - After pressing
 button, selected recording will be forwarded by 15s.
 - After pressing
 button next recording of specified call will be selected.
Recordings saving
RecordMAN2.client application enables to store recordings - downloaded from recording server – to disc of computer with launched application. To do this, specified recording on list of recordings downloaded from server, should be selected and button pressed. Selected recording will be stored in specified location as a .wav file. Mentioned above button is active only, if appropriate privileges are assigned to RecordMAN2.client application user. Detailed description of privileges possible to assign to RecordMAN2.client application user can be found in next chapter.
User privileges
RecordMAN2.client application privileges for specified account (specified PC) are defined in ConfigMAN application by PABX admin. In chapter 2 there are described requirements for log in RecordMAN2.client application user to recording server. To enable application user to log into recording server, it is necessarily to create an account with user log-in and hardware identifier of PC with RecordMAN2.client installed. Additionally for this account recording access levels, internal line filter and how deep (how many days) from recording history recordings can be accessed. For every recording in system specified access level is assigned and only recordings with appropriate access level can be visible. In ConfigMAN application following settings can be defined for every account:
- Full access – all recordings can be accessible for specified RecordMAN2.client account.
- Restricted access – for specified account can be defined all conditions which must be fulfilled by recordings, to access recordings from this account. Mentioned above conditions are following:
- Recording access levels – for specified account only recordings with access levels coherent with account access levels.
- Internal line filter – if in this field extension number is entered, only recordings established with this number as will be visible for specified account.
Settings of both above fields operate together, if in first field you define levels A and B, while in second field number 100 is entered, accessible will be only recordings with access level A and B, established with extension number 100. - Number of days from recording history – in this field you can defined number of days from recording history for which recordings will be accessible for specified account.
- No access – by setting this option, RecordMAN2.client application user after connecting to recording server will be see the message You have no privileges to view recording archive. This option can be used for temporarily lock an account. Due to this option account can be locked an after some time unlocked without necessity of resetting all parameters.