MessengerCTI.desktop Manual
Contents
- 1 MessengerCTI.desktop ver. 1.09
- 2 Introduction
- 3 Basic Features
- 4 Minimum requirements
- 5 Installation of application
- 6 Available configurations
- 7 Application structure
- 8 MessengerCTI.Desktop for Call Center agents
- 9 Licensing
- 10 One user and few different numbers
- 11 Ports and protocols
- 12 Operation of MessengerCTI.Desktop in local network and outside network without changing configuration
MessengerCTI.desktop ver. 1.09
New features in version 1.09
- Manually and automatically copying the caller's number to the clipboard
- New chat type - Announcements
- Built-in image viewer, quick preview and viewer of all files with a given person
- Encrypted connection in communication with the control panel
- Added information about currently viewed day when scrolling chat
- Introduced "New" header informing since there is new content that has not yet been read
- Allowed to send messages over 3000 characters
- View sent message details (sent and read date)
- Changes in the handling of sending Enter messages (ctrl, shift-Enter, numeric keypad)
- Ability to enable subscriber availability notification (phone or chat)
- Added information about who is writing in group chat
- Ability to password lock access to configuration and application services
- Introducing the ability to send emoticons in chat and SMS
- Supports the ability to remotely (ConfigWEB) delete call history and chat
- Chat spell checker for Polish language
Introduction
Slican MessengerCTI.Desktop is software which purpose is to assist users of Slican PBX. Thanks to the graphic interface displayed on the computer screen, software allows for convenient access of telephone calls and other functions related to it. Software delivers additional features that allows to expand capabilities of desk phone. Computer software combines capabilities of controlling desk phone connected to PBX, for example choosing number, receiving calls and also application is able to function as standalone phone. Software also allows to: accessing PBX's phonebook, call history, status of phone and other users of MessengerCTI, text communication and sending or receiving SMS messages. Additionally for new version of DPH.IP doorphone equipped with camera - video preview was added.
Application works with all types of phones connected to Slican PBX: CTS system phones, analogue or VoIP phones. In the most recent firmware version of PBX (6.53 IPx, 1.11 NCP) MessengerCTI can work as standalone VOIP phone. Depending on type of used phone usage of application slightly differs. While using CTS system phone, device is integrated with software, calls can be controlled with turning on speakerphone (choosing number, connecting, picking up or disconnecting call). On FXS and SIP phones, these activities always involve physically picking up phone handset. Nevertheless, users of FXS phones will undoubtedly benefit the most, because they gain access to functions completely unavailable for this class of phones.
Basic Features
Using cameras and DPH.IP doorphones
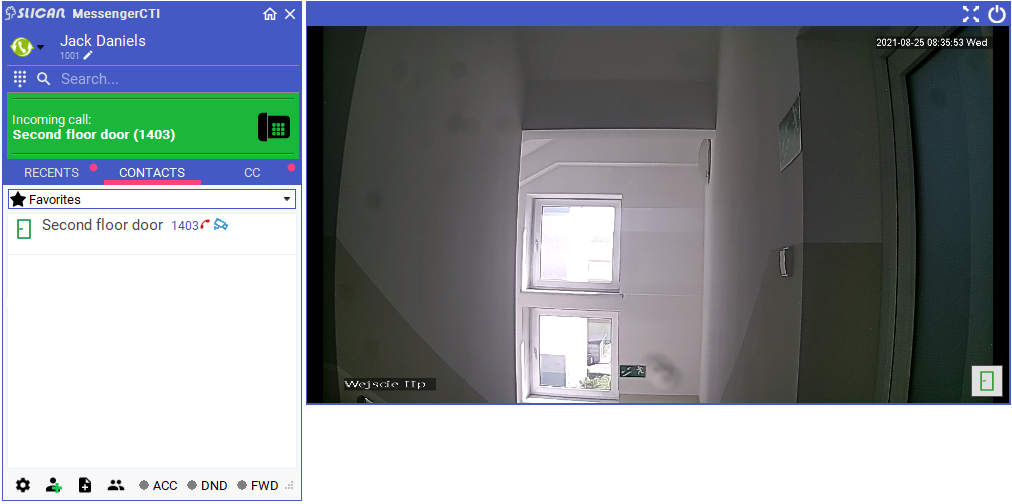
Introduction to sale of DPH.IP doorphones that include cameras allowed to solution that allows display of video from these cameras. Functionality was added with MessengerCTI.Desktop. While connecting to doorphone from software video from camera will appear in new window on computer display. After starting call and next finishing call, even after without talking to person standing beside doorphone, just after visual check user can open door, gate, barrier using dedicated button. Reverse is also true, calling to doorphone or another telephone associated with camera, computer display will show video from their cameras. This allow for temporary observation of neighborhood of installed camera, for example person we are calling. There is also option of watching video from any camera without making call, just using application icon. Thanks to MessengerCTI.Desktop user can preview video from camera of other manufacturers, but those devices have to support video formats, codec compatible with VLC application libraries.
VoIP Client
MessengerCTI.Desktop can work as VoIP, parallel phone connected to desk phone (FXS,CTS,IP). User can decide on which device to pick up a call, phone or computer - using its integrated audio devices (sound card, microphone, speakers or external headphones). Since 1.11 version of NCP firmware application can be used as standalone SIP phone. For such configuration CTIuserPlus license is required.
Phone Book
Big advantage of software is simple and convenient access to contact from phone books and displaying them on computer screen. MessengerCTI.Desktop can use only phone books from PBX. Contacts can be sorted according to user needs. Adding new subscribers and modification of existing entries can be done from CTS system phone or more conveniently, by using computer with MessengerCTI.Desktop or WebCTI. Modification of entry is visible instantly after adding it. Access to phone book allows to simply search numbers of contacts user want to call. On other hand, during incoming calls computer displaying will be showing clear information about calling person.
Call History
User has access to complete history of their calls, picked up and missed one. History is saved on Slican PBX. By using Messenger.CTI history can be displayed alongside information about order, time of calls and number of missed calls from particular number.
CallCenter (NCP PBX)
In conjunction with NCP for Call Center agents, queue handling functionality has been introduced. It allows agents to log in to them, view status, call back lost and abandoned calls, and turn on status of temporary work breaks.
Text messages
With use of MessengerCTI text information can be sent, from internal messenger(chat) through a computer network to another Messenger CTI.user, also as SMS message to another phone and from GSM phone. Chat can be accessed by all users of particular PBX and all PBXs linked to it by eSSL ver.2. This functionality is suitable for companies which obtained Slican PBX and doesn't allow use of public messenger applications because of security reasons.
Listening to recordings
Each user with appropriate permissions can listen to call recordings. In this way, it makes it independent from need to use RecordMAN.client application
Signaling encryption (NCP PBX)
In order to increase security of sending sensitive data, possibility of enabling encryption has been introduced. XML signaling stream is encrypted. (SIP acoustics and signaling are not encrypted)
File transfer (NCP PBX)
Possibility of sending files, documents, photos between users of MessengerCTI application has been introduced. Additionally, user can use clipboard to synchronize their files between MessengerCTI.Desktop and Mobile version
Works with mobile version
Application can be used alongside and synchronized to MessengerCTI.Mobile, Android version for mobile devices.
Minimum requirements
To install SLICAN MessengerCTI.Desktop application, following minimum requirements must be met:
- CPU Frequency - 800 Mhz or higher
- Ram - 1 GB or more
- GPU- compatible with DirectX 9
- Operating System - Windows 7 or more recent
Application can be installed on computer which doesn't meet minimum requirements but it will run slowly or some option won't work correctly.
|
Installation of application
Usage of MessengerCTI.Desktop is licensed so purchasing appropriate license is required. Purchased code can be entered during configuration of PBX, code determines number of devices that can use software. Licensing doesn't affect software installation. Installation file of software can be downloaded from ServNET [1] and installed on Windows computer. After installing, application should be properly configured by entering necessary PBX information to which software should be connected: Settings - Connection with PBX.
|
Second stage (optional) consists of uploading to PBX prepared file containing MessengerCTI.Desktop application. It can be done by PBX administrator who has WebCTI administrator privileges. This action allows automatic updating of software on devices. Update has been described in section "Updating application"
Running application
MessengerCTI.Desktop can be run just as any other Windows compatible software. In program settings automatic start during launch of operating system can bet set. During start of program it is logging to PBX (according to settings set in Settings - Connection tab). After successful login program data is synchronized with PBX data.
Updating application
Software update is automatic and user can't affect this process. Just like updating firmware of BPX, VoIP expansion card or REC card MessengerCTI.Desktop is also updated (by PBX administrator). During each startup of program, program version is compared to version on PBX. If they differ, version from PBX is automatically downloaded, installed and logged to PBX. Depending on version from PBX it may install newer or old version.
Available configurations
- Simultaneous operation of desk phone and application (application VoIP mode is turned off) - calling with phone, application - dialing up outgoing calls for phone (CTS, FXS, SIP) and picking up incoming calls for phone (CTS)
- Simultaneous operation of desk phone and application (application VoIP mode is turned on) - independent choice of picking/dialing up call with phone or application.
- Autonomous application without desk phone (application VoIP mode on) - picking/dialing calls only with application.
Other functionalities, for example: chat, sending and receiving SMS, displaying video from camera, accessing call history and phone book, configuring user status and Messenger application are available for each of above configurations.
Application MessengerCTI.Mobile is intended for mobile devices with Android system, its description can be found HERE (manual in progress).
MessengerCTI.Desktop with parallel setup
Application with VoIP mode turned OFF
Phone calls (transmitting acoustic) are made only using phone working alongside application. Application allow to:
- for outgoing calls - searching for number in phone book or typing phone number using computer keyboard, initiating dialing, dialing with phone speaker using CTS phone
- for incoming calls- displaying caller phone number in window or caller name from phone book of PBX, pickup up incoming call on speaker phone using CTS phone.
For user of FXS and SIP phones picking up handset is necessary.
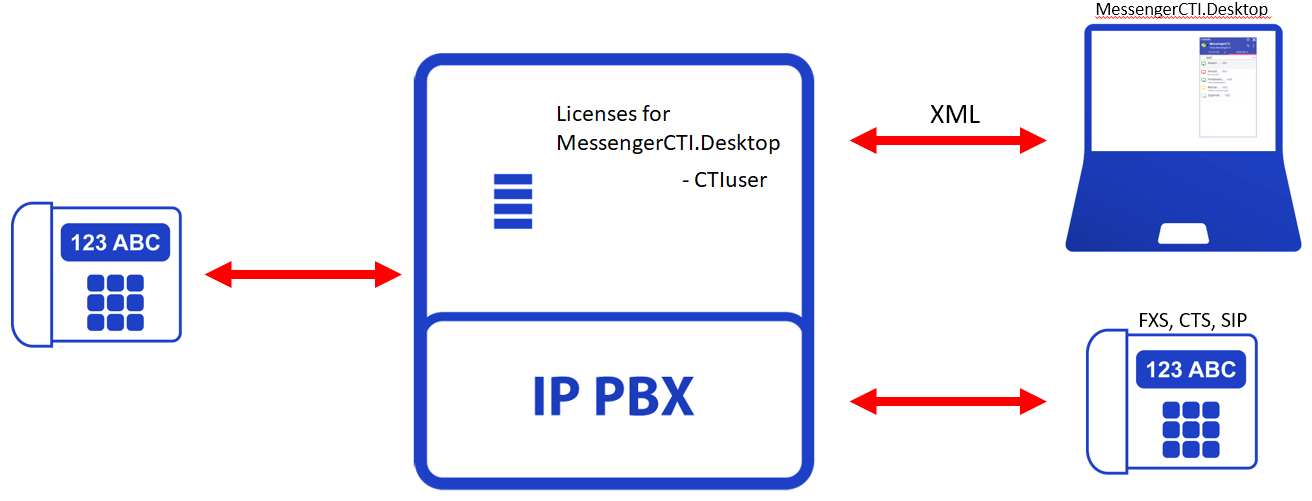
Application with VoIP mode turned ON
Phone calls can be made with phone or with computer and application. Application allow to:
- for outgoing calls - searching for number in phone book or typing phone number using computer keyboard, initiating dialing, calling while using computer microphone and speakers or external headphones
- for incoming calls - triggering sound of incoming call, displaying calling number/name from phonebook, picking up call with computer microphone, speakers or external headphones.
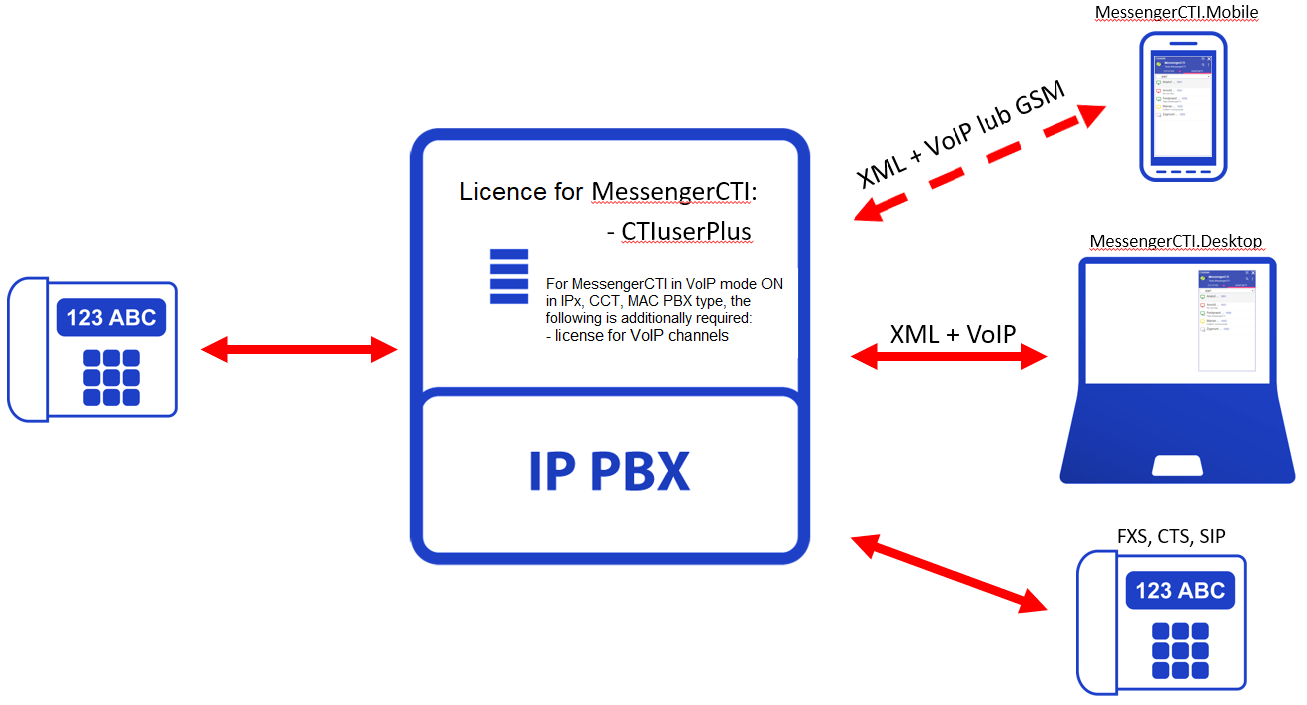
MessengerCTI.Desktop working as deskphone (with NCP only)
Application with VoIP mode turned ON
Phone calls are made only with computer and application. Standalone applications allow:
- for outgoing calls - searching for number in phone book or typing phone number using computer keyboard, initiating dialing, calling while using computer microphone and speakers or external headphones
- for incoming calls - triggering sound of incoming call, displaying calling number/name from phonebook, picking up call with computer microphone, speakers or external headphones.
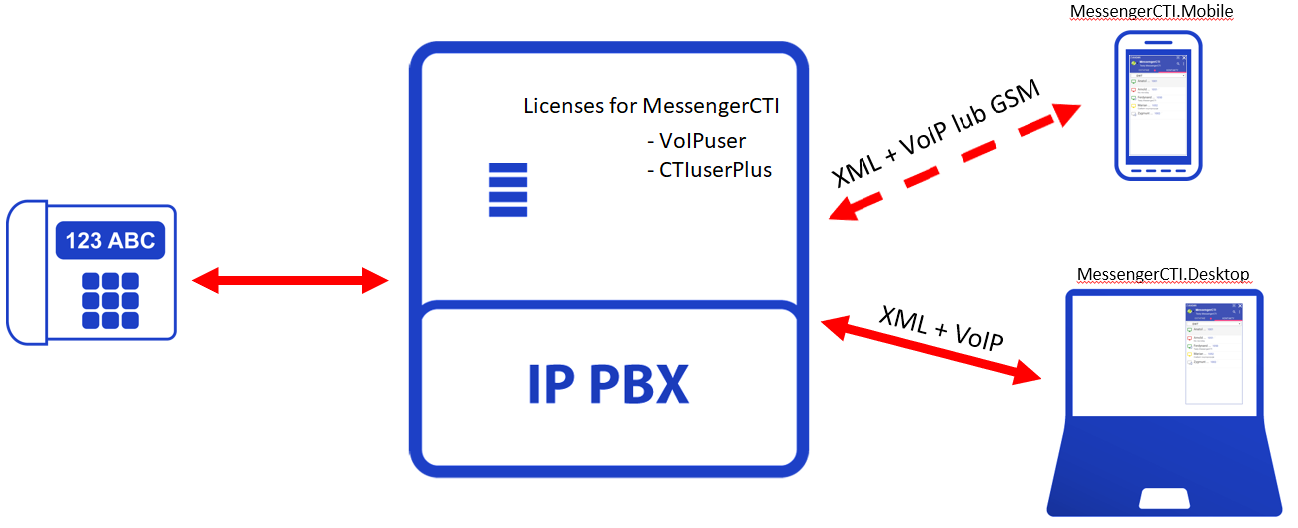
Application structure
Main window
Main windows of MessengerCTI.Desktop application contains interface which show information and allow access to chat windows and main functions.

Top panel
- hyperlink to software version
- application name
- default window position button
- close - minimizing to tray button
- changing application status button
- user name from Contacts
- description - editable comment field set by user that allow him to add additional descriptive information, e.g. inform about upcoming or being on vacation, about dealing with selected project
- keyboard - button to open keyboard for dialing numbers with computer mouse
- magnifier/search - button / field for searching for number or subscriber's name
- access to tabs:
- Recent - history of most recent calls and messages
- Contacts - phonebook from PBX with sorting options
- red dot - information:
- about missed calls
- about calls to be called back in CallCenter
Bottom panel
- preferences - access to program settings
- add contact
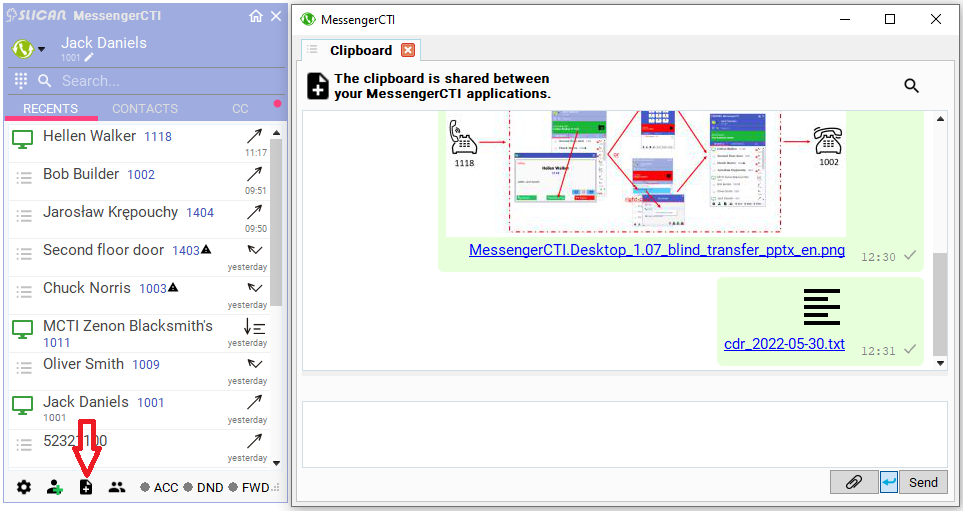
- add to clipboard - sending messages and files between user MessengerCTI.Desktop and MessengerCTI.Mobile
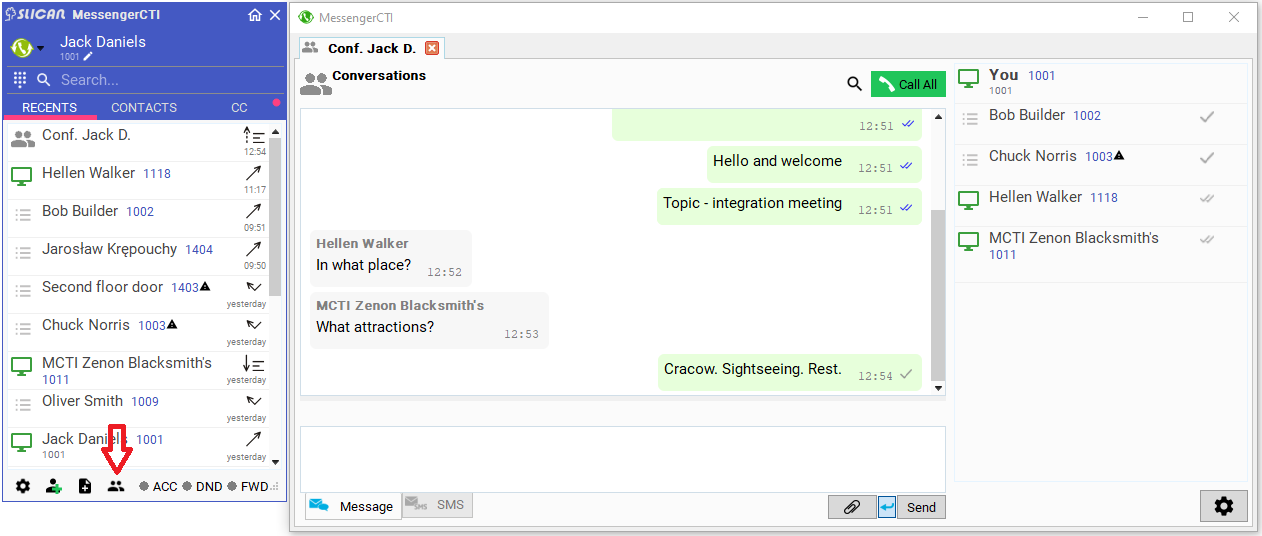
- creating text conference
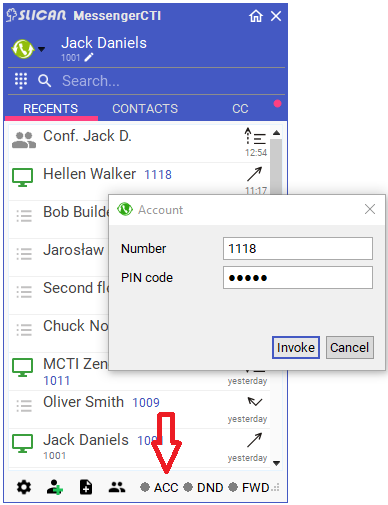
- ACC - subscriber's account login
- DND - configuration/ activation of "Do Not Disturb" service
- FWD - configuration/ activation of "Forward" service
- change size of window
Status of application and user
MessengerCTI.Dekstop software allow to show current status of user with coloured symbol and display it inside applications of other users. Applications status is informing about user availability, depending on user actions status can be changed by him or application can change it automatically. More information can be added through text status of user. User can choose different icons/symbol to set his status manually. Additionally there is graphic informing about ringing phone or current call.
List of icons and symbols
Chart presents list of icons available in Contacts and Recent tabs:
-
 - for internal PBX users - different icon color represent current applications status. It can be set manually through main application window, by icon
  , also is set automatically for Be right back status.
 -
 - for public subscribers.
 -
 - for DPH.IP doorphones connected to open/closed door sensor
Chart 1: Meaning of icon status of application, users and doorphones.
Chart is showing list if icon that appear on the left side of subscriber name in tab Contacts and Recent. Internal phone will have status icon being displayed
Settings
Selecting Open settings icon ![]() in main program window will display window with program settings. In every tab there is available button with info About software with information about version application and link to user's WebCTI account.
in main program window will display window with program settings. In every tab there is available button with info About software with information about version application and link to user's WebCTI account.
Connection
In Connection field you must enter settings necessary for application to connect:

Application login setting
To login, application must have correct settings configured by PBX administrator:
- subscriber number - extension from PBX
- CTI access and password:
- for IPx, MAC, CCT - ConfigMAN chart Subscribers/CTI settings - CTI - access level to CTI and Pss - Password
- for NCP - ConfigWEB chart Extensions/Subscribers/CTI setting - Access to CTI and Password
- Server address - PBX network settings
CTI access level determines what options are available to application:
- CTI.user - MessengerCTI without VoIP and camera preview
- CTI.userPlus - MessengerCTI with VoIP and camera preview
These connections settings must be filled:
- Subscribers number" field - extension number for which MessengerCTI.Dekstop will login.
- Password field - defined CTI password (may contain from 4 to 16 characters, excluding ";" or "~"). After first application login to PBX password change may be necessary. Password can be remembered in application by putting tag in appropriate field (on right side of the password); if tag is not inserted, application will ask for it every time you log in.
- Server - IP address of PBX network interface. In case of application logging outside PBX network - IP address of edge router (port forwarding on router is necessary)
After correct configuration all of above fields, using "Connect" button will allow application to Connect with PBX and synchronize phone book and other information related to that extension. "Login successful" will appear in lower part of window.
If login credentials, configuration settings aren't correct or there are issue with network connection those error messages may appear:
- Wrong login or password. Check if correct login or password was used
- Connecting to PBX alternating with:
- No connection to PBX Check IP address that was entered and check computer LAN connection
In order to facilitate configuration of application, functionality of generating configuration files sent to user's e-mail box has been introduced in NCP PBX. After receiving e-mail, simply use From file button to select right file and application will log in to NCP automatically.
In case of problems with application - its stability, functionality, logging, etc. - after detailed description of irregularities, you can submit report using Send Logs button.
General
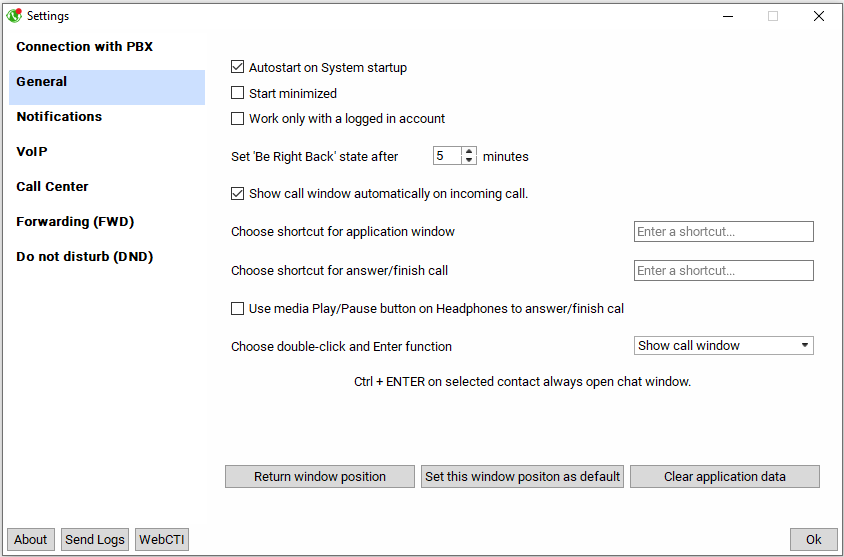
This window allow to configure settings defining how program works and startup options.
Available settings:
- Auto start on System startup - automatic start of application.
- Start minimized - application will run hidden in system task bar.
- Set "Be right back" state after x minutes - status icon will change automatically, informing about user being away from computer after defined time
- Show call window automatically on incoming call - Enables/ disables popup window when there is an incoming call
- Choose shortcut for application window - changes application from Windows task bar to desktop and vice versa
- Choose shortcut for answer/finish call - answer call/ end call with selected keyboard shortcut
- Use media Play/ Pause button on Headphones to answer/finish call
- Choose double click and Enter function (for contact or number):
- show call window - choice windows is displayed with options - number, phone call, opening chat/SMS window, closing current window
- call primary number - automatic number dialing
- show chat window - opens text chat window
- Return window position - return to previous window position
- Set this window position as default - allow to set up default application's window potion on screen
- Clear application data - deletes all application configuration data, attachments, history
Notifications
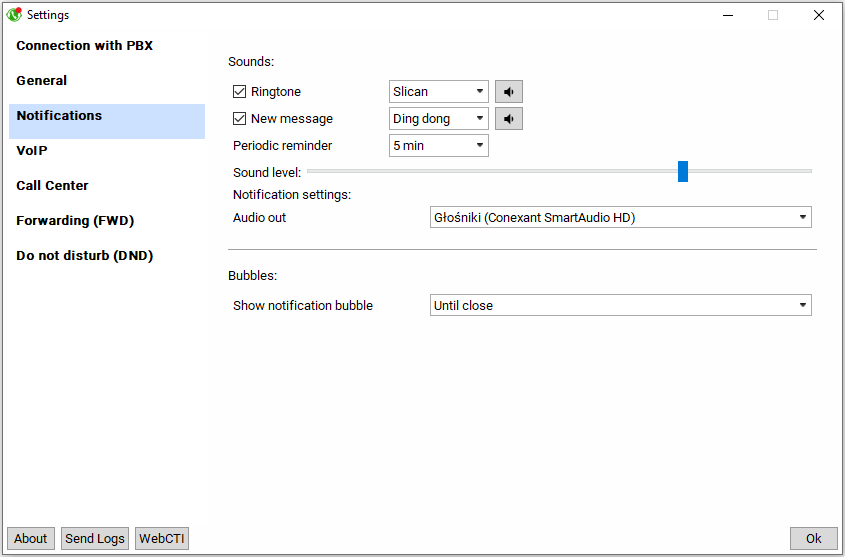
These setting allow to set up audio notifications informing about incoming calls, messages and audio setting of computer audio devices.
VoIP
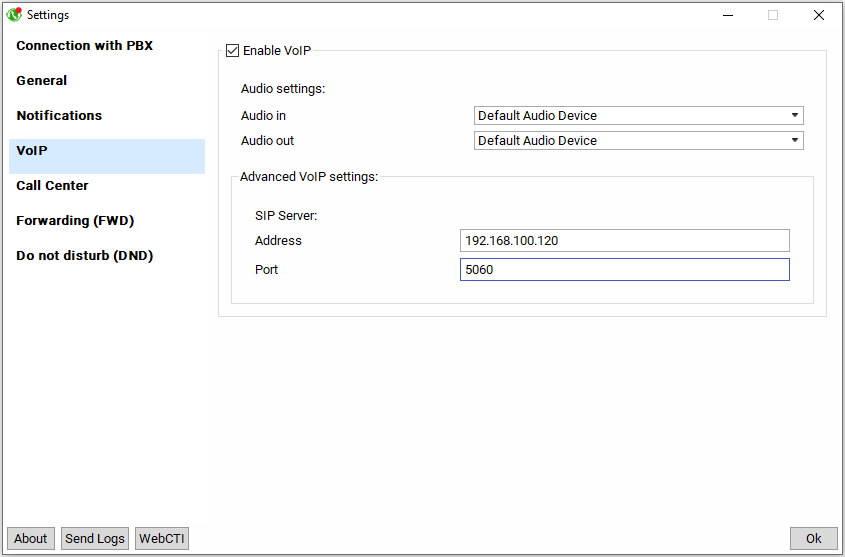
- Enable VoIP on when available - allow application to work as VoIP client (VoIP phone). Advanced VoIP settings also allow to connect application with PBX on non-standard ports (e.g. from Internet to client's edge router, MAC PBX)
CallCenter
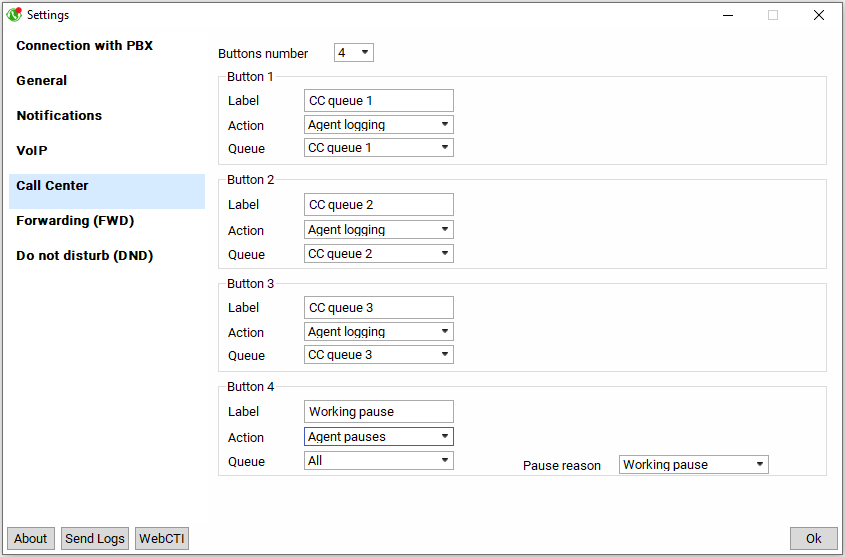
This window allow to configure some options related to agent's handling of CallCenter queues, e.g. buttons for logging in to one, many, all queues, buttons for agent breaks
Services management
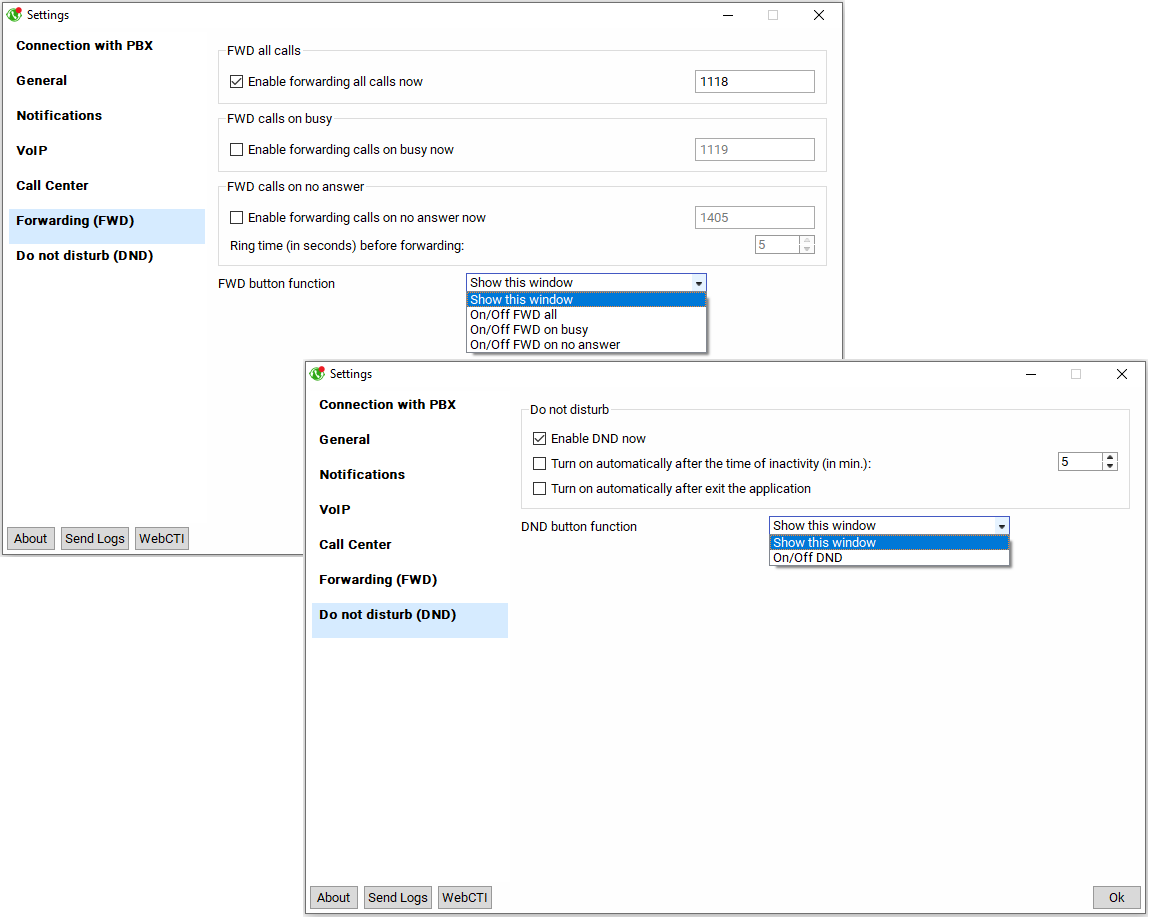
This window allow to configure Forwarding and DND services
Dialing and picking up calls
To make phone call between two users, particular hardware, software and proper configuration must be supplied:
- Slican PBX
- computer with installed and configured MessengerCTI.Desktop software
- software logged to PBX with subscriber extension (Settings tab, Connection field)
- analog, VoIP or Slican system phone
- for video preview - DPH.IP doorphone with camera or phone associated with external camera (not applicable VoIP phones with integrated camera)
Making and answering phone call can be done using computer mouse and computer screen. Conversation (transmission of acoustics) between subscribers takes place using phone connected to PBX associated with MessengerCTI.Desktop or can be done with application itself - if it's running in VoIP mode.
After dialing required subscriber number from MessengerCTI and initiating connection - in case of:
- CTS system telephone - PBX will activate acoustics on it in hands-free mode and establish call to destination subscriber
- VoIP and analogue telephone - PBX will automatically call back telephone first (notify caller that it is ready for call) and, after picking up handset, it will establish call
- MessengerCTI in VoIP mode (MCTI) - will automatically establish call
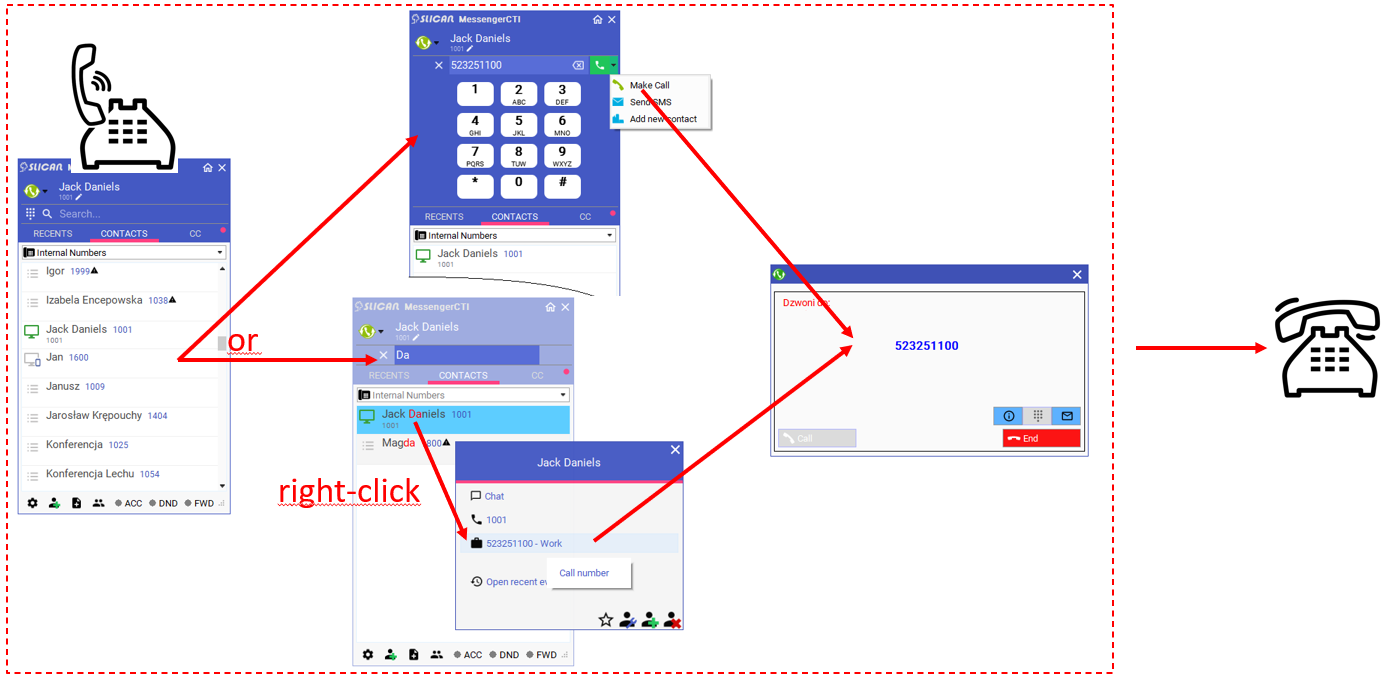
Dialing calls to particular number
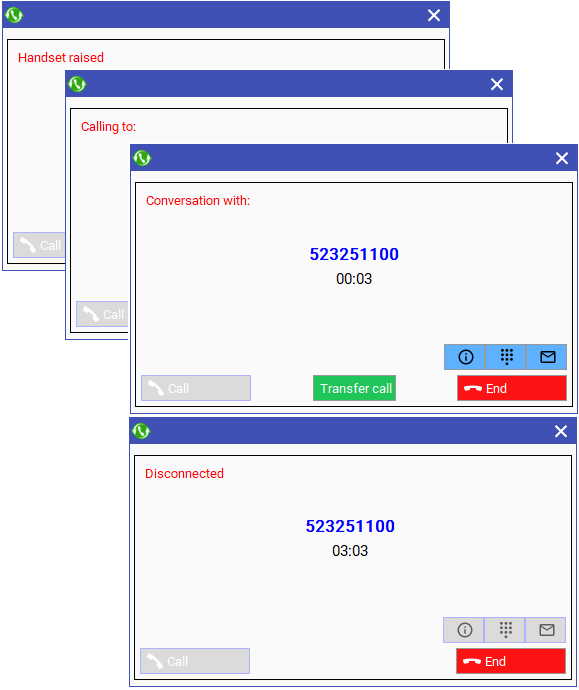
Making calls can be realized in few different way. Depending on how configured are general setting on application - option "Set double click function".
- from Contacts tab
- choose subscriber from proper group (from drop-down list - if it exist) or from group "All contacts" by double clicking on number or contact
- right-click on subscriber from proper group (from drop-down list - if it exist) and then select one of his numbers (associated with contact details)
- clicking on one of icons next to selected contact:


and then, after opening Messages window --> Call button
- using numeric keypad of application
- Search field - by enter telephone number directly using computer keyboard, then click on green icon handset associated with field
- Recent tab - call history:
- we find subscriber call with whom we had contact (he called us or we called him) and then we make call by double clicking on his number or contact
- right-click on call from/ to subscriber with whom we had contact and then select one of his numbers (related to contact details)
- clicking on one of icon by past call


and then, after opening Messages window --> Call button
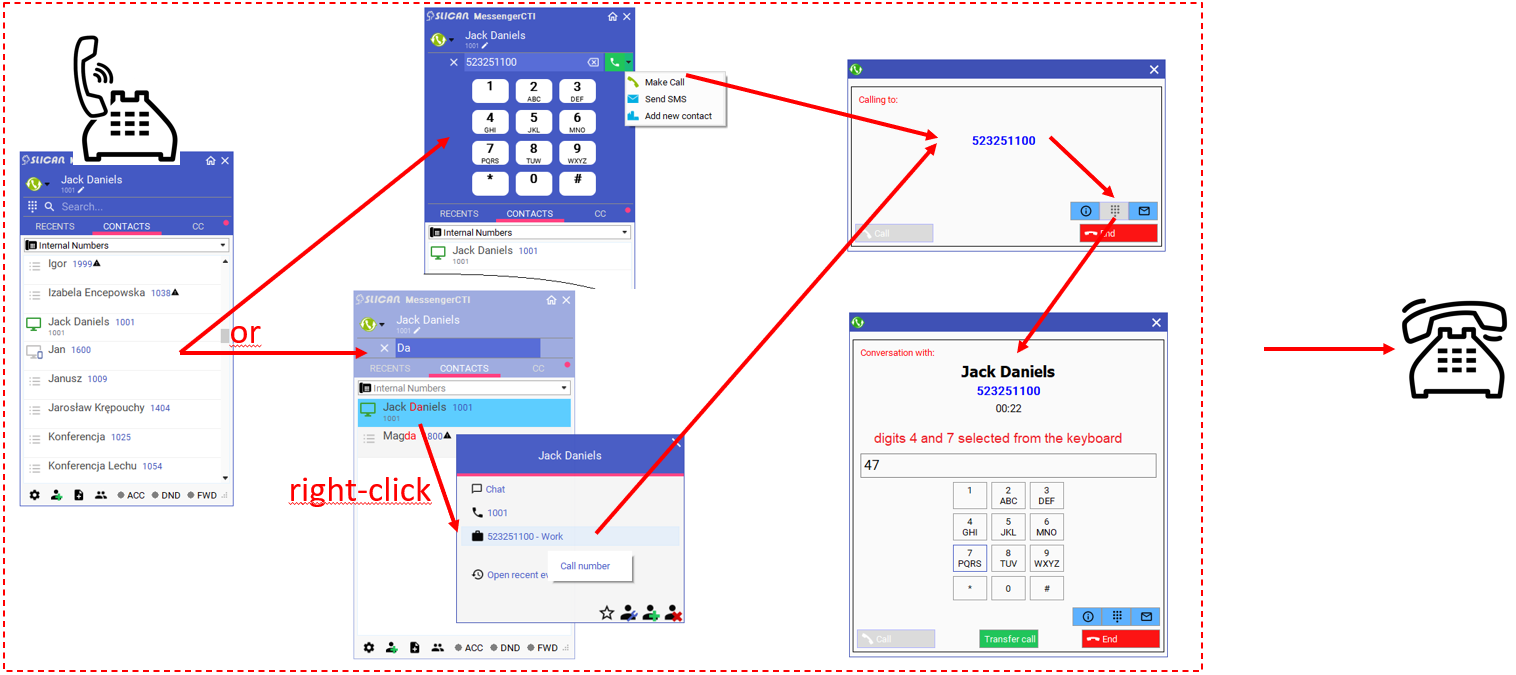
In version 1.03, possibility of selecting digits in DTMF was introduced. This may be applicable in case of a call to Hotline, where you can navigate through menu on active acoustics.
Exemplary scheme of making call from MessengerCTI directly to another subscriber:
Exemplary scheme of making call from Messenger to hotline:
Incoming calls
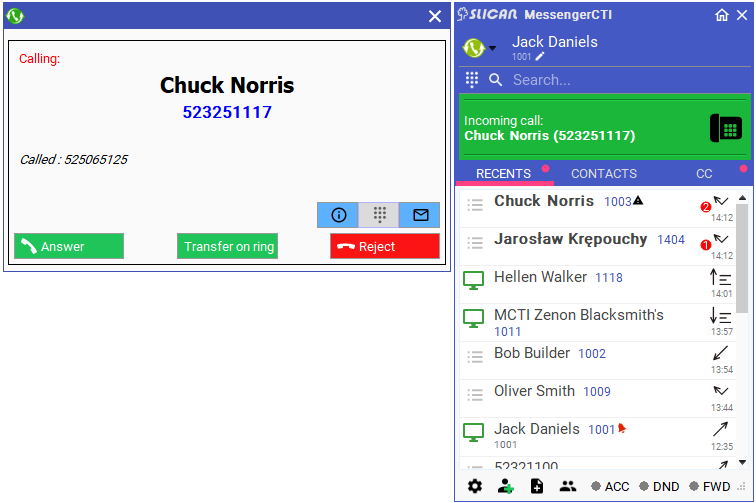
Calls are displayed on computer screen with pop-up window, ringing application and ringing phone. Depending on applied configuration call can be answered, rejected and/ or transferred using application or phone. It is also possible to send text or SMS message back.
Connecting to camera video preview
Connecting to/from DPH.IP with integrated camera or associated phone or external IP camera(doesn't apply to VoIP phone with integrated cameras)will display automatically new window on computer screen. Connecting to doorphone allow to identify visible person and open door/gate with ![]() without picking up call.
without picking up call.
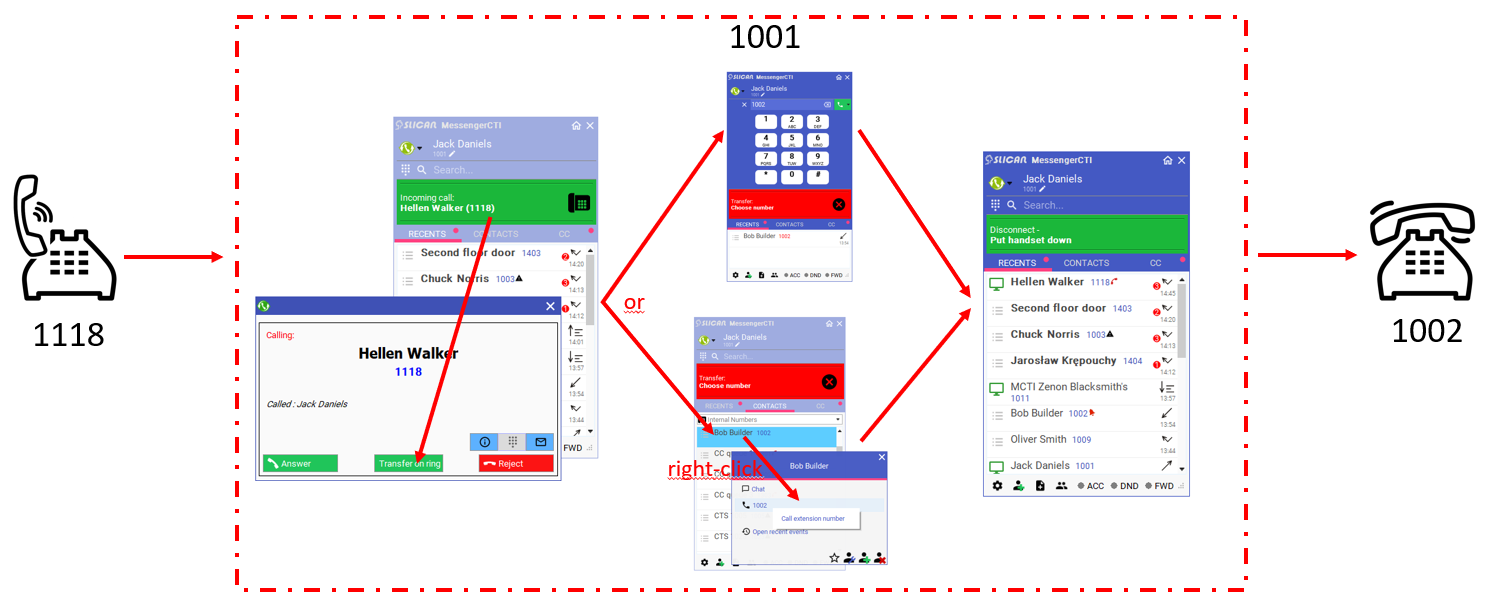
Transferring calls - version 1.07
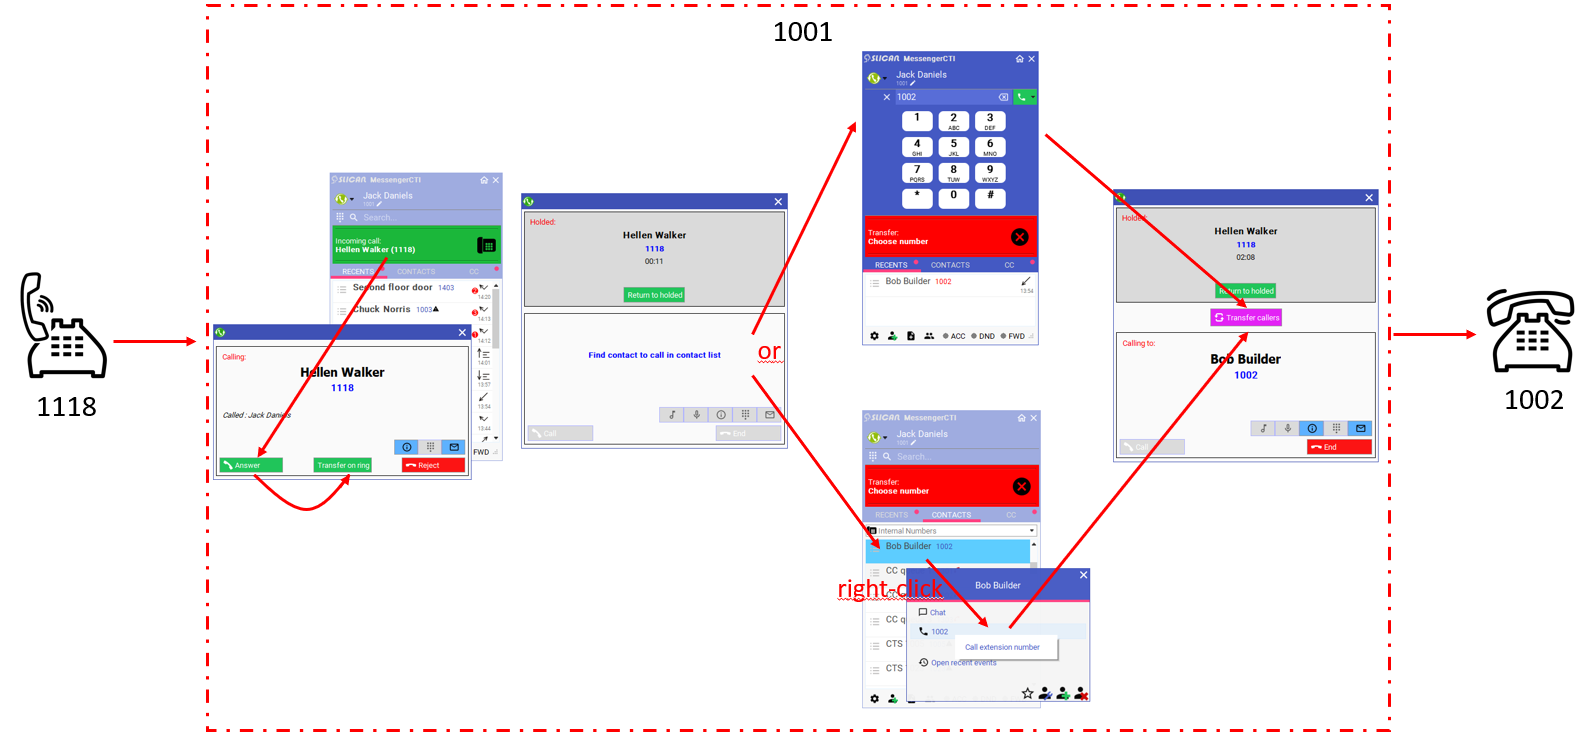
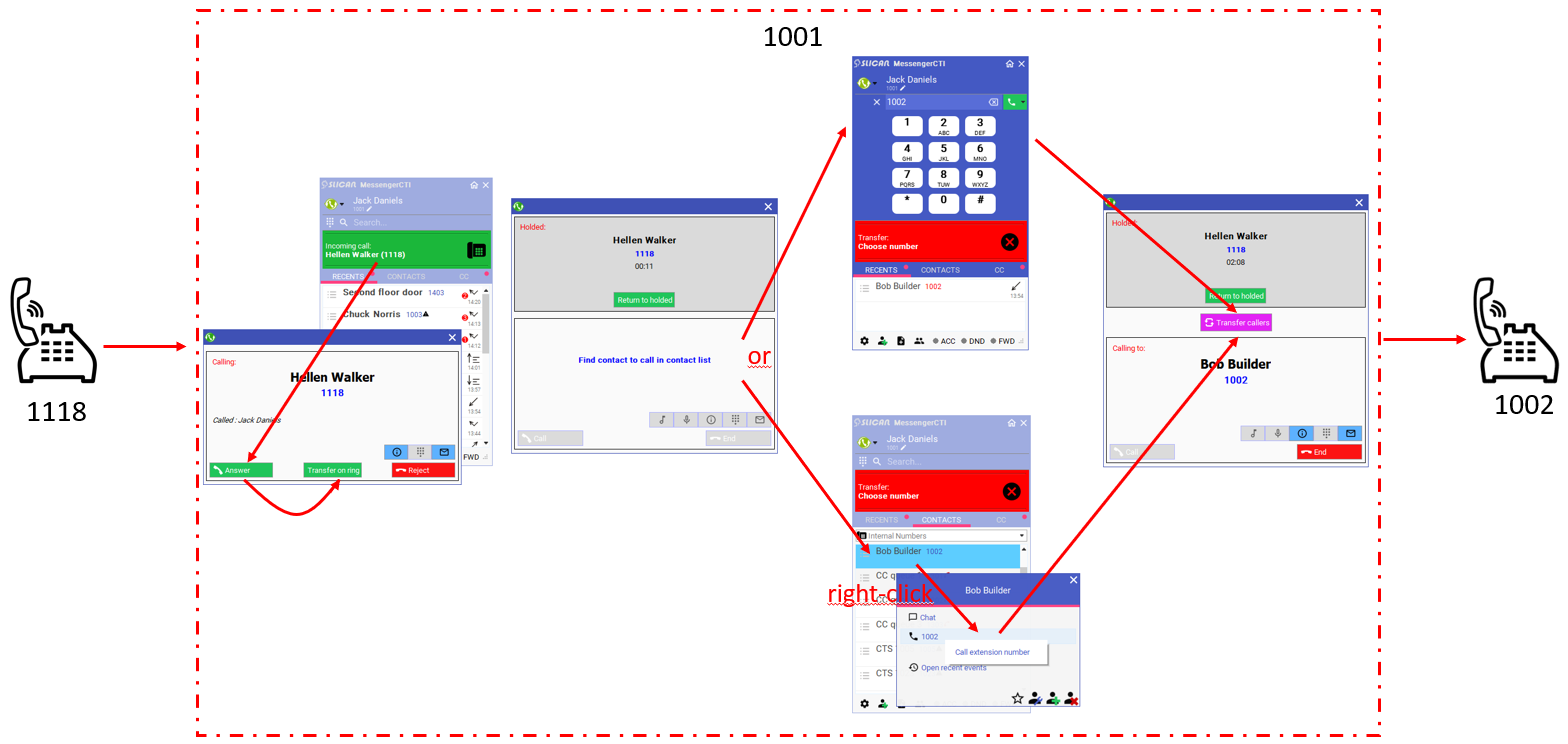
Call can be transferred by choosing contact or number from: Recent or Contacts.
- "blind transfer" - without checking target extensions state
- no announcing - check target extension state without announcing
- with announcing - check target extension state with announcing
Sending messages
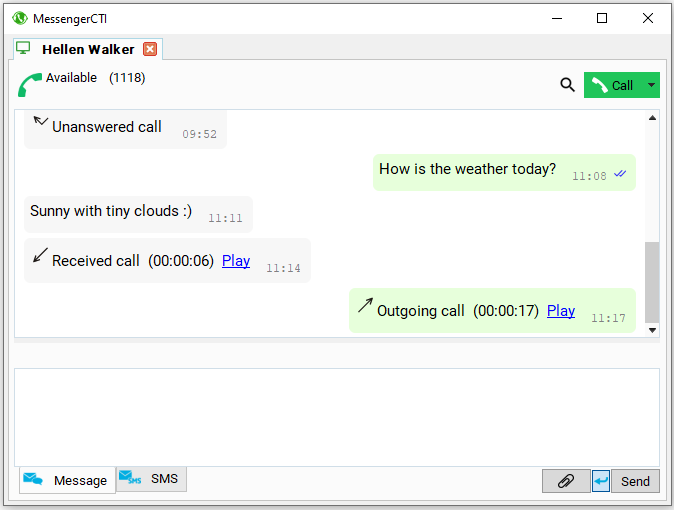
Application allow sending and receiving text messages between application users (internal chat) or by SMS. Message can be sent using ![]()
![]() or by typing GSM number in search field of main application window. If in PBX phone book there is GSM number associated with extension number, user sending message can choose between chat message or SMS.
or by typing GSM number in search field of main application window. If in PBX phone book there is GSM number associated with extension number, user sending message can choose between chat message or SMS.
Functionalities that can be implemented through chat window:
- running text chats between users of MessengerCTI application (desktop and mobile) of same PBX and linked PBX
- sending and receiving SMS
- file transfer (using paperclip button or drag and drop method)
- viewing history calls with given user
- listen to call recordings from calls made (if you have appropriate permissions)
Receiving new message is signalized on Windows system task bar with two icons alternating ![]() ,
, ![]() and popping up
and popping up ![]() .
.
Messages history is available through hyper link Load previous. It is stored on computer local hard drive.
Searching data
MessengerCTI is using advanced way or text search. Searching can be accessed through Recents and Contacts tab in Search:
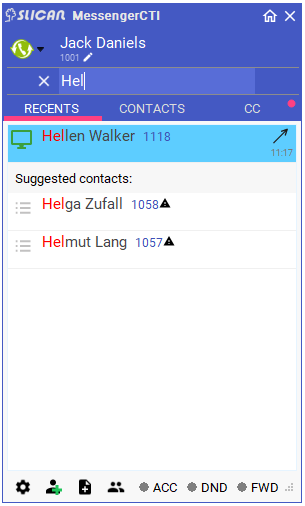
During entering characters/signs in search field, software automatically searches in database. Entries found in subscribers group displayed on left field side will be displayed under it. Entries from other group are classified as Suggested.
Contacts
This field allows for searching, displaying, customizing and running actions related to contact. By default Favorites group is displayed. Subscribers from other groups can be accessed by extending groups list with mouse.
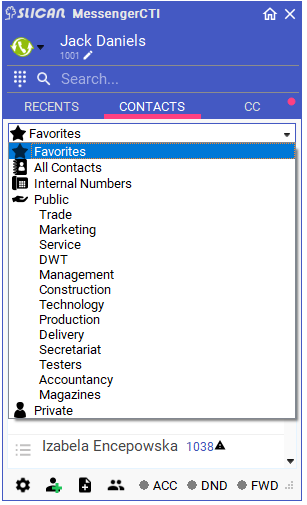
Adding contacts is possible:
- from search field - entering number and adding it with green handset icon
- from Contacts or Recent tab - right clicking on connection
From contact list we gain access to:
- favorites
- all contacts
- extensions
- created subscriber groups
- public contacts
- private contacts
Call history
Choosing Recent tab - in main program window will display call history of currently logged extension to MessengerCTI.Desktop. Window will look like this.
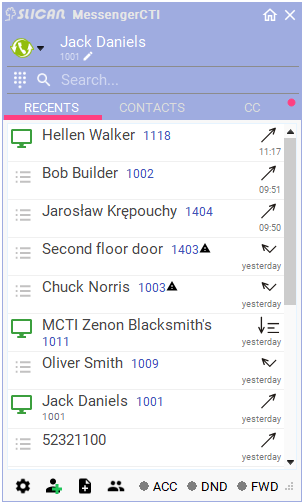
History is displaying all calls associated with logged in extension. Each list segment represents at least one call or message. If same subscriber(number)called/send message more then once, contact status icon will show that number. Each segment is showing caller number, his text status(for outgoing calls - chosen number and text status), length of call or call date and time. For extensions call status is also displayed. Beside text information each line have icon status for each call:
Upward arrow for outgoing call, isn't distinguished between picked up and missed call.
Downward arrow for incoming call that was picked up.
or
Turned arrow for missed incoming calls, digit is showing number of these calls.
Arrow with listed lines or text bubble for text chat or sent SMS. Digit is showing number of missed messages.
If history contains missed calls or unread messages icon in Recent field will be in colour red.
From History window call can be dialled or messages be send to chosen users by right clicking on subscribers text status
, clicking on icons ![]()
![]() and
and
. If internal subscriber have other number listed in their phone book, choice can be made between them. For internal subscribers there is option of editing, deleting contact and deleting from favorite list.
Clipboard
Clipboard is used to transfer messages/ information/ files between MessengerCTI.desktop and MessengerCTI.mobile of same user. When you put file in one application, it automatically appears in other application.
Text conference
Functionality introduced for simultaneous exchange text messages between multiple users. User calling conference selects users to attend. After approval list, message is automatically sent to each of them. After joining conference, sent message is delivered to each user. Each user sees both information exchange and other users participating in conference.
Recall another user's account
This functionality was introduced for users working in same place at different times (e.g. shift work) and using same phones and computers. Logging in with your own account number allows you to later correctly settle each employee's tasks and working time.
MessengerCTI.Desktop for Call Center agents
From NCP 1.12 firmware NCP and MessengerCTI.Desktop version 1.02, application includes features for servicing Call Center queues. For application user which have Call Center permissions set in PBX - Windows system tool bar will have additional icon Agents status and additional tab CC in application itself.
Application state icons:
Red dot by application state informs about unanswered call or message waiting for user.
Agents state icons:
Red dot by agent state icons informs about calls unanswered by CC agents.
CC tab within application, depending on configuration is showing:
- up to 4 programmed buttons with present state for current agent: Log in/out of CC queue and Turn on/off agent pause
- serviced queues with amount of logged agents and waiting calls
- Callback list - numbers/contacts to call back
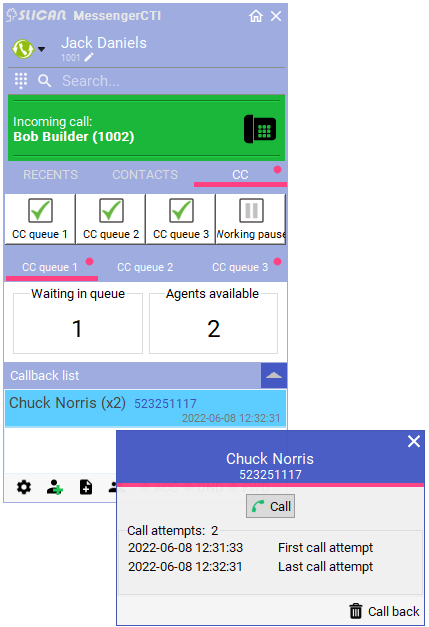
When using callback list, additional window will appear allowing to make call and field to confirm if call was successful.
To properly configure CC tab, Call Center sections within application preferences must be set up.

Licensing
IPX, MAC, CCT PBX
MessengerCTI.Desktop application:
- ALWAYS MUST be associated with subscriber port, analogue, system or VoIP; for subscriber ports standard licensing applies - for associating with VoIP port, 1 VoIP for subscriber license is necessary.
- for configuration using VoIP functionality (working as parallel phone) there isn't need to associate application with VoIP port, it is application functionality, it can be associated with any type of subscriber port
- calls made form application in VoIP mode are using VoIP channels just like other VoIP devices
- MessengerCTI.Desktop configured without VoIP and camera preview access - CTIuser license is required
- MessengerCTI.Desktop configured with VoIP and camera preview access - CTIuserPlus license is required
NCP PBX
MessengerCTI.Desktop:
- CAN be associated with any subscriber port - analogue, system or VoIP; each subscriber port is treated as 1 user from Base license, additionally while associating application with VoIP port 1 NCP.VoIPuser license is necessary
- for configuration using VoIP functionality (working as parallel phone) there isn't need to associate application with VoIP port, it is application functionality, it can be associated with any type of subscriber port
- MessengerCTI.Desktop configured without VoIP and camera preview access - NCP.CTIuser license is required
- MessengerCTI.Desktop configured with VoIP and camera preview access - NCP.CTIuserPlus license is required
- MessengerCTI.Desktop as standalone subscriber - MCTI (not associated with subscriber port):
- MessengerCTI.Desktop with VoIP functionality and camera preview access - NCP.VoIPuser and NCP.CTIuserPlus licenses are required
One user and few different numbers
Sometimes one computer use must operate with few different extensions numbers. On workstation (computer) use of "instance" is necessary. Application has to be installed (just once). User must prepare shortcuts containing extra parameters that will allow to create separate configuration.
- default location of program installation is: C:\Program Files (x86)\Slican\MessengerCTI\messengercti.exe
- if program can't be found in default location, Windows search option or through Start Menu. For Windows 10, open Start Menu, search for Slican directory, in directory look for MessengerCTI, right click -> More/ Open File Location - program icon will appear, right click -> Properties/Shortcut/Target
- create program shortcut on desktop
- in shortcut properties add instance - Properties/Shortcut/Target: "C:\Program Files (x86)\Slican\MessengerCTI\messengercti.exe" -instance 1
- create as many copies of shortcut as needer for user, in each next one change instance digit for next number, for example: -instance 2, -instance 3, ...
- while running application from shortcuts we can configure each one separately for different numbers
Ports and protocols
Default port numbers and types of protocols used by PBX for purpose of providing selected services of MessengerCTI application.
Basic:
- signaling
- 5529 TCP - application signaling (XML)
- 5543 TCP - signaling in mode with enabled encryption tag (XML)
- VoIP calls
- 5060 UDP - SIP signaling (for VoIP calls)
- 8100 - 8300 UDP - acoustics - for IPx, CCT, MAC PBX
- 10000 - 20000 UDP - acoustics - for NCP PBX
Additional:
- file transfer - NCP only (clipboard, between users):
- 443 TCP - file transmission without encryption tag enabled (transmission is still HTTPS encrypted)
- 5543 TCP - file transmission in mode with enabled encryption tag
- image transmission from DPH.IP doorphone camera
- location of link to camera in PBX:
- NCP: Extensions/ Devices/ Cameras
- IPx, MAC, CCT: Peripherals/ Cameras
- during connection, PBX sends camera link to MessengerCTI application: rtsp://IP_addr_camera:554/login_password_additional_information
- location of link to camera in PBX:
Example for NCP for MessengerCTI working from outside PBX IP network (configuration in ConfigWEB):
- XML signaling, VoIP, file transmission - Extensions/ Settings/ Information about CTI settings for subscribers and applications tab
- sending image from camera (link to camera, linking camera with DPH.IP) - tab Extensions/ Devices/ Cameras
Sample configuration data:
- IP PBX address: 192.168.0.10
- public IP router address: 222.0.0.1
- domain address: company_name.com
- IP camera address: 192.168.0.20
- ports used to redirect individual services on router: 55xx
XML signaling:
- MessengerCTI --> router --> NCP
- MessengerCTI --> 222.0.0.1:5555 --> 192.168.0.10:5529, or
- MessengerCTI --> company_name.com:5555 --> 192.168.0.10:5529
XML signaling with encryption tag enabled:
- MessengerCTI --> 222.0.0.1:5558 --> 192.168.0.10:5543, or
- MessengerCTI --> company_name.com:5558 --> 192.168.0.10:5543
VoIP calls (signaling)
- MessengerCTI --> 222.0.0.1:5556 --> 192.168.0.10:5060
- MessengerCTI --> company_name.com:5556 --> 192.168.0.10:5060
VoIP calls (acoustics)
- MessengerCTI --> 222.0.0.1:10000 - 222.0.0.1:20000 --> 192.168.0.10:10000 - 192.168.0.10:20000
- MessengerCTI --> company_name.com:10000 - company_name.com:20000 --> 192.168.0.10:10000 - 192.168.0.10:20000
File transfer:
- MessengerCTI --> 222.0.0.1:5557 --> 192.168.0.10:443, or
- MessengerCTI --> company_name.com:5557 --> 192.168.0.10:443
File transfer with encryption tag enabled:
- MessengerCTI --> 222.0.0.1:5559 --> 192.168.0.10:5543, or
- MessengerCTI --> company_name.com:5559 --> 192.168.0.10:5543
Image transferring from DPH.IP camera
- MessengerCTI --> router --> camera
- MessengerCTI --> 222.0.0.1:5560 --> 192.168.0.20:554
- MessengerCTI --> company_name.com:5560 --> 192.168.0.20:554.
Operation of MessengerCTI.Desktop in local network and outside network without changing configuration
Changing network source by MessengerCTI.desktop or MessengerCTI.mobile user (e.g. LAN <--> Internet <--> LAN, workplace <--> travel <--> home) always entails need to change application configuration, i.e. change IP address of PBX from local to public or vice versa.
In order to simplify operation and configuration of MessengerCTI application, you can use functionality offered by many network routers.
It allows device with MessengerCTI (computer, smartphone) connect to PBX, regardless of whether it is in local network (LAN, WiFi) or outside it (other sub-networks, Internet, GSM-LTE). In routers, this functionality is called NAT hairpinning, NAT loopback or NAT reflection. It allows access to PBX service via public IP address, regardless of range of network user is currently in.
Sample network:
- router's public address (WAN on router): decimal address - 203.0.113.1 or domain address - voip.xxxxxx.com
- router's local address (LAN on router, gateway): 192.168.1.1
- LAN PBX address (NCP, IPx, MAC, CCT): 192.168.1.2
- LAN IP address user's notebook with MessengerCTI.Desktop or smartphone with MessengerCTI.Mobile: 192.168.1.100
If MessengerCTI on notebook/ smartphone from local network IP: 192.168.1.100 sends packets to public address 203.0.113.1 (voip.xxxxxx.com), packets are routed to default gateway - 192.168.1.1 (router). NAT hairpinning router detects that 203.0.113.1 (voip.xxxxxx.com) is address of its WAN interface and treats those packets as if it came from that interface. Determines destination for these packets based on DNAT rules (port forwarding). If packets have been sent to port 5529 (for VoIP: 5060, 8100-8300 IPx, 10,000 - 20,000 NCP) and there is DNAT rule for this port directed to 192.168.1.2, then PBX receives packets at this address.
If appropriate DNAT rules exist, address translation is performed - router rewrites source local IP address in within packet to public address. Notebook/ smartphone (192.168.1.100) sends packets, but PBX (192.168.1.2) receives it as coming from 203.0.113.1. When PBX responds, process is same as for notebook/ smartphone. In this way, two-way communication between notebook/ smartphone in LAN via a public IP address is possible.
If no DNAT rules are active, router will discard packets. In this case, it may return an ICMP Destination Unreachable reply.
